
3D Paper Tags: Dragonflies
Hello Graphics Fairy friends! I’m Diana from Dreams Factory and I’m happy to be here again to share another DIY project with you! Today I will show you how to make these gorgeous 3D Paper Tags with touches Dragonflies and touches of gold. They have a little bit of French charm and an overall vintage vibe. You will love how easy these are to put together, I’ll walk you through all the steps needed to complete this project in no time!

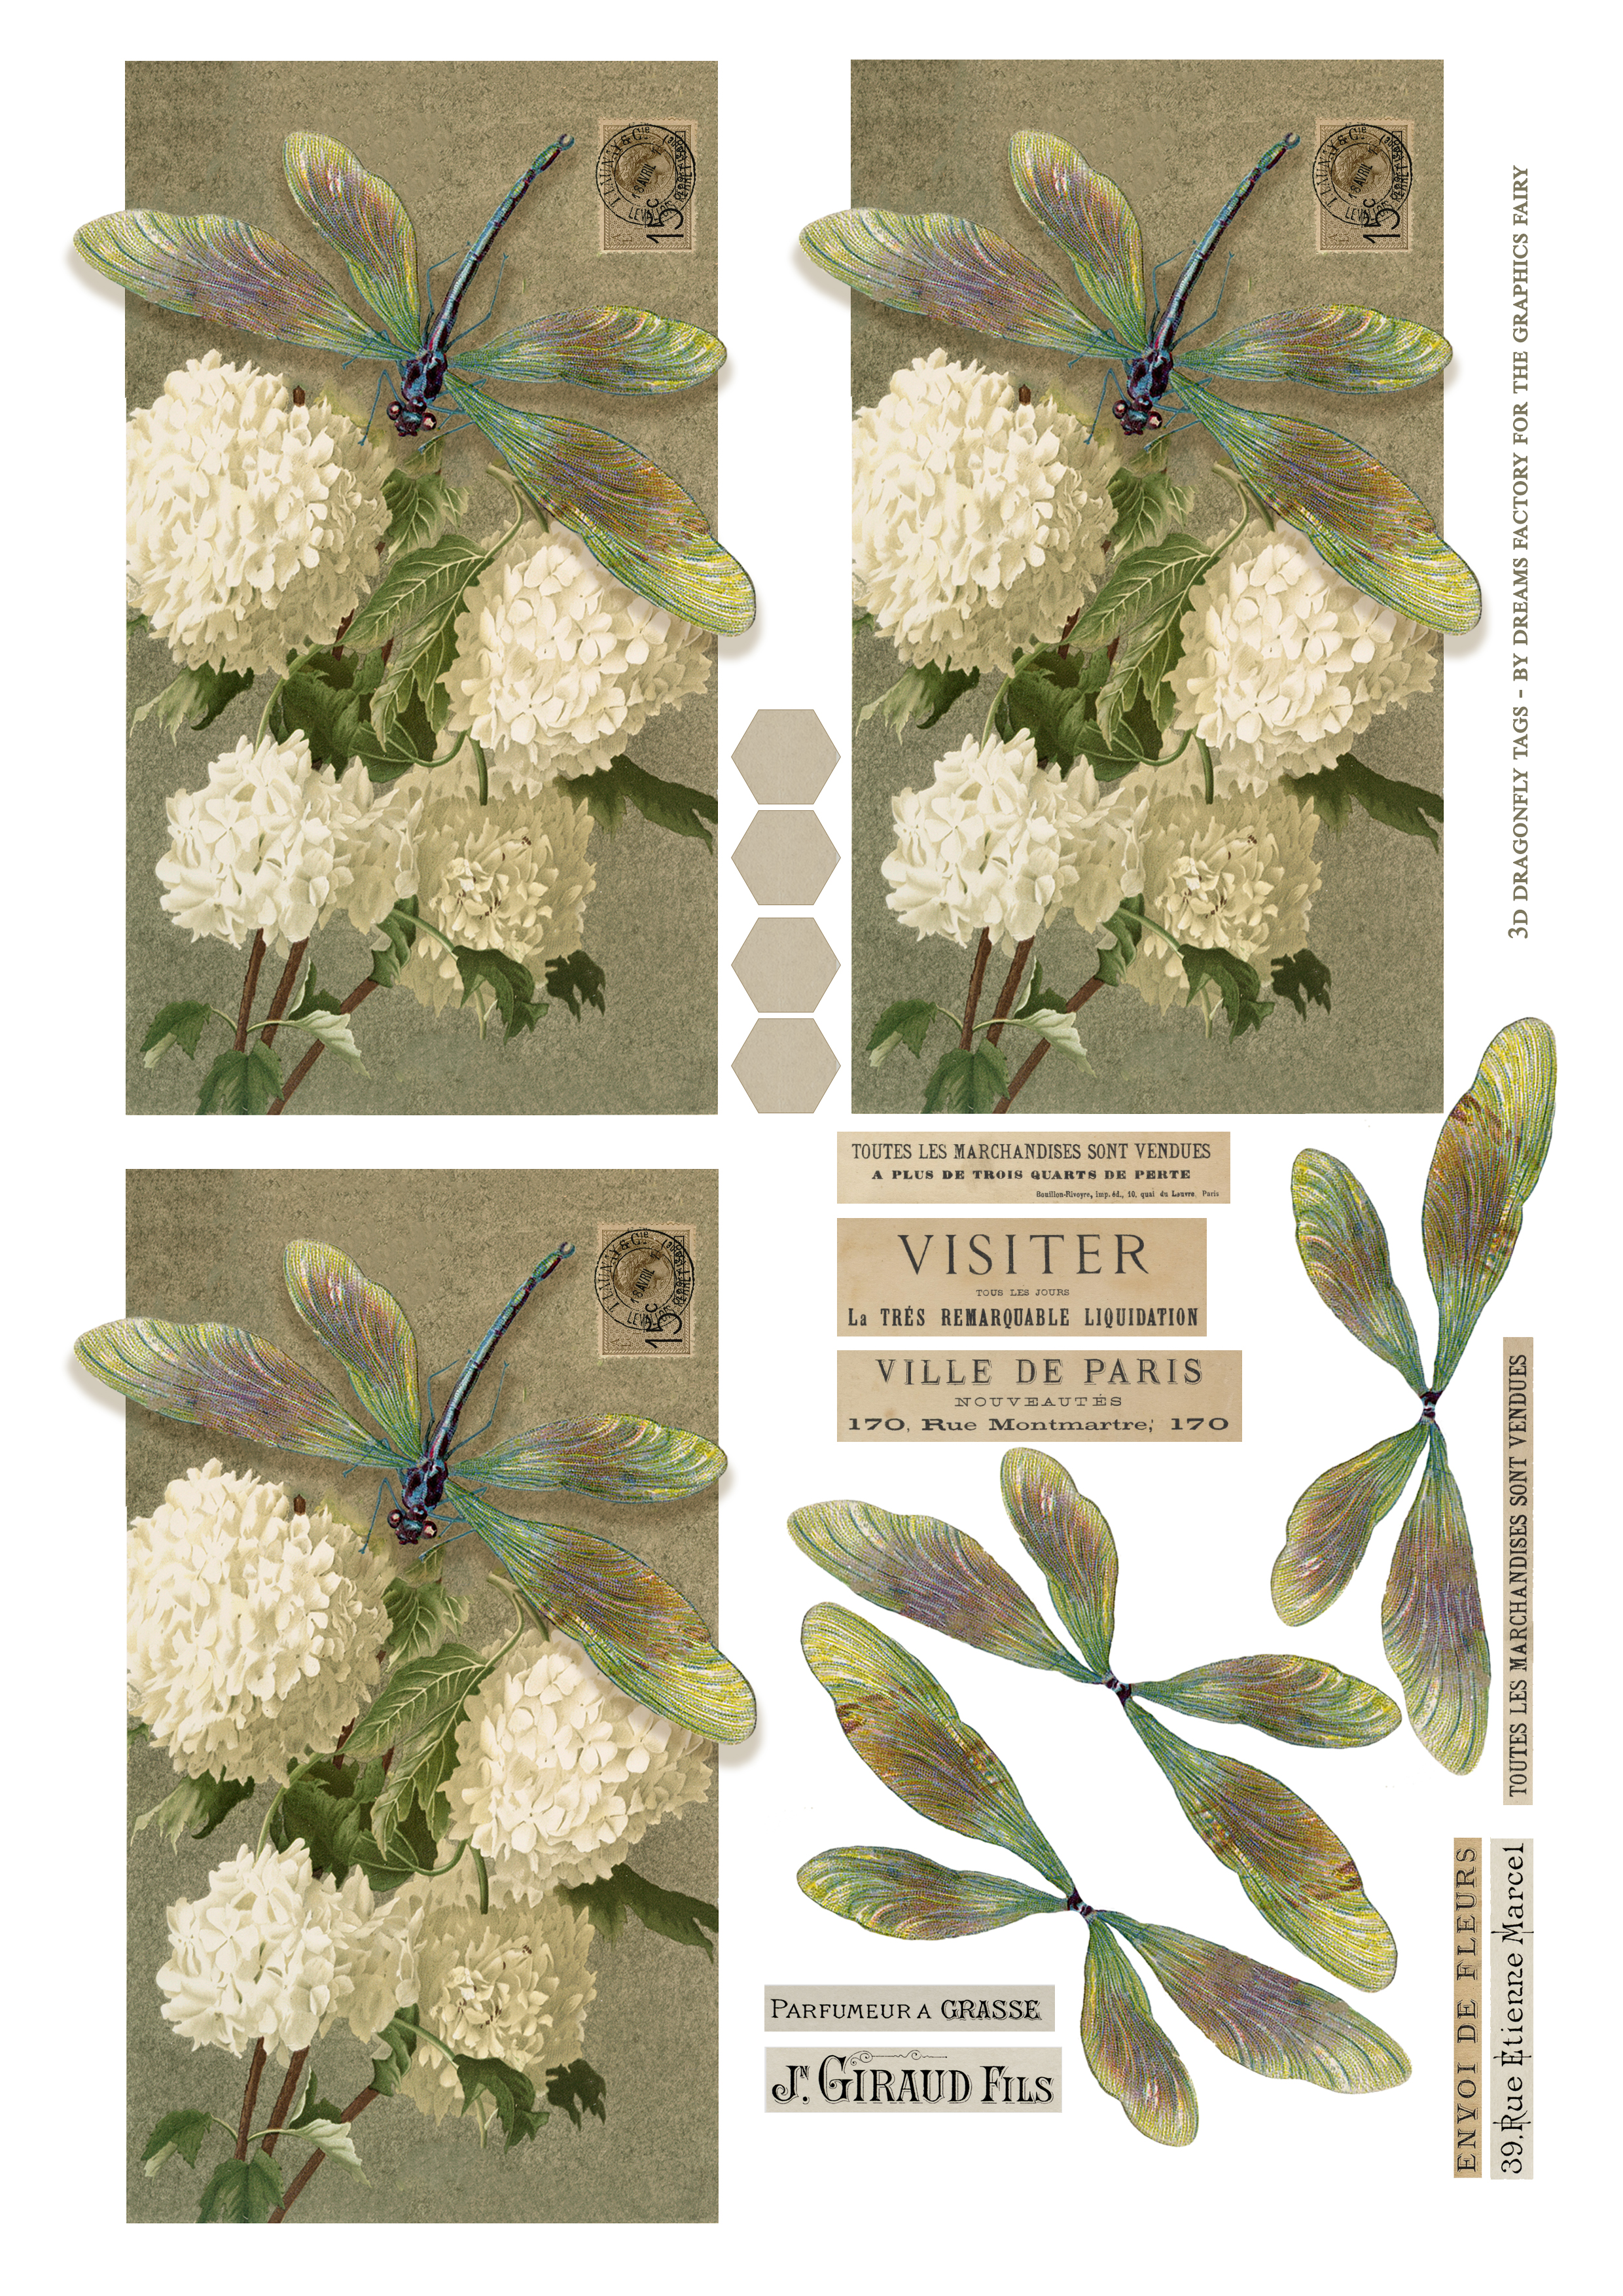
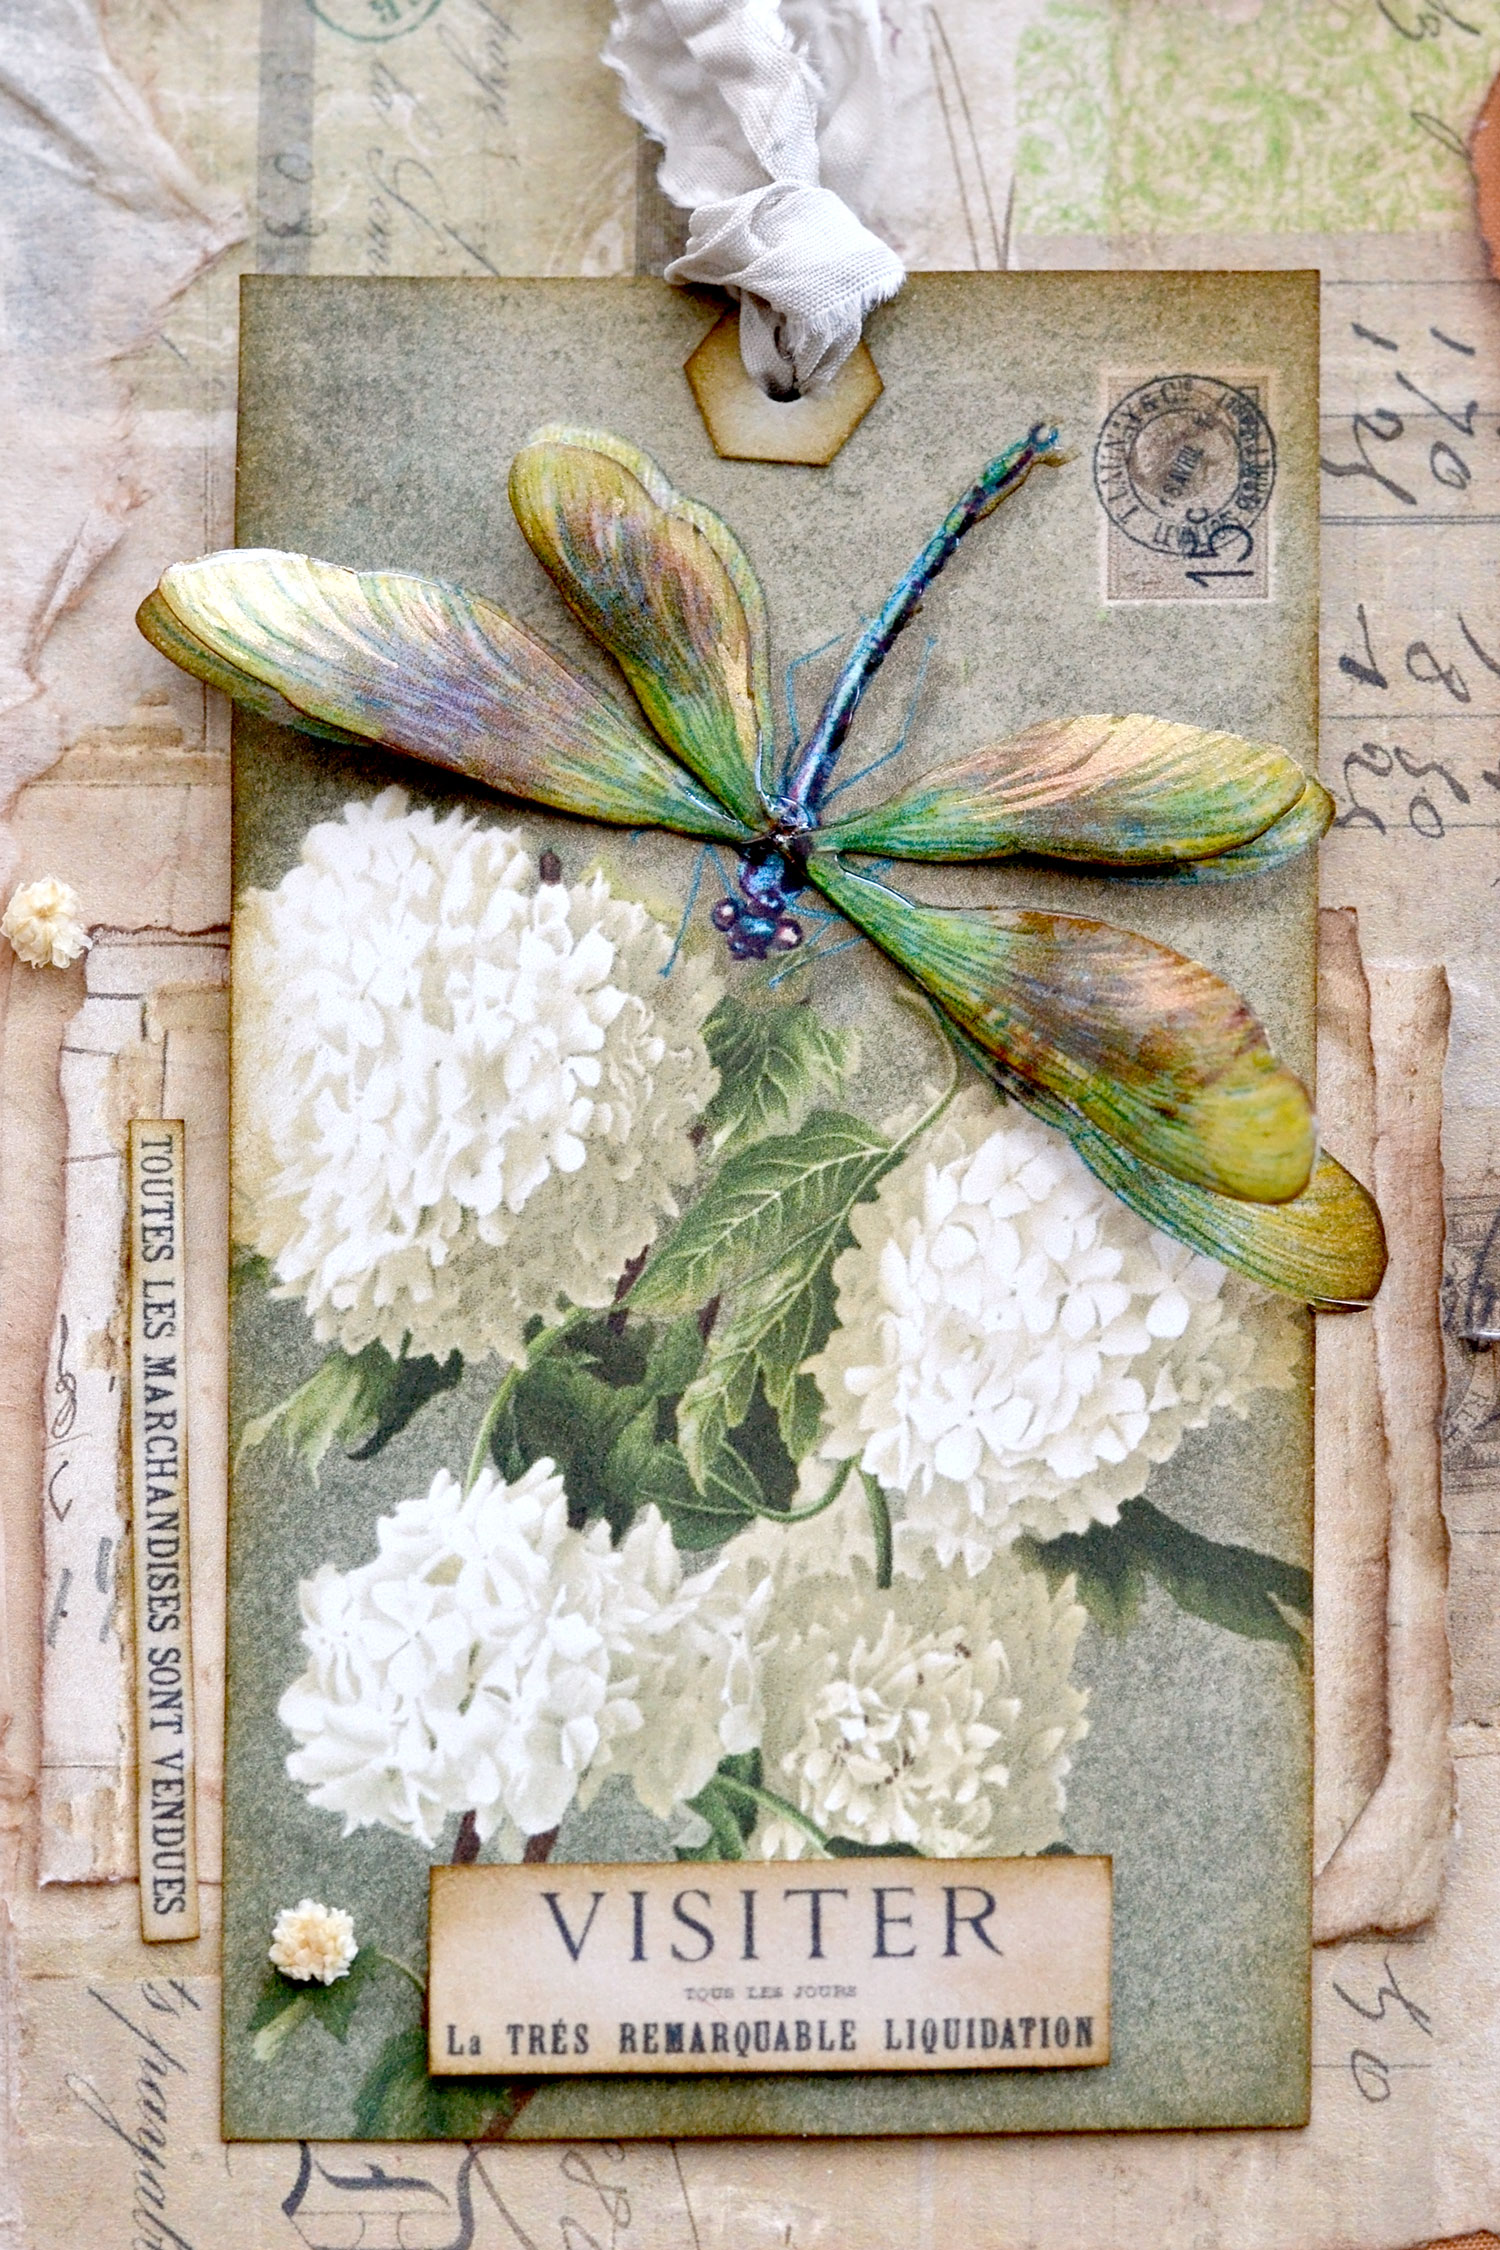
I used this beautiful hydrangea image to make the base for our tags, but la pièce de résistance is definitely this stunning dragonfly that I added on top. This is no ordinary dragonfly, but one that has some super chic, quite ethereal wings! I think the first thing you’ll notice is their AH-MAZING color and how realistic they look! I loved these wings so much that I’ve decided to further embellish and overlap them to create our lovely 3D raised effect element.

You will find below the free printable that I created for this project. I included three tags, three overlapping wings and a few French ephemera cutouts that you can choose from. I also included three hexagonal reinforcers, plus an additional one as a backup.
Free Printable:
—-> Click HERE to Download the Full Size Printable PDF <—-
3D Paper Tags Supply List:
- white cardstock paper
- home printer
- scissors
- mini distress inks
- blending tool with foams
- Mod Podge or paper glue
- Glossy Accents
- watercolors (I used my favorite Kuretake Gansai Tambi Starry Colors)
- regular brush
- small brush
- toothpicks
- crinkle ribbons

STEP BY STEP TUTORIAL:
Start by printing the tags on cardstock paper, then use your scissors to cut out each of their beautiful elements. Carefully go around the edges while cutting the tags and try to make the wings that are slightly going outside as round as possible. We don’t want any sharp edges here, we want everything to look as smooth as possible. You will notice a small shadowing effect around the wings outside the tags, you can choose to keep it or completely remove it, as I did.
Pay extra attention while cutting the separate overlapping wings, as they are quite fragile in the center. We need to carefully remove all the white paper around them to make the wings as realistic as possible.
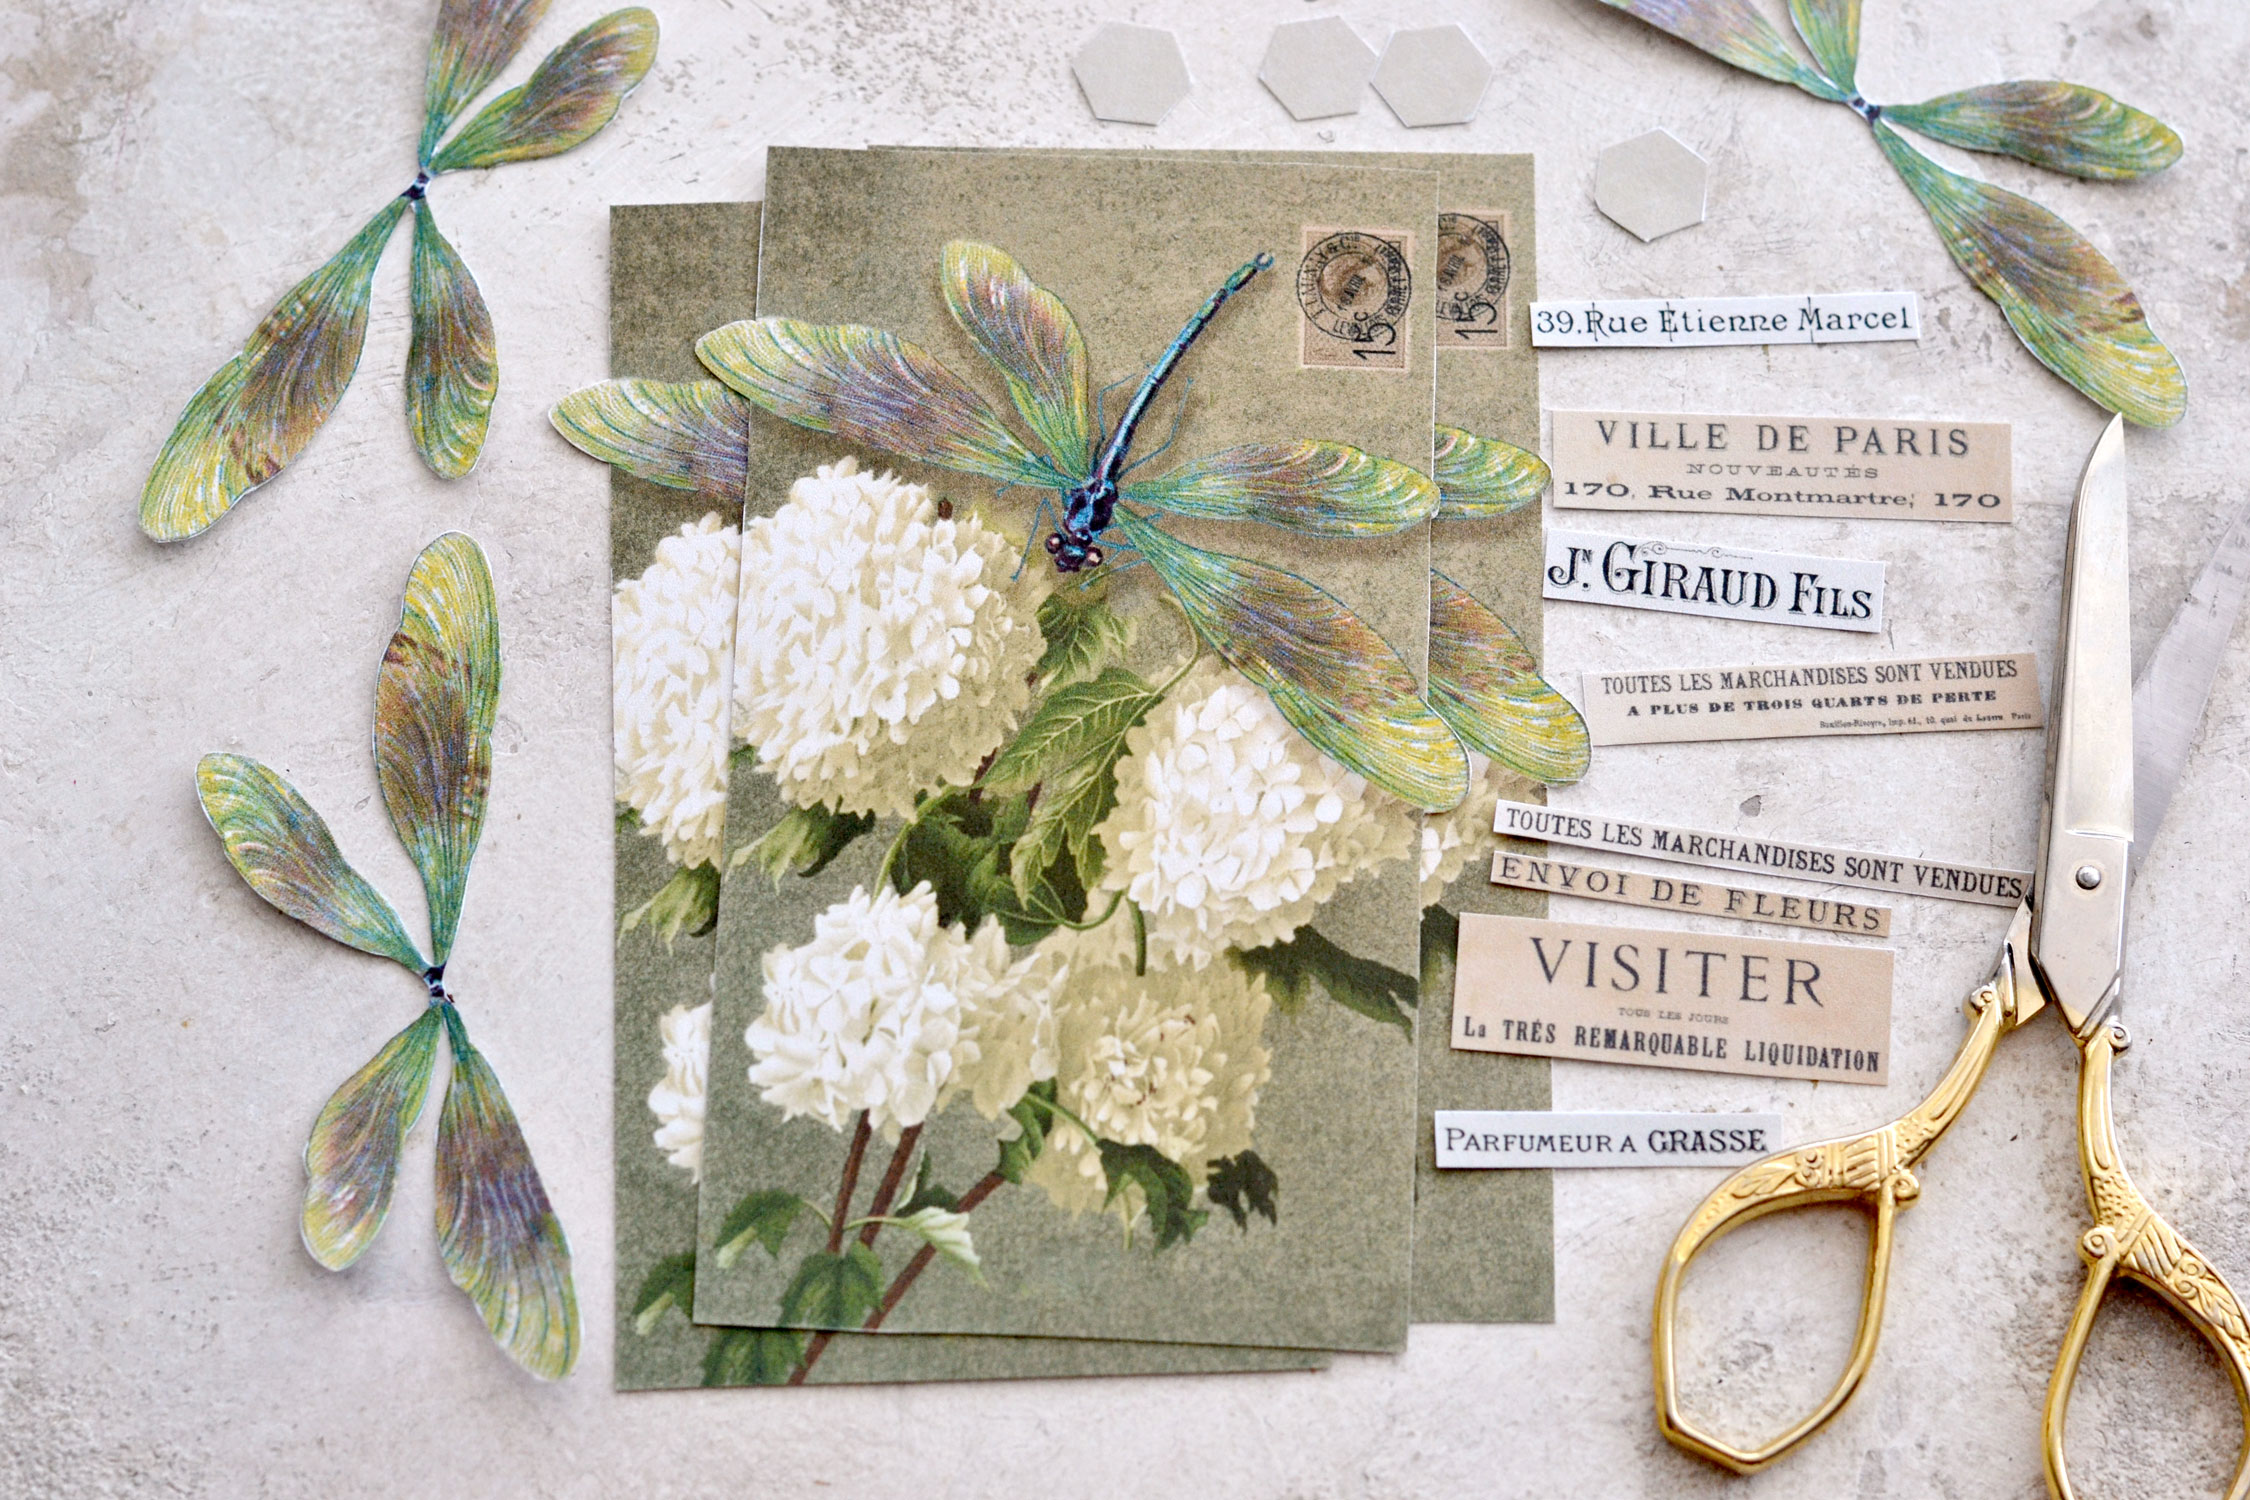
Use your favorite brown distress ink all around the edges to give the paper even more of a vintage vibe. I usually love using the Walnut Stain from Ranger, but more recently, I’ve started adding some Wild Honey too, after having to re-ink it.
Pay extra attention while distressing the separate wings, remember that they are quite fragile and can easily break in the middle.

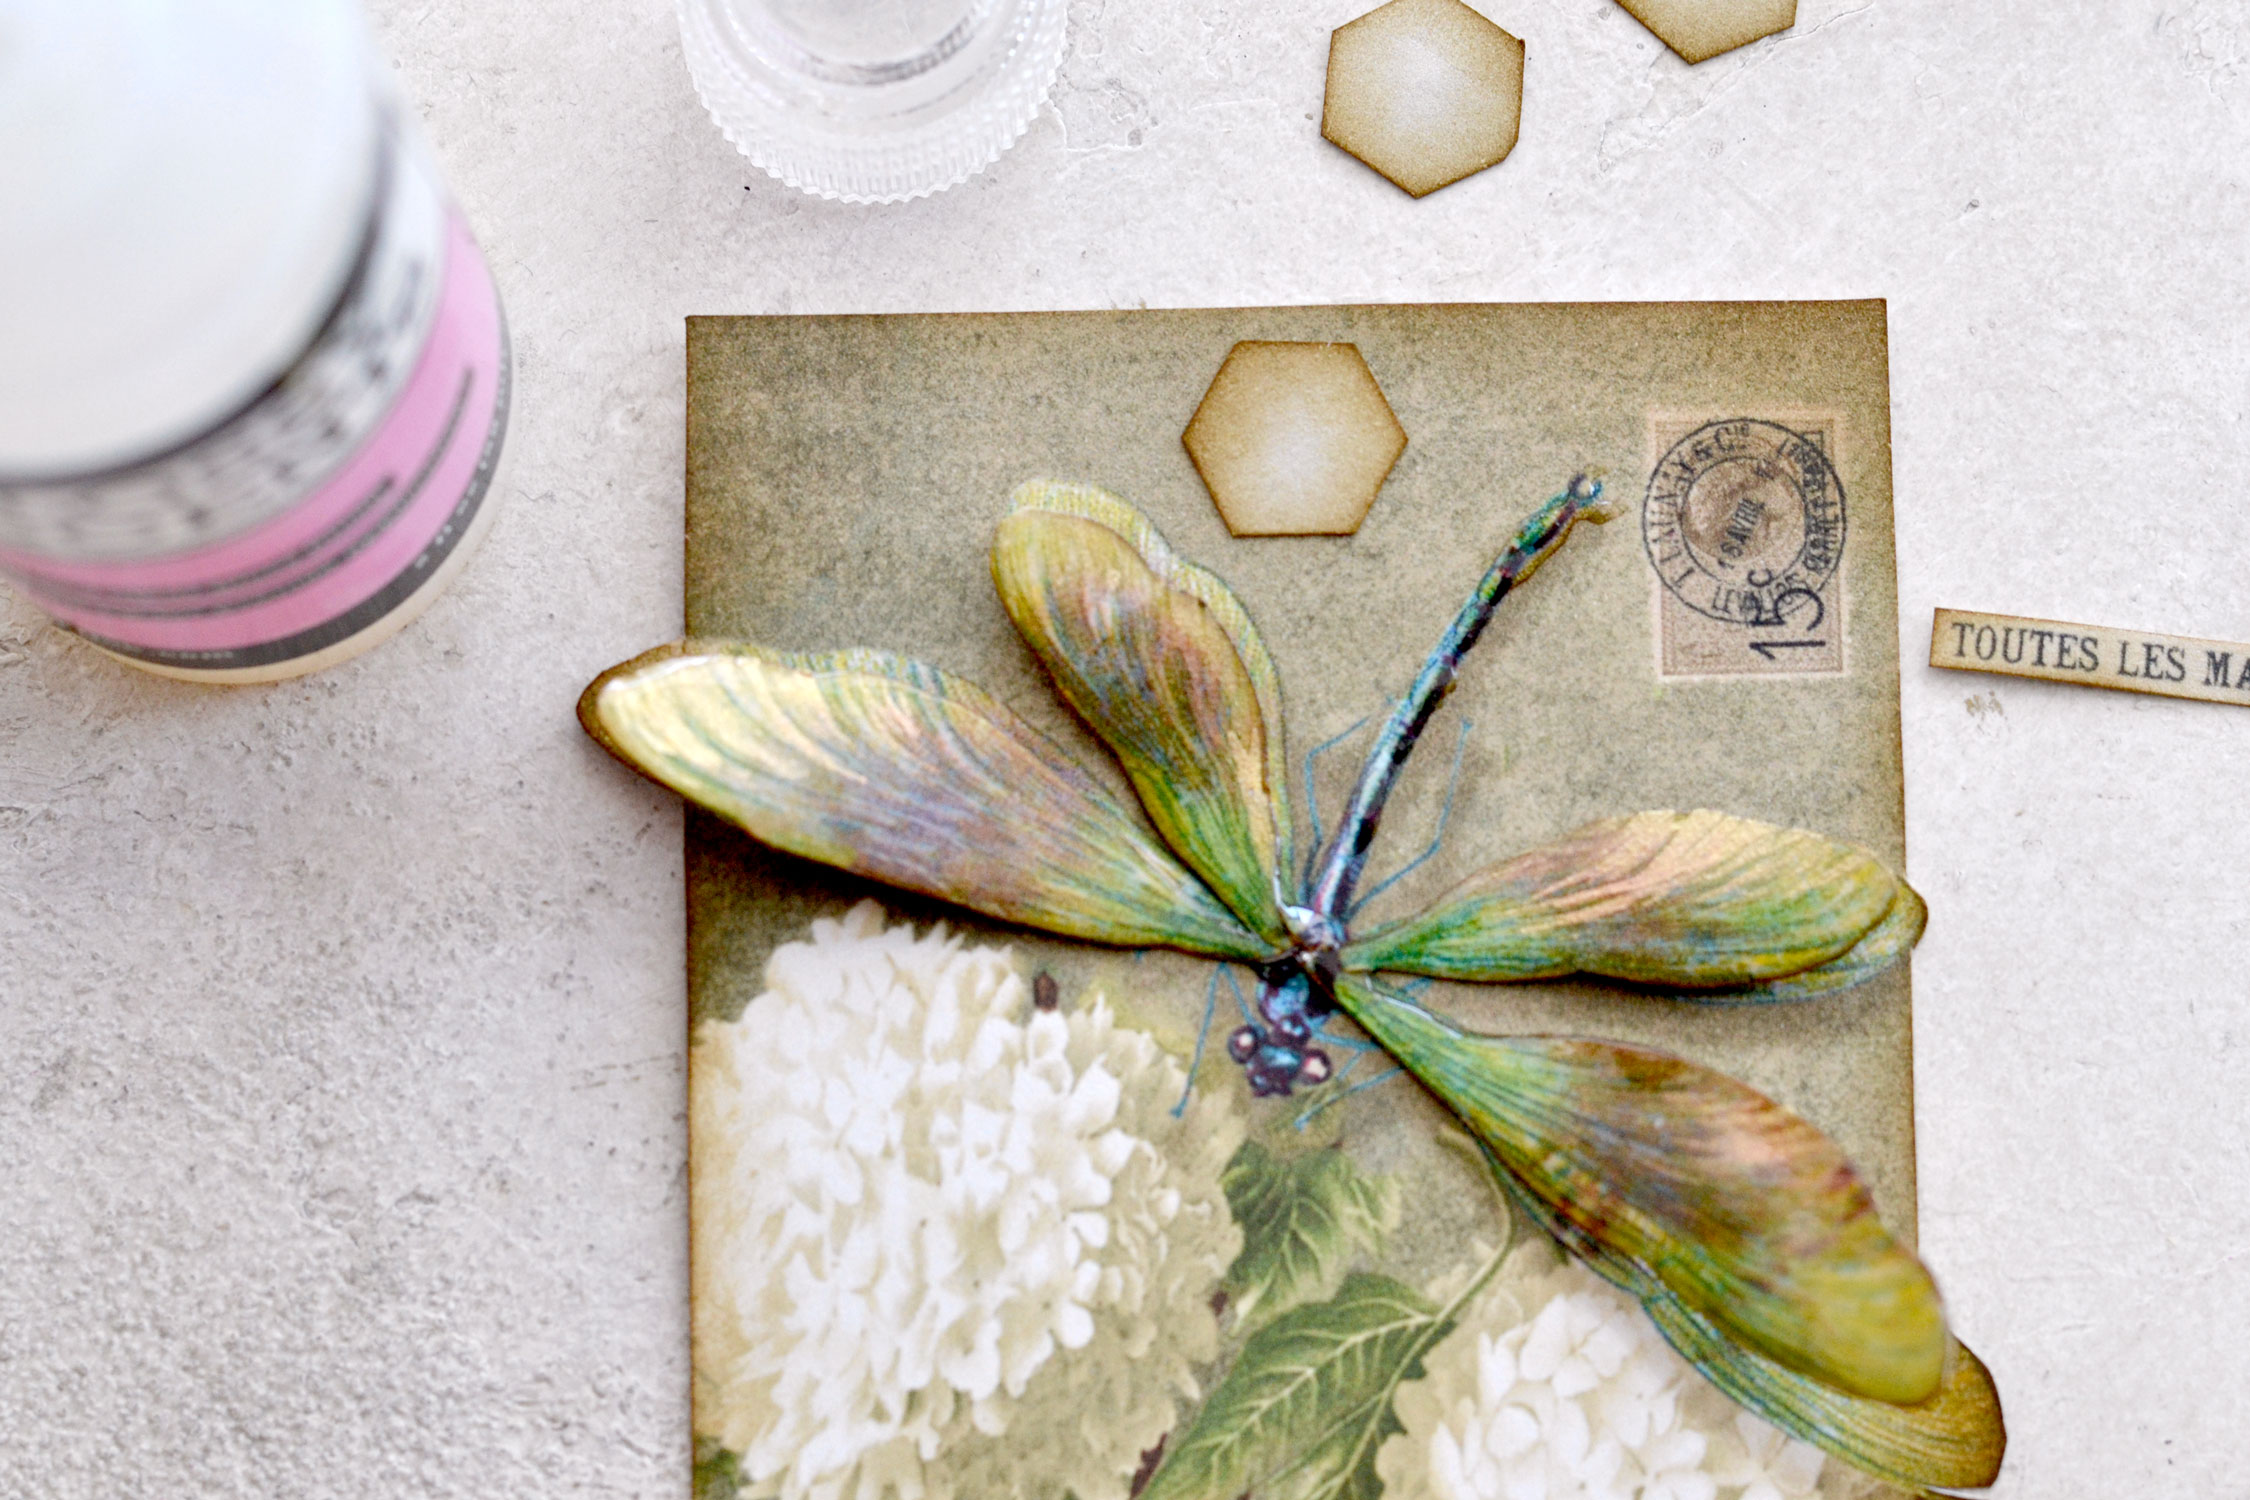
Now it’s time to have some fun with the separate wings and further embellish them with a touch of gold! I used my favorite gold watercolors here and the smallest brush I could find. The small brush is really important as we want to keep that feathery look of our wings and only enhance them with some thinly brushed gilded strokes.
Use a small spray bottle and spritz some water over your watercolors to wake them up first. Place one of your wings on a piece of baking paper, a silicon mat or a recycled plastic packaging to protect your working surface. Now, use your small brush and a little bit of paint and starting from the outside, paint gilded strokes right near the edges that follow the design of your wings. The idea is to use the gold to enhance the fine lines on the wings, but not completely cover the design.

The gold will almost bring these beauties to life! You can see in the image below the difference between already gilded wings (the two on the right) and one without any gold (the one on the left).

The gold paint will dry fairly quickly since we only added a small amount. So you can move on to the next step, which is adding a thin layer of Mod Podge on top! The idea is to use Mod Podge or any other craft glue or medium that dries clear to create a protective layer on our paper. Try to apply an even, thin layer that will completely cover the surface, then let the glue dry completely before moving on.
P.S. Make a few tests before using anything other than Mod Podge with your gold watercolors. Some glues or mediums can remove that beautiful shine and make the gold look dull and unappealing.

For our next step, we’ll use Glossy Accents to create a beautiful raised effect on our separate wings. The Mod Podge layer that we added earlier will prevent the Glossy Accents from seeping into the paper. Use a toothpick to hold the wings in place while adding the Glossy Accents on top. I like to go all around the edges first, to contour the shape and then use some more of this amazing medium to fill that shape. Try to contain the medium inside the shape, we don’t want it to go outside the edges because it will mess up the whole raised effect we are trying to create.

Let the Glossy Accents medium dry completely before moving on. You can slightly bend each of the four wings toward the edges before assembling them on your tags, but you can also do that afterward.
One thing that you can also do is to cover the back of the wings with distress ink or even some of that amazing gold. This way, everything will look good even if you decide to bend the wings a little bit more or admire them from the side.

Add a touch of Glossy Accents on the back of the wings, right in the middle, and then attach them to your tags. You can position them so they are perfectly overlapping the wings underneath or slightly rotate and then glue them, to create more interest.
Use a little bit more of this amazing Glossy Accents to enhance the body of your dragonfly, too. Just add a few lines following the shape of the body and use a toothpick as an improvised brush if you need to tidy things up afterward.
Then, use Glossy Accents or Mod Podge to glue the hexagonal reinforcer on top.
If you want, you can use glue to adhere the French ephemera cutouts directly to your tags. But if you want to also give these a little bit of dimension, you can use double-sided foam tape or double-sided adhesive foam squares (or dots).
I had to cut mine in the middle (horizontally) because they were quite tall, so I only used one for each of the tags.

Let the reinforcers dry completely before moving on to punching them and attaching the ribbons.

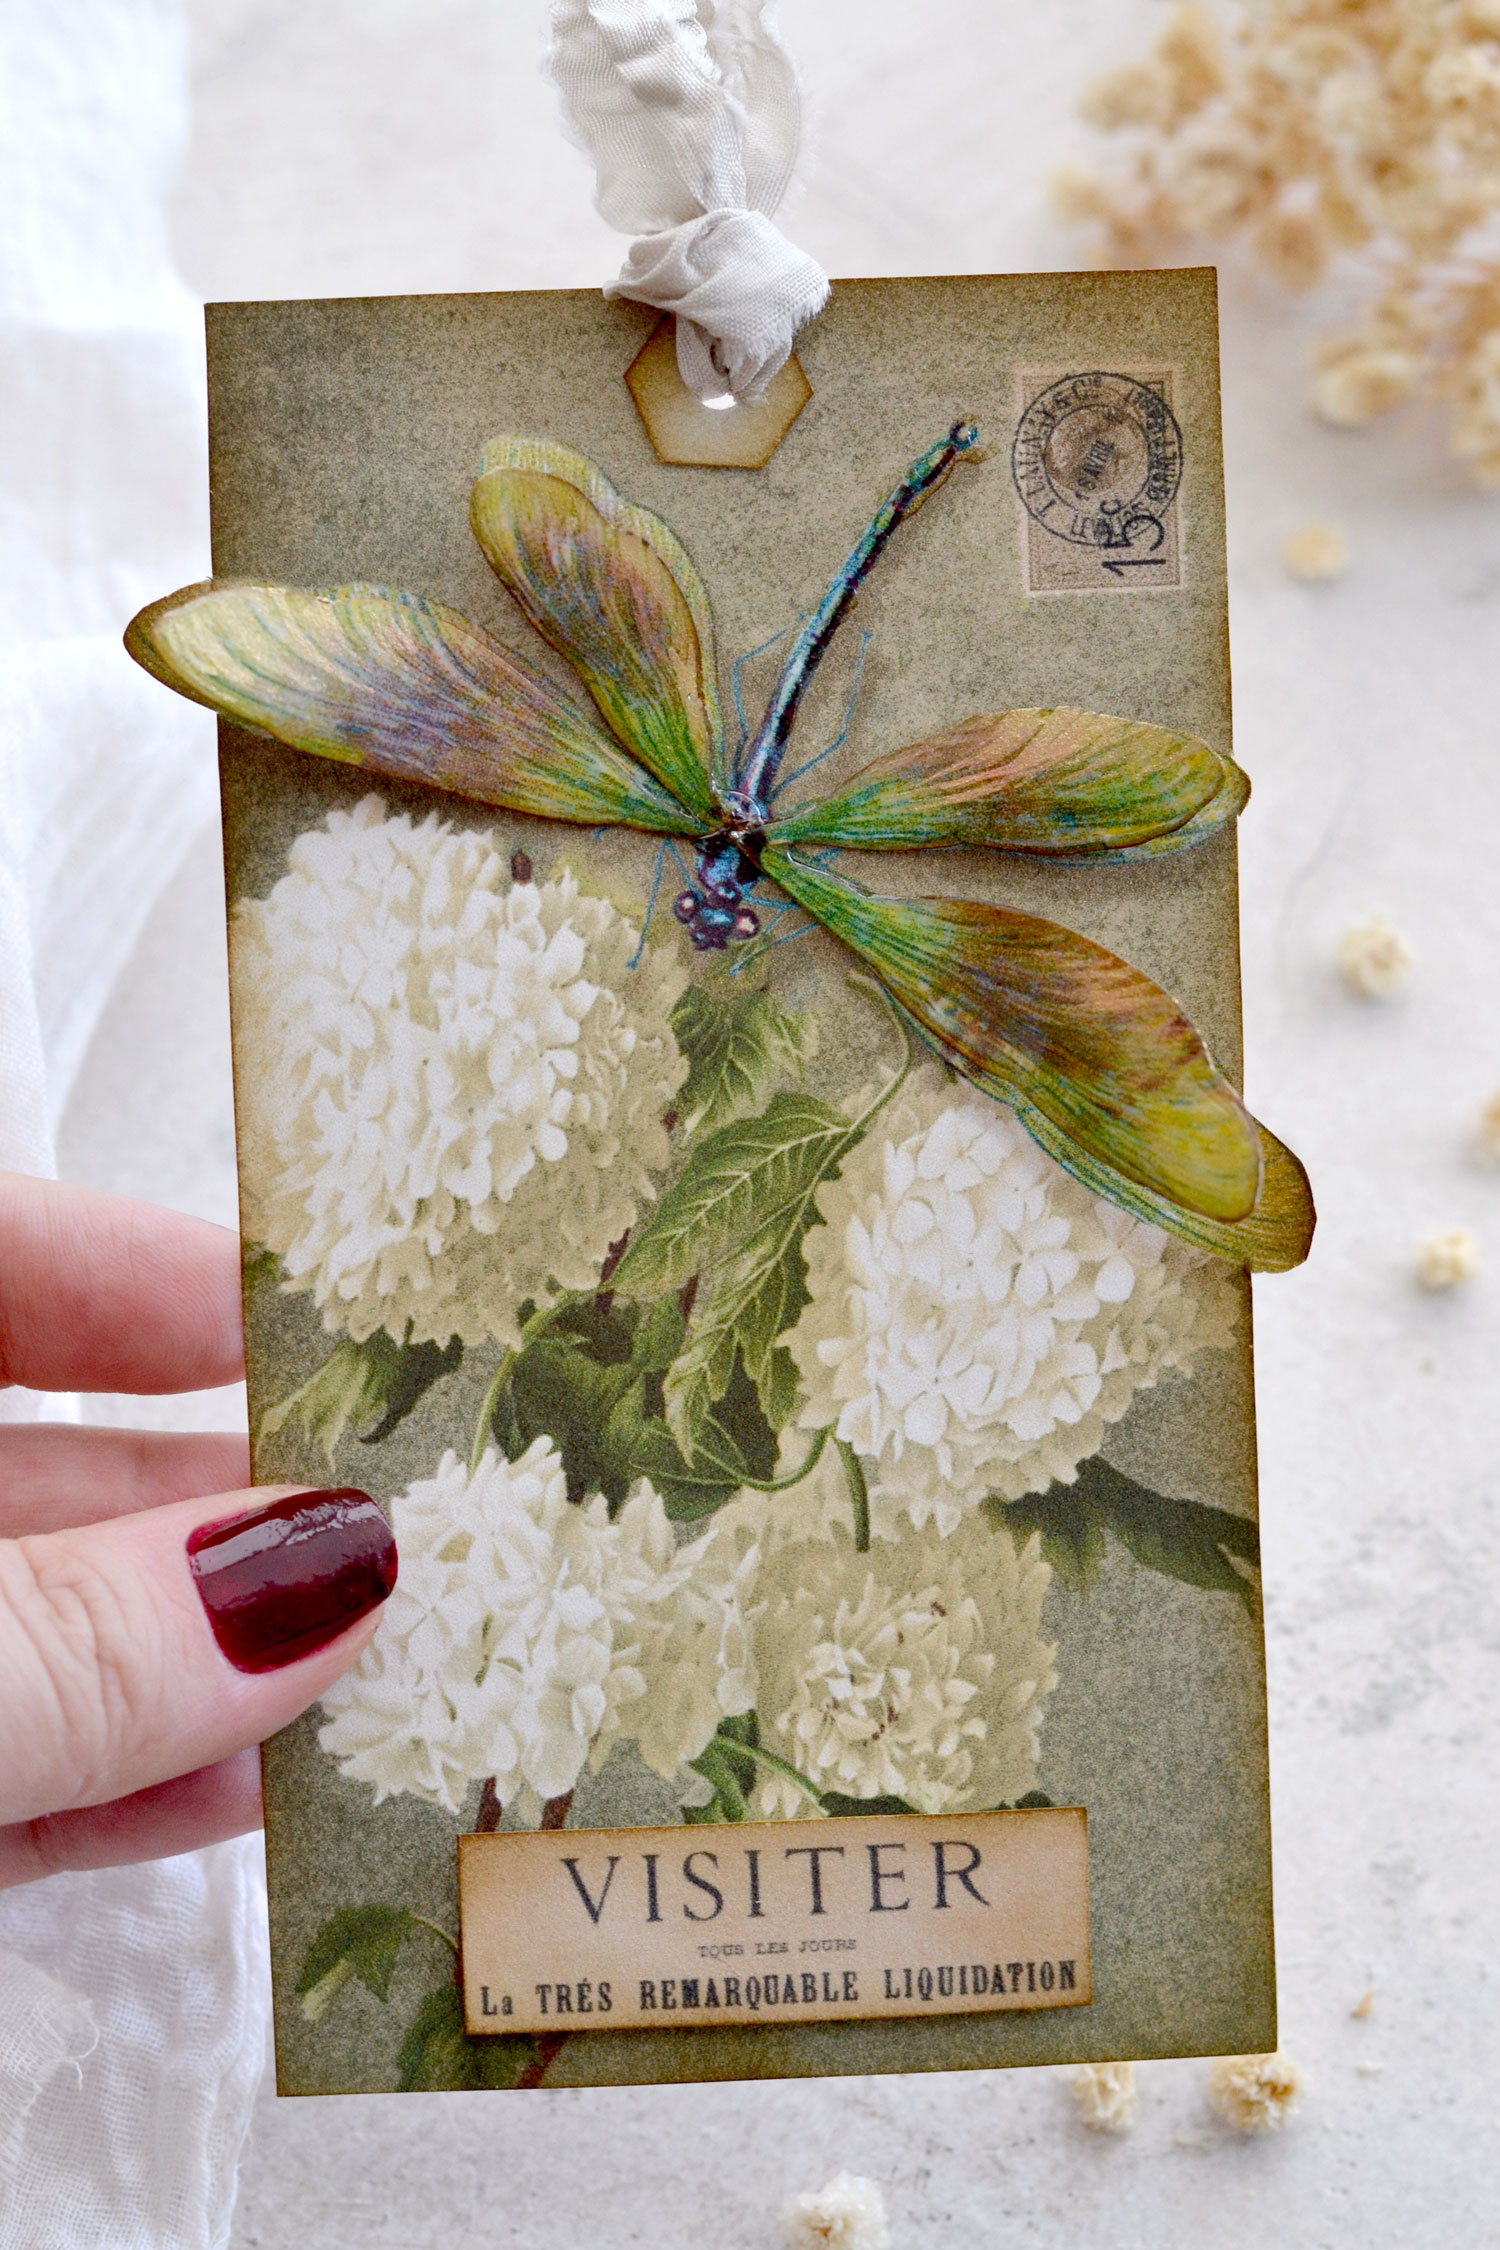
And then, you can finally admire your absolutely gorgeous 3D Dragonfly Tags! They turned out quite stunning, don’t you think?

If you look closely at the tag below, you will notice that the body of the dragonfly has a different shape. That’s because I added a little bit too much Glossy Accents while enhancing it and I had to improvise along the way. So I created some diamond shapes using my improvised toothpick brush and hoped for the best. I think it turned out beautiful … and quite unique!

The Glossy Accents medium will give the wings, well… a glossy finish. I really loved how they looked, but if you feel like you want to still create that lovely 3D effect and keep everything more on the matte side, here is a thing that you can try. Add a tiny bit of Matte Mod Podge on top! Just brush, a thin layer, let it dry and watch everything turn matte.

The details on our tags are absolutely stunning, don’t you think? They looked beautiful to begin with, but I feel the gold and that lovely raised effect that we created take them to a whole new level of chicness!

If you are familiar with resin and even have some around, you can use it instead of the Glossy Accents medium. I would probably use the UV resin to cut down on the waiting time – this one can be quickly cured with a UV lamp.
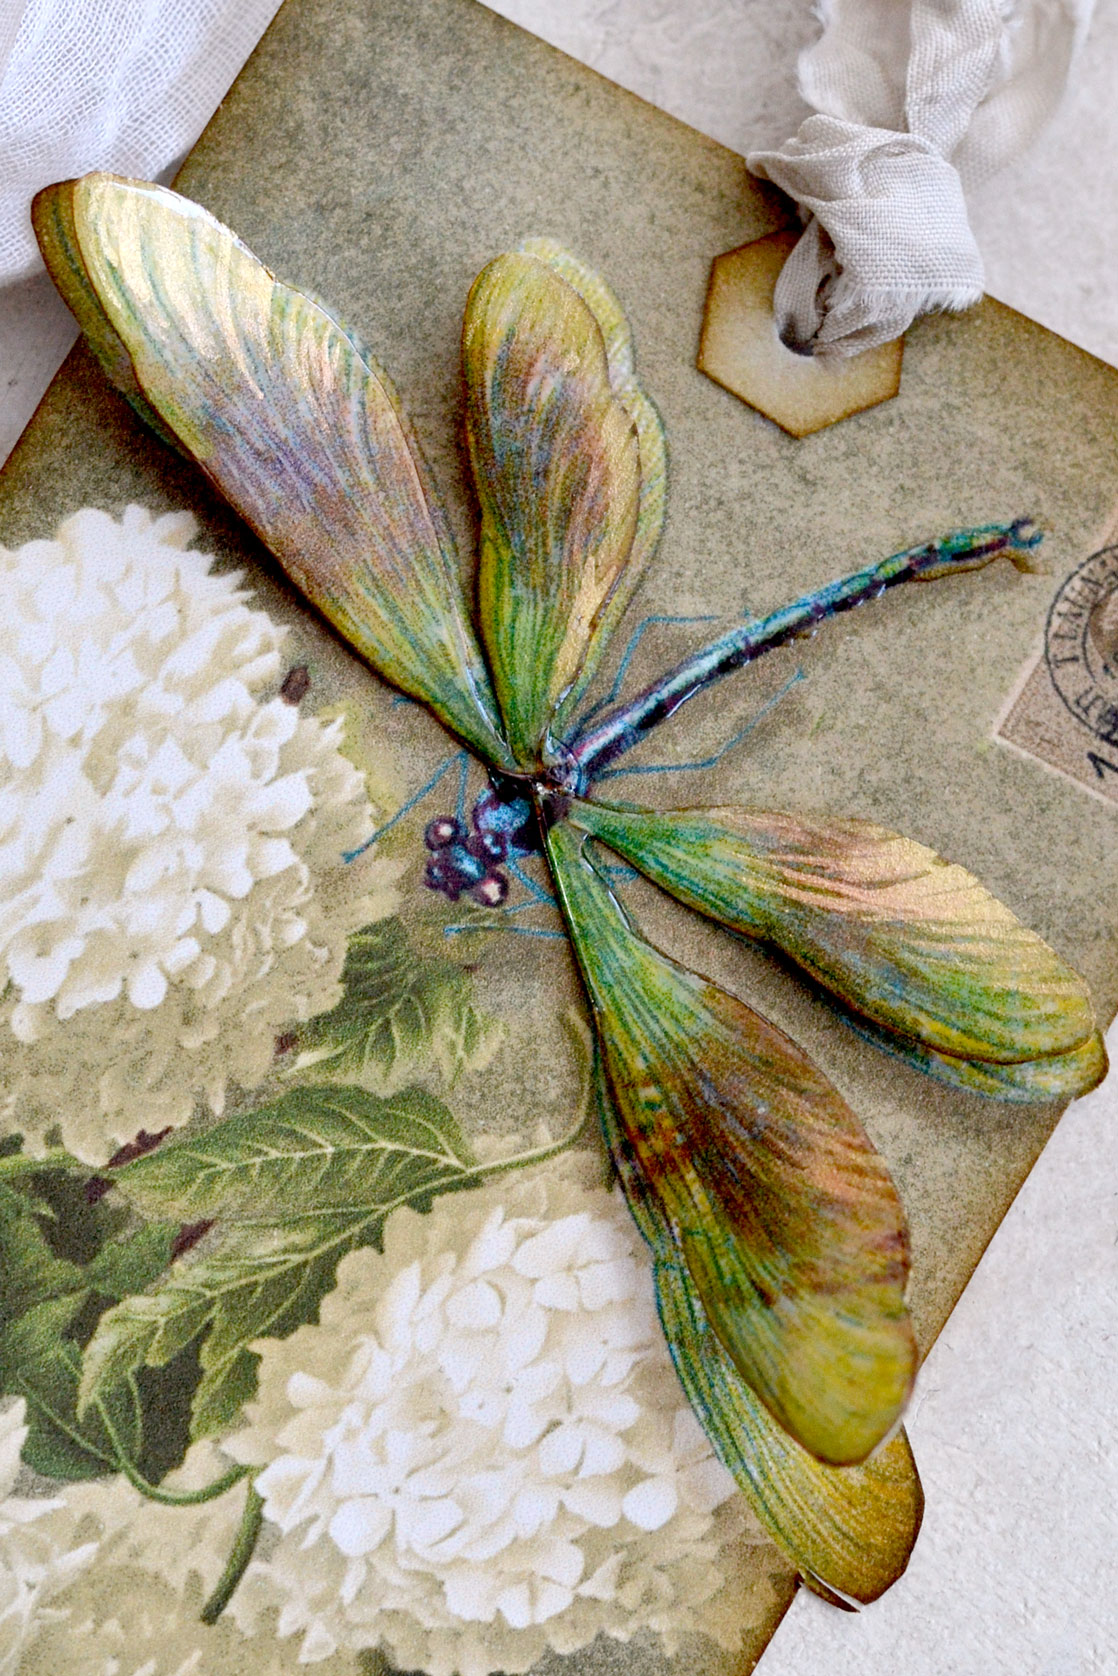
I still can’t believe how realistic these overlapped wings look. I think they are such a nice addition to our tags!

Feel free to use these beautiful 3D Dragonfly tags with touches of gold, a little bit of French charm and an overall vintage vibe to your heart’s content. They will make the most amazing companions for your gifts and can be easily included in all sorts of other creative projects, too! You can even add them to your junk journals to instantly beautify your pages or, why not, even the covers.
Leave out the ribbons and the reinforcers and use them as labels to decorate large vases or pots. You can even turn them into cards, just use a vintage background as a card base and you are good to go.
I hope you will love this project and decide to give it a try! You will see that the process itself is uncomplicated and, to be honest, quite relaxing! Painting the wings with gold and then creating that raised 3D effect turned out to be so much fun. And the final results are quite mesmerizing, you’ll just want to admire these beauties over and over again!
You might also like my Gorgeous Paper Tube Craft Boxes HERE!
Happy crafting,
Diana | Dreams Factory


Kimberly says
They are beautiful and a fun project, but relaxing…I’m not so sure for me! Thanks for the alternative suggestions you shared throughout too.
Karen says
Hi Kimberly. I’m glad the alternative ideas were helpful though. Thanks so much for giving it a try!
Karen BRight says
I love this one! You have a very delicate touch with the water colours. What brand do you use? I have not done anything with gold or added paint yet, and it does seem to add quite a lovely dimension. Thanks!!
Karen says
Hi Karen! She used her favorite Kuretake Gansai Tambi Starry Colors, I think you’ll also find them on Amazon 🙂
Weltha Smith says
Magnificent looking creatures.
Karen says
Absolutely!