23 Easy Image Transfer Methods (Photo Transfers)
This is a comprehensive post about Image Transfer Methods and Photo Transfer Techniques! Some of these can be done with Inkjet Printers, some with Laser Printers and some only work with old fashioned toner from a photocopier or copy machines. We covered so many different ways to create this nearly magical process, and we’ve covered all sorts of surfaces, like Furniture, Fabric, Paper, Clay, Wood, Glass and more. While we mainly use graphics for these projects, as we are a graphics site, many of these methods will work with photos too. Time and time again, the question that I get asked most frequently by my readers, is “How can I transfer your images on to _____”. There are numerous Transfer Methods on this blog, and this post attempts to consolidate it all in one place so that you can easily find the method that you want to use for your particular project. Below you will find links to 23 different ways to Transfer onto pretty much any type of material. We are always trying out new products and new techniques on this site, so I have updated this post to include the new ones. I hope you find it helpful!
How to Transfer Onto Furniture
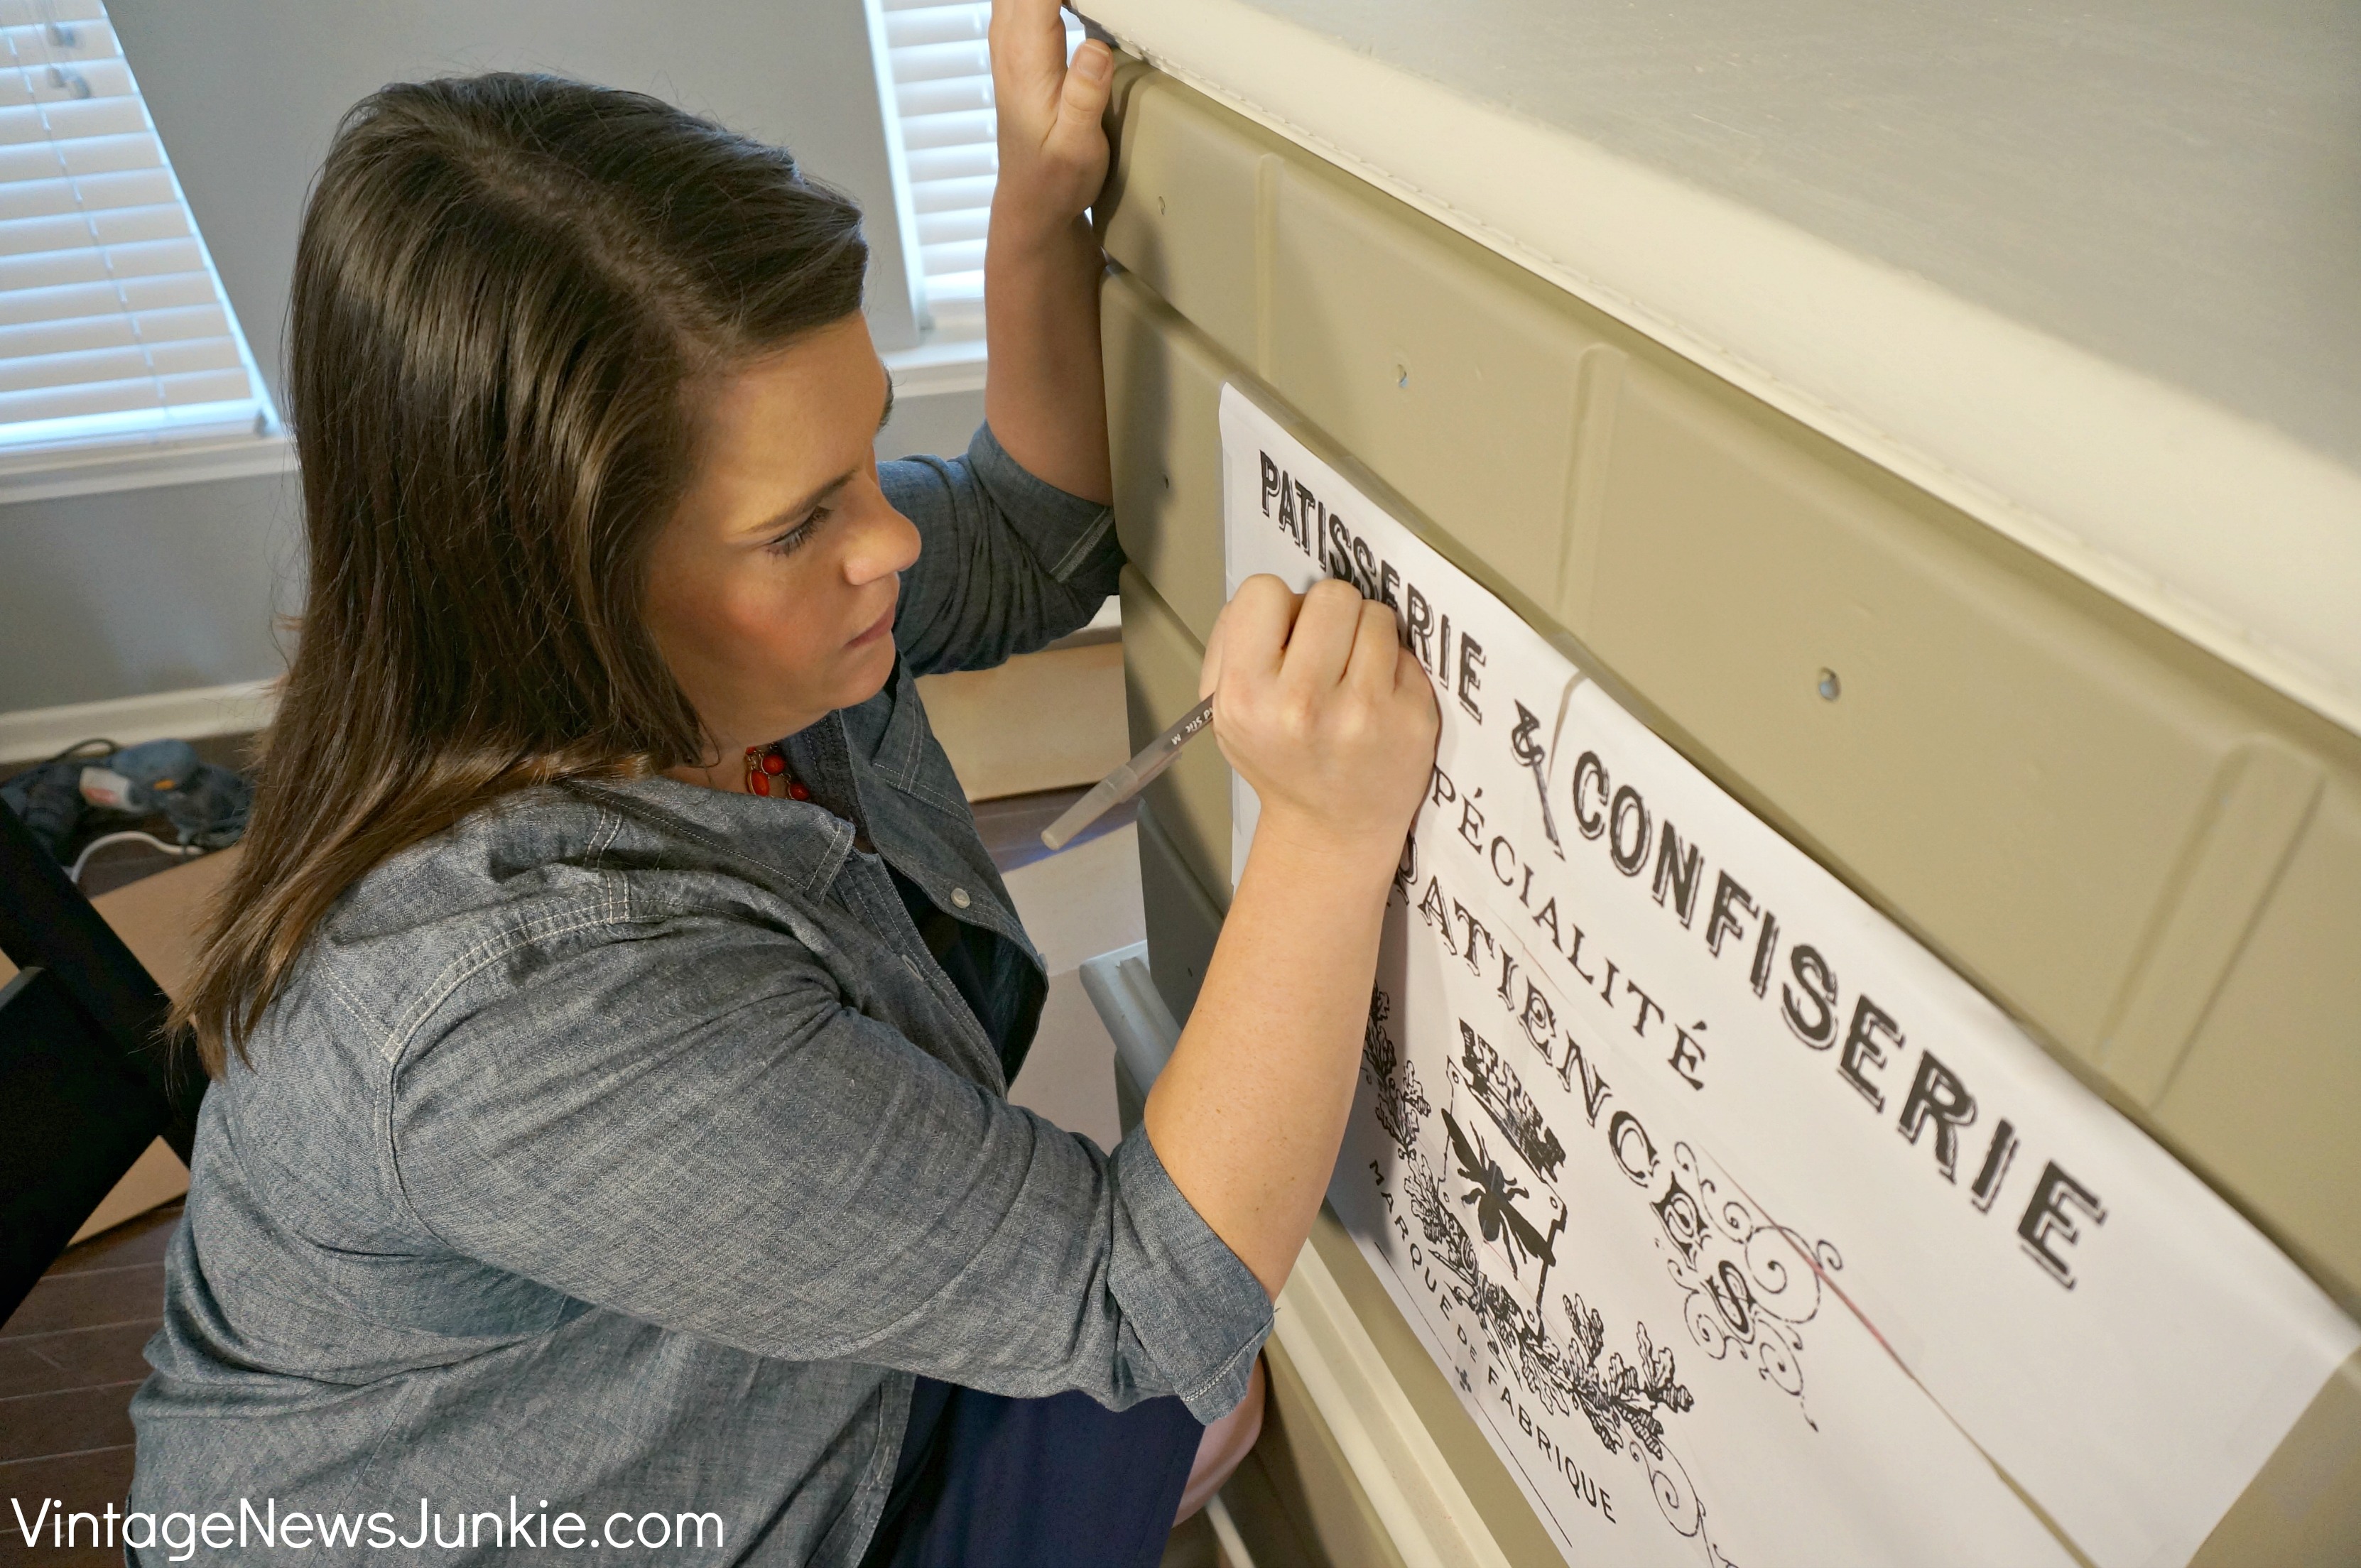
How to Transfer Typography onto Furniture : This is a two part written Tutorial showing how to blow up your image really big, using a free program, and an easy cheap transfer method, so that you can paint your image on large or small pieces of Furniture, Walls or Signs. Great for painted wood pieces or natural wood.
How to Transfer an Image onto Furniture Video Instructions : This is the Video version of the original Furniture Transfer Tutorial that I created several years ago. My friend Candice is great on Video and she kindly put this Tutorial together! The Video will show you instructions for how to blow up your image really big, using a free program, and an easy cheap transfer method, so that you can paint your image on large or small pieces of Furniture, Walls or Signs. Great for painted wood pieces or natural wood. Works best with simple designs like many of theFrench Typography Printables that I offer here on my blog.
Transferring onto Fabric
The Citra Solv Method : This method uses a cleaning product called Citra Solv. This one works well with Fabric projects, like Towels, Pillows, Chair Seats and Lampshades. This method will give you a slightly faded, slightly imperfect, transfer for an old world look.
The Iron On Method: In this Tutorial I show you how to do an Iron on Transfer, using my favorite Transfer Paper. I consider this brand to be the “Holy Grail” of Transfer Papers, as it completely blows away the other stuff out there. If you’ve tried doing Iron Ons in the past, with crappy results, you will love this stuff! Great for any Fabric Projects. Great for Image transfers or Photo transfers.
Printable Fabric Sheets Learn how to use precut Printable Fabric Sheets that are made specifically to be used in your Home Ink jet Printer. (Printable Canvas Sheets are another alternative) Fun and easy!
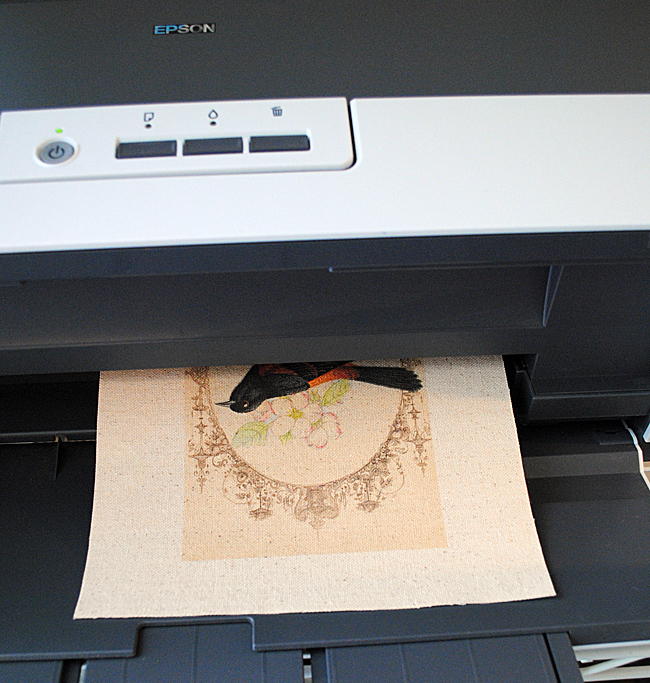
Printing on Fabric: This technique shows you how to cut out the middle man, and print directly onto fabric, with your home printer! For those of you that sew (or don’t mind gluing your projects) this is a really fun method!
The Iron On Method: In this Tutorial I show you how to do an Iron on Transfer, using my favorite Transfer Paper. I consider this brand to be the “Holy Grail” of Transfer Papers, as it completely blows away the other stuff out there. If you’ve tried doing Iron Ons in the past, with crappy results, you will love this stuff! Great for any Fabric Projects.
High Quality Image Transfers on Fabric: In this post Heather, shows us how to get a very high quality transfer onto fabric, using an exciting new technique! This technique works best with fabric and bonus… she tested it out and it’s washable!
How to Transfer onto Paper
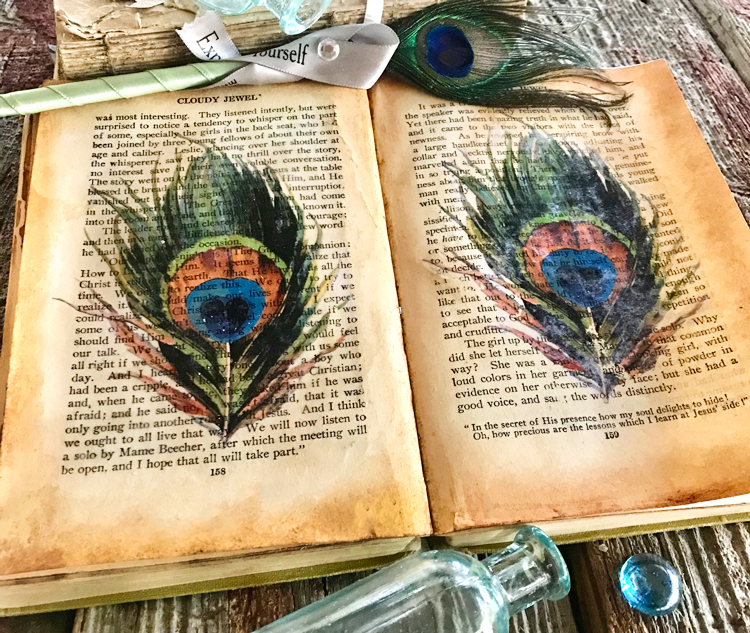
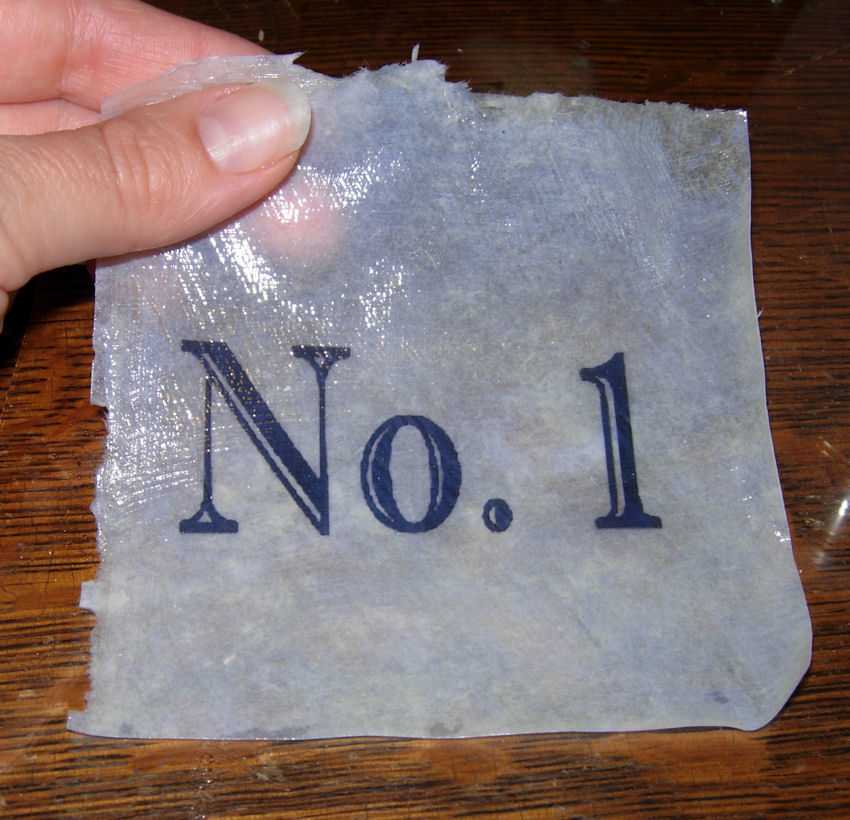
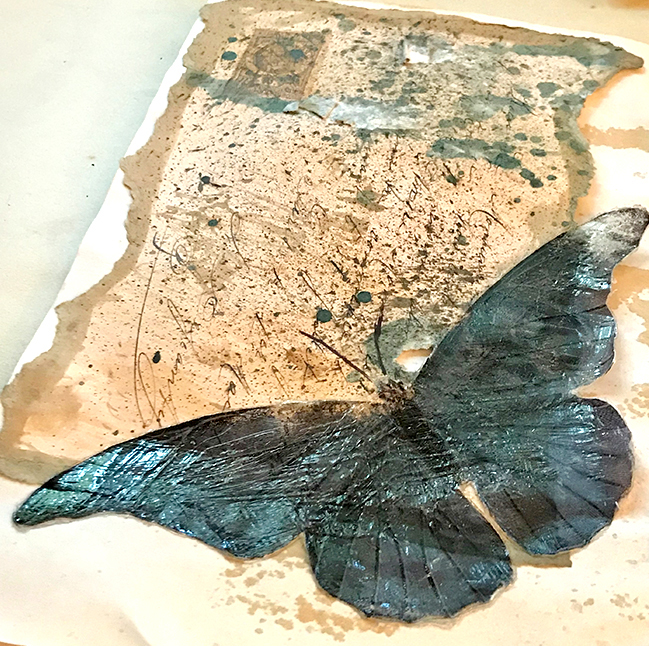
Transfer an Image to Paper Perfect for Junk Journal artists, collage artists and mixed media artists. You’ll learn how to lay an image directly onto paper, cardboard or bold books, to create gorgeous effects with this fun method.
Acrylic Paint Technique If you are a crafter you probably already have the supplies for this one in your craft room! Rebecca walks us through these simple steps for acrylic transfers, to add pictures to paper. She demonstrates on some cute paper gift tags.
Printing on Paper Bags Did you know that you could print on paper bags with your home inkjet printer? Learn how to make some cute custom bags, that are perfect for Holiday party favors and more.
Transferring onto Glass
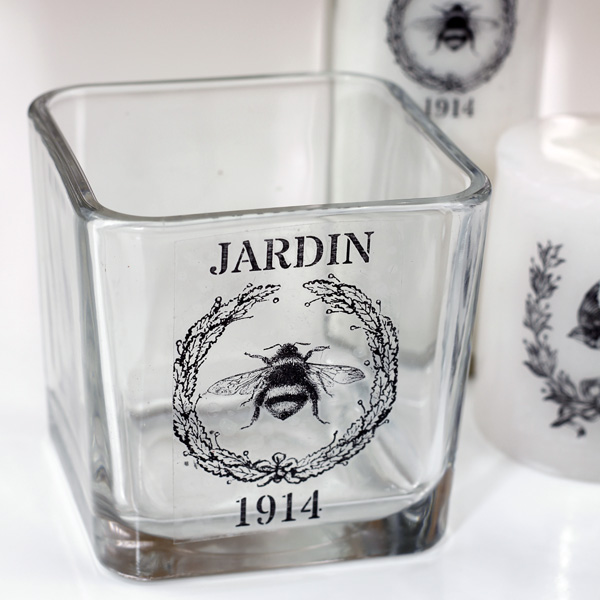
DIY Packing Tape Transfers: This is a superfast and fun Technique! This works great with Glass, and although, we haven’t tried it, some of readers have mentioned that it’s good for shiny Ceramic pieces too! The effect is similar to a decal, so best used on Decorative pieces only, like Votives and Vases etc.
Clear Contact Method: Learn how to use Clear Contact Paper to transfer Color Images onto Glass!Similar to the Packing Tape method, only you can do larger pieces since the Contact Paper is so much bigger! Easy and fun!
Transferring onto Wood
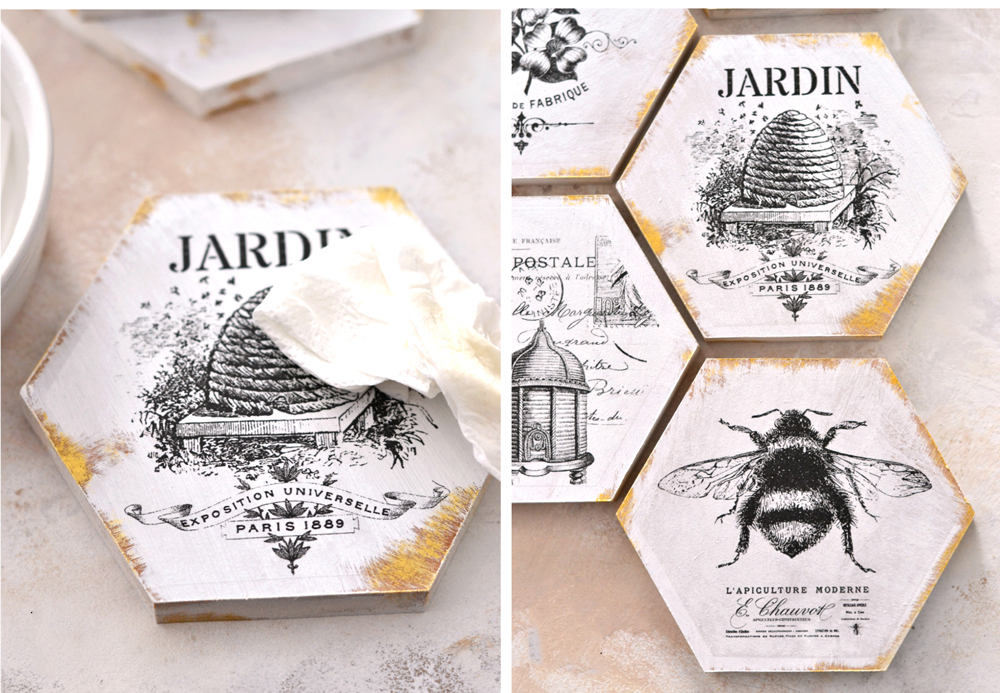
Using Water Slide Decals Make some adorable Bee themed wood Coasters with Diana, as she walks you through the steps of using water slide decals. Such a cute idea! Use the Free printable provided or just follow the instructions to transfer photos onto wood that you took yourself, to make your own unique creations. You can purchase decals for inkjet image transfers or laserjet ones, just make sure that you buy the appropriate product for your home printer.
The Wax Paper Method: I have yet to try this method, but it looks amazing! The only supplies you need are your Printer and a piece of Wax Paper and the super simple Tutorial from Angela at Unexpected Elegance! I’ve seen this one used on Painted and Natural Wood and Painted Metal.
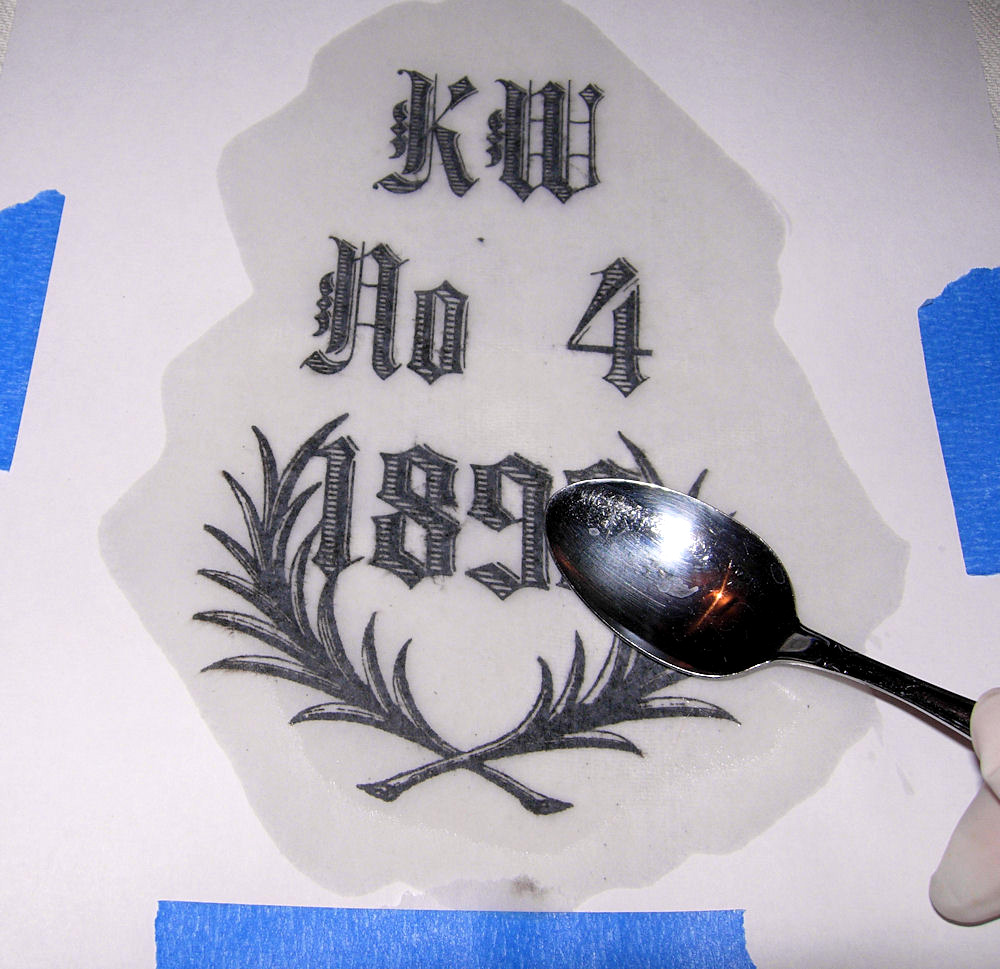
The Projector Method: Marian from Miss Mustard Seed shares her Sign Making secrets, using an Overhead Projector to transfer images onto wood! This method can be used for Painted or Natural Wood.
Transfers onto Clay
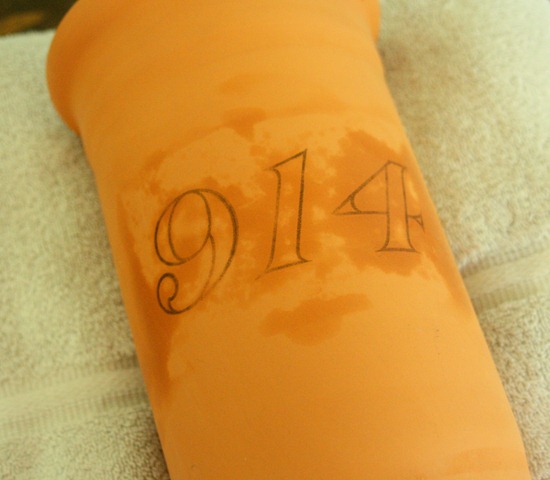
Transfer onto Clay Pots Gina from The Shabby Creek Cottage came up with this simple and innovative way to transfer an image onto a Clay Flower pot.
Easy Clay Image Transfer: You’ll find this one over on my pal Johnnie’s blog! She’ll walk you through the steps of Image and Photo Transfers onto Polymer Clay so that you can make the cutest Vintage Image Jewelry ever!
Multi Surface Image Transfer Methods
The Omni Gel Method: In this Tutorial I explain how to use a liquid substance called Omni Gel, to transfer images onto Tumbled Marble Tiles for Coasters. I’ve also used this on Painted Wood.
Mod Podge Photo Transfer Medium: In this Tutorial I test out a new product by Mod Podge made specifically for image or Photo Transfers. There’s also a Printable and a fun DIY Project for making your own customized Furniture Knobs! This Medium works great for Small Wood Projects or Light or Dark Fabric Projects.
Image Transfer Product Comparison: In this post Rebecca compares 3 popular products used for this technique. Lots of great info here and you’ll be able to see all of the results! The comparison includes Matte Medium, Mod Podge Photo Transfer Medium and a product by Deco Art.
How to Make Gel Medium Transfer Skins Rebecca teaches us how to make Skins from Gel Medium that can be applied to a variety of surfaces.
Unique Methods
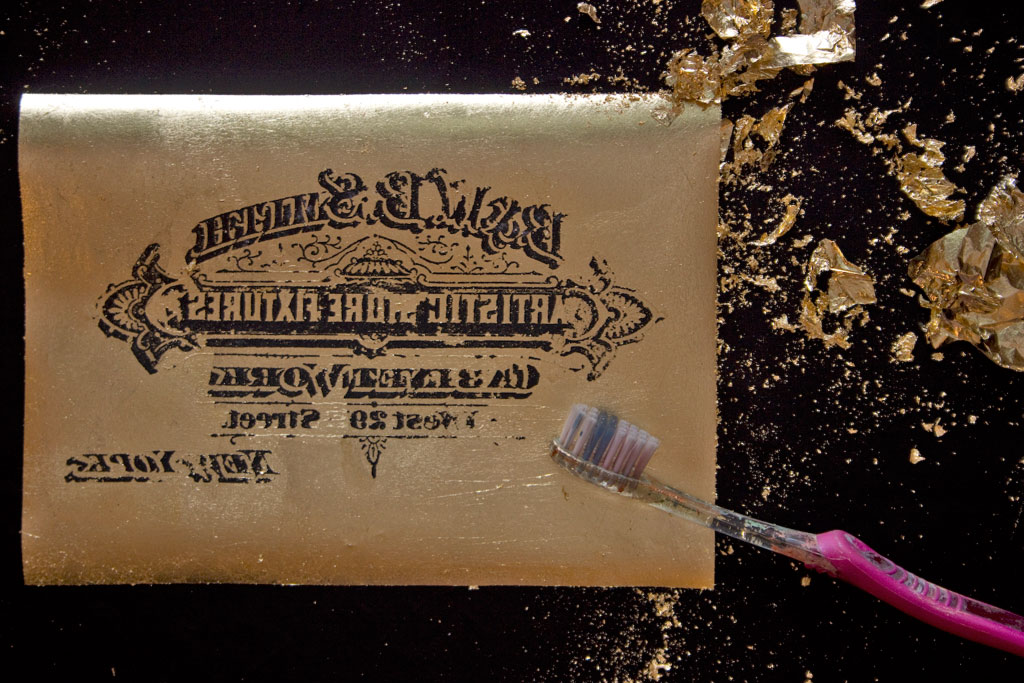
Gold Leaf Technique Combine Transfers with Gold Leaf for stunning results! Heather will walk you through this process to create a gorgeous Antique Typography Sign.
More Info on Transfers
How to Mirror Image: Learn how to easily Mirror Images in Paint! You probably already have this free program installed on your PC.
Top Tip for Transfers: This is a great post to read before you get started! This tip will save you some headaches and frustration!
Favorite Transfer Products: These are my favorite all time Transfer Products rounded up into one place.
Well hopefully that will clear things up and you will find lots of inspiration for your projects. Feel free to grab my Transfer Printablesto use in your DIY projects. Have fun working with Image Transfers and Photo Transfers!
Be sure and check out our Premium Membership site HERE, for loads of PNG images, with transparent backgrounds, these types of images are perfect for Transfer Projects!
And if you really want to dive in and do professional looking transfers, check out our amazing Online Image Transfer Workshop with Heather Tracy HERE!
Myszka says
Thanks, you are great!!!!
Isabella says
How stunning!
Rebecca says
This is fantastic all in one place, instead of the dozens of pins I have in my boards on pinterest Since you did say share I am going to pin this on pinterest.
Karen- The Graphics Fairy says
I’m glad you both liked this!
Rebecca, Yes, feel free to Pin! Thank you so much!!
The Prudent Homemaker says
Oooh, I’m so excited! Thanks!
BTW, my new site design is going live in a few minutes, with a few more of your images on it 🙂
gail says
fantastic post Karen! To have this all in one place is great!
I pinned it. 🙂 and I put it on fb, that’s how excited I am about this post!
I have tried citrasolv and failed miserably–a friend is going to mail me a copy that she KNOWS is doable. I think my guy at staples didn’t know what he was doing.
Thanks for including my post with these other great tips!
gail
Karen- The Graphics Fairy says
Prudent Homemaker, How fun, I will have to check it out!!
Gail, Yes, finding the right kind of copy is the only difficult part with that method. The Staples copies won’t work, in fact you don’t want to go to any of the large chains, so forget Kinkos, Office Max etc. You need to find an older machine, so try your local Library, Post Office, or an Independently owned Printer place. I get mine made at my local Grocery store.
The Polka Dot Closet says
Thanks for the shout out!! This is fabulous!! I think you covered it all,
Carol
WhyCuzICan says
Neat Post!
Hiya Gail (friendly wave)
Great post and thanks Miss Karen!
Smiles, Suzanne at WhyCuzICan
WhyCuzICan says
Oh, Karen, someone else did it using a wood burning tool that heats up the paper and transfers the ink. If I can find that post someplace, can I post it here too?
Smiles, Suzanne at WhyCuzICan
Clear Crick Cottage says
I have saved this page to my “favorites.”
-THANK YOU KAREN!
love,
Sherilyn
Danielle says
Thank you! Thank you! Thank you! This is wonderful to have all the methods on one list. I’m going to pin it!
Larain says
Great all my questions answered in one go, thanks for sharing
Regina at Fauxology says
This is incredible — I’m sharing this all over the place. Thank you for putting this together!
Claudia says
Thank you sooooo much! This is just perfect! Greetings from Germany
Stacey says
Thank you so much…I have been wanting to try several of these but haven’t gotten my nerve up. This will make it easier to study & decide which one might work best for me. I LOVE your blog & all of the great things you post!!!
Jennifer says
You are wonderful! Thank you so much!
Anonymous says
Thank you, thank you, thank you!
Not only do you provide the world with the most beautiful images, but now you also generously give your time to help others in finding tutorials for transferring your gorgeous images!
You have my great appreciation and my thanks!
DownTheLaneWithDaisy says
Your information is just fabulous. Thank you, Thank you, Thank you.
[email protected] says
Thanks for mentioning my transfer method, Karen. I’ll have to check out some of the others.
Kathy @ Creative Home Expressions says
I’ve seen your other posts, Karen, but I’m glad you put it all together in one. This will not be saved in my Favorites so I can access it easily for the tutorials. Thank you! : )
Edzellinni says
Wow, what a wonderful listing! Thank you 🙂
Misty Meadows says
Thanks Karen!!
I have spent many hours perusing the net looking for this information. But I just ended up frustrated, and there sits my projects!!
Karen- The Graphics Fairy says
Wow, thanks so much for all the nice comments everyone! I’m so glad that you guys are finding this useful!
Rosemary, You are so welcome. Your project is so lovely!!
Suzanne, Yes, please post it here in the comments! I have one of those tools, but haven’t had much success with it. I could use a Tut for that!
Regina, Thanks for sharing this! I really appreciate it!
La Miette bricole says
Merci Karen pour ce superbe travail, bises de France, Miette
Jami @ An Oregon Cottage says
Love it! Now I can get rid of all my bookmarks and just use your post- thank you!
Karen says
Thanks so much Karen – you’re a doll!! Just ordered my CitraSolv (not easy to find over here in the UK and very expensive when you do!!!) but looking forward to trying out all these great methods. Thanks also for the wonderful graphics you share.
Hugs.
Karen x
debra says
Thank you, thank you, thank you. Debra
Anonymous says
What is the best way to transfer an image to a mirror? Thanks!
Karen- The Graphics Fairy says
Anonymous, For mirror you would want to use the same method as for glass. So try #9.
Kim @ One Peoject Closer says
Really nice collection of articles. I haven’t done any art transfers yet, but the two examples you gave are fabulous. Now we need to find somewhere to work the concept into our house!
First time I’ve visited your site. Awesome!
Kim
Shastar says
Wow, I’m so loving your site and have just used one of your French printables to add to a little milking stool I found at a Recycle Shop on the weekend. My first time using Mod Podge (wish I’d found the tutorial you recommended first, but will use next time). Am also brand new at blogging, but wanted to show you my little piece that I used your art for. THANK YOU so much. I love it, have pinned to Pinterest and linked your page to my blog.
Barbara says
Thank You, Thank You, Thank You !!!!!!!!
What else can I say?
Anonymous says
Amazing and so informative – As Always!!! You started my creative career and I just love your site.
Thanks so much!
Sandie
Creative Living + Wabi Sabi Style says
Clever and Creative! I’v blogged about it here: http://inredningsdesigner.blogspot.com/2012/01/bloglove-graphics-fairy.html
Cheers from Sweden, Lisbeth
WhyCuzICan says
FOUND THE LINK I was thinking of, Karen!!! I haven’t tried it, but I’m sooo happy to have it in my files TO try one day!
http://alapinlife.blogspot.com/2011/07/woodworkers-transfer-tool-will-transfer.html
This is the one with the wood workers transfer tool (posted by A Lapin Life)
Smiles, Suzanne at WhyCuzICan
Karen- The Graphics Fairy says
Thanks Suzanne!
Julie Blanner says
I often print onto inkjet printable book cloth http://www.julieblanner.com/2011/02/framed-prints.html?m=1 Thanks for the ideas! I can’t wait to try them all!
Karen- The Graphics Fairy says
Thank you Julie, I’ve never heard of Book Cloth, I will have to check it out!
Emanuela says
Thank You so much Karen!!! Very useful!
I couldn’t find the “gesso method” tutorial at the link you gave…is it me or the link is not the correct one?
Emanuela
Karen- The Graphics Fairy says
Emanuela, It seems to be working fine for me. Here’s the url so that you can cut and paste it http://whimsyartstudio.blogspot.com/2010/10/canvas-of-beauty.html I hope that helps!
Dru says
Thanks Karen – having these instructions all in one place is wonderful!
Donna says
Thanks Karen,
This is fabulous to find all methods in one place. I’m book marking this page right now!
Blessings,
Donna
colleen says
karen you are the bestest thx 😉
Hooked on Decorating says
Thanks so much for this post! It is nice to have all of the transfer methods in one place. I just posted my how-to-guide on transferring photos to canvas if you want to come and take a look. It is the best method I have found so far for getting crisp, clear images and it also works really well on other mediums including furniture.
Hooked on Decorating
Birds and Blossoms says
Awesome ideas! I tried number 5 (iron transfer). I bought the exact paper and the image transferred beautifully to my fabric…I waited over night, and then washed the fabric, and I found that the ink actually ran and caused bluish pink staining all around the image. Did anyone else have this problem??? I used a tight weave fabric and I ironed it for long enough. I was surprised because it said on the packaging for the paper that the image would be color fast. Thanks for any tips 🙂
Mandi
Karen- The Graphics Fairy says
Hi Mandi, According to the instructions, you need to make sure everything transfers completely or it won’t wash well. The instructions say that “there should be no polymer residue left on the sheet”. So next time maybe try ironing just a little longer first.
Oiseau deNim says
Thanks for sharing with us the wonderful methods!!
✿ⒹⒺⒺ✿@ A Lapin Life says
Hi Karen,
I posted a video on how to use the woodworker’s transfer tool on my blog. The tool works on wood, leather and fabric.
http://alapinlife.blogspot.com/2011/07/woodworkers-transfer-tool-will-transfer.html
Dee
martinealison says
J’ai lu avec beaucoup d’intérêt votre publication… Gros bisous
Little Bit says
This is so wonderful of you to organize it for us…I’ve been wondering and asking around for info about transferring! thanks, Little Bit
Anonymous says
I have just dicovered your blog (I’m following now in Google Reader)! IT’s amazing!! Thanks for all the useful information and graphics!!!
Blumyrose
Trish - PolyClayPlay.com says
Don’t forget transferring to Polymer Clay… There is a video there of this method.
Thanks for sharing all the ways to do transfers! Super great list!!
Colleen says
Thank you soooo much!!! Very, very, very helpful! Colleen
Elissa says
Thank you so much for this!! 😀
Anonymous says
I am trying to find the best method to put a title onto the mat board around a photo. I have hand printed, stenciled, and dry rubbed none of which are what I was looking for. I want it to look like I had the title printed on the board.
any ideas?
Chris
Anonymous says
You can use a warm iron to “fuse” the waxy side of freezer paper to fabric, cut to size and zip the whole thing through the printer. Let the ink dry, and peel off the freezer paper. Presto! You’ve got a crisp image on fabric. The freezer paper pulls right off without distorting the fabric. (I usually iron the image to set the ink) This freezer paper works great for “fussy cutting” a fabric image for quilting or applique, too.
Cyndi ✪ Blue Star says
I tried the Mod Podge method and had some trouble. I was just wondering if anyone else encountered the same issue?
Kristin says
Wow thank you for this amazing information. Recently I started a blog because I get so inspired by stuff just like this. Last year we were foreclosed on and ended up purchasing a Cheap home lol and had to gut it down to the siding. All these great ideas I find will help me finish my home with personality. Thanks Graphics Fairy..Kristin
vania angelo says
isso é maravilhoso e você é incrível! obrigada, querida, por sua dedicação e carinho aos seus fãs!!!!! beijos
Anonymous says
Thank you SO much for investing the time and effort it took to bring this to us…you’re wonderful!!!
Johanna says
Hi Karen,
I am coming over [email protected] Delightsome Home. Thank you for those tutorials. Ther are so many inspirations for me.
Best greetings, Johanna
Aiping Wang Fulepp says
Very informative. Thank you!
I’m going to forward this to my email list.
Dewdrop Gardens says
Thank you so much for this post!! Fabulous and I can’t wait to check out all the links. And…I can’t wait to start using some of them!
Thanks!!!
Debbie 🙂
Anonymous says
Great post, many thanks.
Elisabet
gabricci says
Your blog is amazing and so are you! And generous! Thanks for providing us with loads of fun!
Anonymous says
I’m sorry but I have to agree with Anonymous. I have tried several of your transfer techniques and am not having any success at all. I love all your graphics but can’t find a good method to transfer them to wood.
Karen Watson says
Some of the methods may take a little practice. The best thing to do is to try them out on some scrap pieces of wood, until you get the hang of it. If you check out my Brag Monday posts, you can see lots of projects done by my readers, successfully using these techniques. I hope that helps!
Anonymous says
Does anyone have a suggestion as to what good color printer to purchase? I am looking for a good price for both the printer AND ink! We have 2 printers in the house and neither one prints color copies true. Flesh colors always seem to be a green tinge, and never as bright as I want them, despite fooling w/the settings.
Anonymous says
yoU are awSome!!! thank yoU so much for posting all these. i can’t wait to get started.
nanasewn says
#12, part 1 link is not working.
emmanuelle says
Votre blog est magnifique . Merci de partager votre savoir faire et vos belles images.
cathy says
How do I transfer large images to fabric? Like maybe a quilt. Maybe a poster.. Is there a way? Something larger than a regular printer size. All of the places I check do not have ink jet printers…
Inspire Me Heather says
Thank you for putting this all together Karen, what a great resource! I’ve got this linked to my image transferring tutorials roundup post too today!
CC's near the lake says
So many projects I’ve wanted to create but had no idea where to start! Thank you for all of the info!
g.c. pickering says
Thank you! I just found a yard sale table and remembered the great post you did recently with the grain sack transfer and blue stripes. Now to pick a graphic…
Thanks!
suruha says
Hi, Karen! This is a really good post! You have covered so many good techniques! So, in addition to supplying the world with such wonderful graphics, you are a genius when it comes to their applications! LOL I so admire what you do!
I know this post is last year, but, I wanted to share another technique, one for digital stamps/transfers. Over at Captivated Visions, Rachel has done a tutorial showing how to use most any image, and turn it into a digital transfer. Her intent in the post is to show how to use one’s digi-stash in other ways, like art-journaling. Actually, Rachel’s post is part of a series called “Artful DigiScrapping”. The results are just amazing!
I see posts all over the place where folks have used your images in new and creative ways, so, I thought of you and Rachel’s post when I saw this one. She has been featured in several places with this tutorial/technique. (No, I am not on her payroll. LOL) She’s a doll, though!
It’s a real simple technique. Basically, you clip an image to a brush stroke, or stamped brush. But, I will let Rachel explain it to you! LOL
Thank you for all that you do and how sweet you are doing it!
Su
MiMI says
Help!! Love LOVE LOVE your graphics. I have picked one to transfer to wood using Mod Podge (for Images). Here’s my question…how do I make the background transparent. I did a test on a sample wood and I see my white background behind the print graphic.
Karen Watson says
Hi Mimi,
You’ll need to cut around the design very closely to get rid of the white with that method. Or you can paint your wood white to match. I hope that helps!
kim pereda says
Hi Karen, Love your blog. Do you have an ideas for transferring images to plastic? I am trying to transfer an image to the plastic part of a pacifier. Thanks Kim. by the way I have a ink jet printer. Thanks again.
Karen Watson says
Hi Kim,
I’m not sure about plastic. I would definitely recommend not transferring onto anything that would go into a babies mouth, it’s just not worth the risk. Perhaps you could make a cute bib or onesie, using an iron on instead!
Hypekn says
The link to #5 The Iron On Method is broken 🙁
Karen Watson says
Thanks for letting me know! I just fixed it!!
Dianne Gibson says
With the risk of sounding stupid, I have a question. I printed out the mirror image with the taps paper but when I ironed it down, it reads backwards. What am I doing wrong?
Anna says
Thanks, You are the best!!!!
jackie says
The book looks so cute
Izabela says
Hi, Karen. I can’t speak English ver well, but i’m hope You Understand me. I’m writing from Poland. I love Your blog and everything You do. You inspiring me:) Thanks. I find Your Transfer Methods. May be You will be interesting my method of transfer (haw does CarPlan work).
I invite You to my blog,
Greeting to You
Iszart from deco-szuflada.blogspot.com
Genevieve says
Thank you so much. I would love to learn to do this and I need all the help I can get. I really appreciate it.
Hannah says
Once I click on the image I want, how do I mirror image it (my printer won’t do this) and shrink the size to fit what I am working on.
Siena says
wow!!!!! The “How to Transfer Typography onto Furniture” has really helped me a lot making a birthday present for my grandad. thank god you were here to help. you have saved my day !
Karoline says
Dear Karen,
only a few days ago I found your site by chance. Such a lot of amazing things you have collected! It makes me want to start at once with lots and lots of projects!
I´d like to add another form of transferring prints on fabric. Did you ever hear of lavender oil as transfer medium?
You print your pattern with a laser printer, fix the paper face down on fabric with tape and soak it with lavender oil (you find it in drugstores for aromatherapy or things like that) then you rub the print with the back of a spoon or any other round, hard tool. It takes some pressure and about 15-20 min to get the colour on to the fabric. You can look once and again, whether it is sufficiently transferred. After removing the paper let it dry a day, then you can fix the colour by ironing as hot as the fabric allowes. So you can even wash it.
best wishes from Bavaria
Karoline
Karen Watson says
Thank you so much Karoline! I’ve never heard of that method before! I think it would be lovely to work with too, since the fragrance would be so nice!
Heather says
Hi Karoline – I love using essential oils for laser print transfers! I carry an item with me every day that I decorated this way and it still has a lovely fragrance, even after over a year…I’ve used lavender essential oil and patchouli oil both with success. I used to use the Blending Pen method, but I’ve converted – less toxic, less expensive, more fun. Thanks for mentioning using it on fabric – I haven’t tried that yet, but will have to, now!
Karen Watson says
Great tips Heather! Thanks!
Niki says
Hi Heather,
I’m wondering how you use Lavender Oil to transfer an image? Would you be able to write back and tell me briefly step by step?
Thanks so much!
Niki
Stacy says
I love your tutorials on transfer methods for furniture. I am curious why graphite transfer paper can’t be used? or even old fashioned carbon paper to “copy” an image onto painted furniture? Thanks
Maggi says
Hi, Karen!
I just found your website and it’s amazing. I just have one question, do you need a laser printer or a regular inkjet printer for transfering?. I’ve tried the ModPodge method and for that you need a laser printer. And last night ,i tried your method on freezer paper and the ink looks quite fresh ,almost runny and didn’t transfer as well as yours.
Thanks
Maggi
Karen Watson says
Hi Maggi, It just depends on the transfer method. Each method should have full instructions and should tell you which kind of printer to use. I hope that helps!
Sue says
Maggi, I tried the Mod Podge method yesterday and used a laser printer – it worked just fine – I’m ectatic about it!!!
Karen Watson says
Yay! That’s great Sue!!
Sally says
Hi Karen,I know this isn’t technically on the subject, but I downloaded some bird graphics. Block Poster is fantastic. I found some fonts, downloaded to write Faith, Hope, Love, but I can’t figure out how to use them. Do I need to download something else before I can write with the fonts?
You do a great job!
Thank you,
Sally
Karen Watson says
Hi Sally, Most all of the font sites have a help section, go ahead and consult that, they’ll be able to walk you through it. The process can vary depending on what type of set up you have on your computer. 🙂
Terry says
Hi Karen, I tried to use Block Poster last night and it’s a great tool but it only accepts jpg files and your files print in pdf format. Has anyone else had this problem?
Karen Watson says
Hi Terry, Instead of saving the PDF file, just click on the picture of the transfer in the post. You can save that picture and use it instead, as it’s in JPG format. I hope that helps!
Trudy Musgrove says
Karen,Came across your web site yesterday.Amazing I Iike the idea how you personally connect with each person.Rarely do see that.Some of us are just learning Your willingness to help is so appreciated.I’m sure i speak for all who are just learning.’THANK YOU’. I’m sure i will be a regular.
Karen Watson says
Thank you Trudy. I wish I could connect with every person, but unfortunately it’s really tough to find the time anymore! I hope you will enjoy yourself here and visit often though!
sidney says
Hi Karen,
How can I transfer a large graphic onto fabric (say 24’x15′ onto a cotton)? Would I need to have a printer (kinko) print it out for me and then citasolv it with a paintbrush, or can i have a printer’s print it right onto the fabric? I realize this is not quite DIY – but would be if I could laser large prints!!
Thanks
Karen Watson says
Hi Sidney, click on Method number 1, we have all that info right on the post. Have fun transferring!
Marsha Greene says
I decoupaged a color print onto a Americana Decor Chalk painted desk top. The color image transferred really nice but the white of the paper background adhered to much to the desk and is also leaving a halo affect around the color image. Does the chalk paint have to be sealed first? Is there any way to remove the white background completely. It just won’t rub off no matter how wet I get it?
RedHotGirlinTexas says
I realize this is too late to be of much help to the original poster, but there are a few ways to avoid the ‘halo’ sometimes left by the background; 1 – some printers have an option that will allow you to choose to ‘turn off’ background graphics (usually in advanced printer settings), 2 – use an exacto knife to cut out only the desired portion of whatever you printed for use (not a good method to use with the wax paper method – takes too long and ink dries/soaks into paper and runs before transferring), 3 – use a photo editing software program or app to ‘erase’ unwanted parts of image, and 4 – (my personal favorite) after base coat is painted/stained and piece is ready to receive transfer, print a plain copy on regular paper to figure out your exact placement, then apply very thin layer of vaseline to anywhere that you do not want to transfer ink to and after transferring image and letting ink dry – vaseline wipes right off and you can continue as normal
graphicsfairy says
Wow, thanks so much Jen! Great suggestions, thanks for sharing 🙂
Serena says
I have an easy way to transfer things to any hard surface. A friend of mine showed me this years ago and I was able to paint Disney babies on the side of my son’s crib. These days I use it to make customized gift bags. Find an image you like and print it, doesn’t matter what kind of printer. or if you’re like me and too cheap to buy ink (seriously I can just buy another printer cheaper than the ink for mine!) hold a piece of paper up to the computer screen and trace it (if it’s simple enough!) After you have your image, turn the paper over to the wrong side and mark where the top, bottom and sides are of your image. Keeping the paper on the wrong side, color in with a pencil (I just use a standard no. 2 pencil) and color in where your tick marks are. You have to color the entire back of the image with pencil, using a little pressure. Then turn the image around and retrace over the image onto your surface. Take the paper away and now you have your image on whatever it is (in my case, those paper brown gift bags!). You can then paint the image. After the paint dries, go over the outline again with a fine tip sharpie, and fill in details like eyes, mouth, etc.
J K Weigle says
I would love to Pin these directions. Can you tell me how?
Karen Watson says
Sure! Just hover your mouse over the picture, until you see the word “Pin” pop up. Click on it, and save it to one of your boards. Easy peazy!
Siobhan says
Hmm. Still missing method of Annie Sloan chalk paint transfer to chalk painted surface using decoupage, I know it can be done but don’t have copy of her book. Decided after I painted (before wax) to do transfer but no one seems to have relevant details. Do I remove some of the existing ascp? Does it have to be smooth? Do I put the AS decoupage OVER the printed image, or just on the furniture side?. Only utube I found was saying to use inkjet copy &.I know THAT is wrong. I don’t want to wreck it. Sigh.
Karen Watson says
Siobhan, Before doing a big project, I always recommend testing out your transfer method on a scrap piece of wood first. Practice makes perfect and since we are all using various different types of paint, and different printers/copies and different waxes, it’s really the best way. Grab a couple of scrap pieces of wood and do some practice boards and take notes on what you did and which products you used, then you will have your own perfect recipe and the confidence to work on your larger pieces!
Dre Madrid says
This came in so helpful for my wedding DIYs. Thanks a lot! keep up the good work 🙂
Jo Anne says
Very excited about image transfers on to fabric. Can you recommend a product that will work with a laser printer?
Karen Watson says
Hi Jo Anne, I don’t own a laser printer, so I’ve never tried it. I know that there are products that are made just for laser printers. Lasertran is the name of one I believe.
Anita riley says
Wow I can’t wait to get started after seeing you designs. Thanks for putting it all together.
Karen Watson says
You’re welcome Anita!
Jacqueline Woodward says
This is awesome! Love that you gathered all in one place! Thank you!?
Karen Watson says
You’re welcome Jacqueline!
Pat Wright says
I have only recently found your site and it is great. I have a question though. I haven’t done anything other than painting furniture yet, but does the image transfer work on what we in the UK call emulsion paint. Please Thank you, Pat
Karen Watson says
Hi Pat, I’m afraid I don’t know, but this post should help you to figure it all out https://thegraphicsfairy.com/top-tip-for-working-with-transfers/ We use Annie Sloan paint here in the states quite often, since she is based in the UK, you might want to give that a try. I hope you will give transfers a try as well!
jools Thatcher says
Woo Hoo! I’ve been trying to transfer my rather complex original design onto a dark blue fabric for embroidery. I didn’t want to trace it because I wanted to get the line thicknesses accurate. I tried sew and tear but the fabric was too stretchy. I then tried the print and iron method but both the original and the copy on the fabric was much too faint. Finally I read through your post and all of the comments and I tried the wax paper/freezer paper idea (although I used transparency film – because I have lots of it-that was agreat suggestion) and it worked! I am so happy. Thanks to you and your commenters I can finally finish this project that has languished for months.
graphicsfairy says
Yea!!! That is wonderful Jools, so happy for you!
Nancy says
Always see lots of great ideas! Love it!
Sarah Eaton says
I have found that using the overhead projector transparency sheets (not the inkjet ones) work really well. The ink stays wet and allows a great transfer without having to cut paper to size!
graphicsfairy says
Thanks Sarah, great to know!!
Kathleen Riggs says
I did read the above comments however I would like to use these as wallpaper to attach
to the wall. What method would you use or do these come as wallpaper? I’m most interested
in the Vintage Robin, Bird Nest Frame and Bird-Frame-Vintage.
Any help you can suggest would be most appreciated. Thank you.
Kathleen
graphicsfairy says
Hi Kathleen, check out transfer method 1, the link to the video on step 5 shows you how to do that on walls. Good luck 🙂
Bhavana says
Hi. Could you please guide me a bit?
I have a few pieces of wooden ply-board and want to transfer using mod podge. Can it be transferred onto ply-board. If yes, then do i need to smoothen the board with sandpaper or a slightly rough texture will do??
My boyfriend’s birthday is in a week’s tome and i really wanna make a photo transfer in wood for him.. Please help.
Love,
Bhavana.
graphicsfairy says
Hi Bhavana,
You should be fine with the wooden texture provided it isn’t splintery which might make it harder for the Mod Podge to adhere. I always recommend that it’s a good idea to try any project out on a scrap piece of wood first just to get the technique down, practice makes perfect 🙂 Good luck with your project!
Melissa Gardiner says
Do you know how I can make colorable images with raised lines so kids can stay inside the lines EASIER? Thanks!
graphicsfairy says
Now that would be very cool Melissa! I do not know of a way to do that unfortunately. Good luck though 🙂
Diane Lyman says
Instead of using a credit card is it possible to use a warm, steam iron for rubbing off the transfer?
graphicsfairy says
I’m not sure Diane, let me know if you try it 🙂
Mary Molnar says
Could this method be used on a dining room table top that has been stained
graphicsfairy says
Hi Mary,
Which method are you referring to? Look forward to hearing back from you:)
Ulrika BJORK says
Would like to get free images, thank you! Maybe subscribe later but I just am looking for images for my own pieces of furnisure. Thank you.
Ulrika
graphicsfairy says
Wonderful! That is exactly what we offer at The Graphics Fairy! All of the images on the blog at thegraphicsfairy.com are free of charge for you to create whatever you wish 🙂 Enjoy!
Brittany Quinn says
Wow best list ever on transfer methods I will refer back here when I’m doing crafts. This list is great I will make sure to refer others here.
graphicsfairy says
Thanks so much Brittany! I’m so happy you like the transfer methods and hope they help you create great things!
Laurie says
Thanks so much for keeping me updated on transfers. I discovered IOD’s from your posts
graphicsfairy says
Thanks Laurie, I’m so glad 🙂
Nicole says
Would someone be able to tell me how I can transfer/save my children’s drawings on the bottom of my dining room table? I want to save the “artwork” but not the table.
Hollyflower says
Very nice article for digital printing. 🙂
Este says
I got a mirror for a present with a family foto on. Can’t see how it’s made. Will you maybe be able to help me?
graphicsfairy says
Hi Este,
I am not sure I understand what you are asking. Could you be more specific? Thanks 🙂
Kathy says
Hi there! I LOVE your site and I’ve found it to be very helpful. However, if it’s possible, I’d like to see some kind of printable for “Home and Family.” Is this something that you might be able to add to the site? Thanks a bunch and have a blessed day!
graphicsfairy says
Thanks Kathy. We will add it to our reader recommendations list 🙂
Jeannette says
Hi there,
Just wondering, can you transfer an image from a poster? I was wondering if I bought a poster and wanted to transfer the image to several tiles, would it work or do I absolutely need to print out the image to be transferred?
graphicsfairy says
Hi Jeannette,
I have never tried that before so can’t really say. Perhaps give it a try onto a scrap tile to see if it works before trying on your finished project piece? Good luck 🙂
Henry Samayawardana says
Dear Karen,
I wanted to pint
Dear Karen,
I wanted to make transparent film art on a flat glass. Could you please let me know how to it.
Your help is most appreciated.
Thank you!
Henry
Dear Karen,
graphicsfairy says
Hi Henry,
This is a method that works well for glass, http://thepolkadotcloset.blogspot.com/2011/03/using-water-slide-decals.html
I hope that helps 🙂
steve says
I hope you don’t find this to odd a question. I am trying to find a method that would allow me to transfer color prints to thermoplastics (e.g KYDEX) materials. is this anything you could help shed some light on. thanks in advance for any help or advice you can give.
graphicsfairy says
Number 11, the Omni Gel method works well with transferring to plastic. Good luck 🙂
Barb says
another source for water slide decals? Message comes up No Longer Exists for the Robins website
graphicsfairy says
Barb Amazon will have them or check your local craft stores 🙂
Roland Bleitz says
I’m looking for a transfer method to apply lettering to brass or aluminum plates for an acid etch process.
The applied black images need to resist acids like Ferric Chloride, Hydrochloric Acid…
I had a company silkscreen apply some patterns on and that worked great but that company is now gone.
I’ve heard there is an iron on method…What can you recommend ??
Karen Watson says
Hi Roland, I’m so sorry but I’m not familiar with that process or what product you would need for that.
denise brady says
thank you so much. i love your images
graphicsfairy says
Thank you Denise, I am so glad 🙂
Larry Smith says
Do you sell transfers for furniture?
graphicsfairy says
Hi Larry, no we do not sell transfers, we offer the images and you can create transfers of your own 🙂