This post contains affiliate links
Citra Solv Transfer Method – Make Grain Sack Towels for your Kitchen
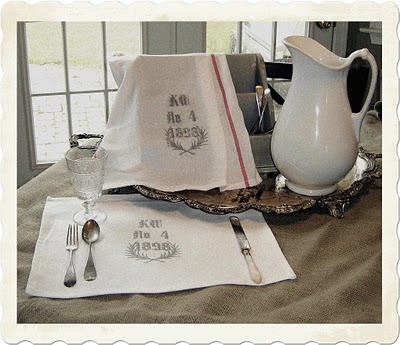
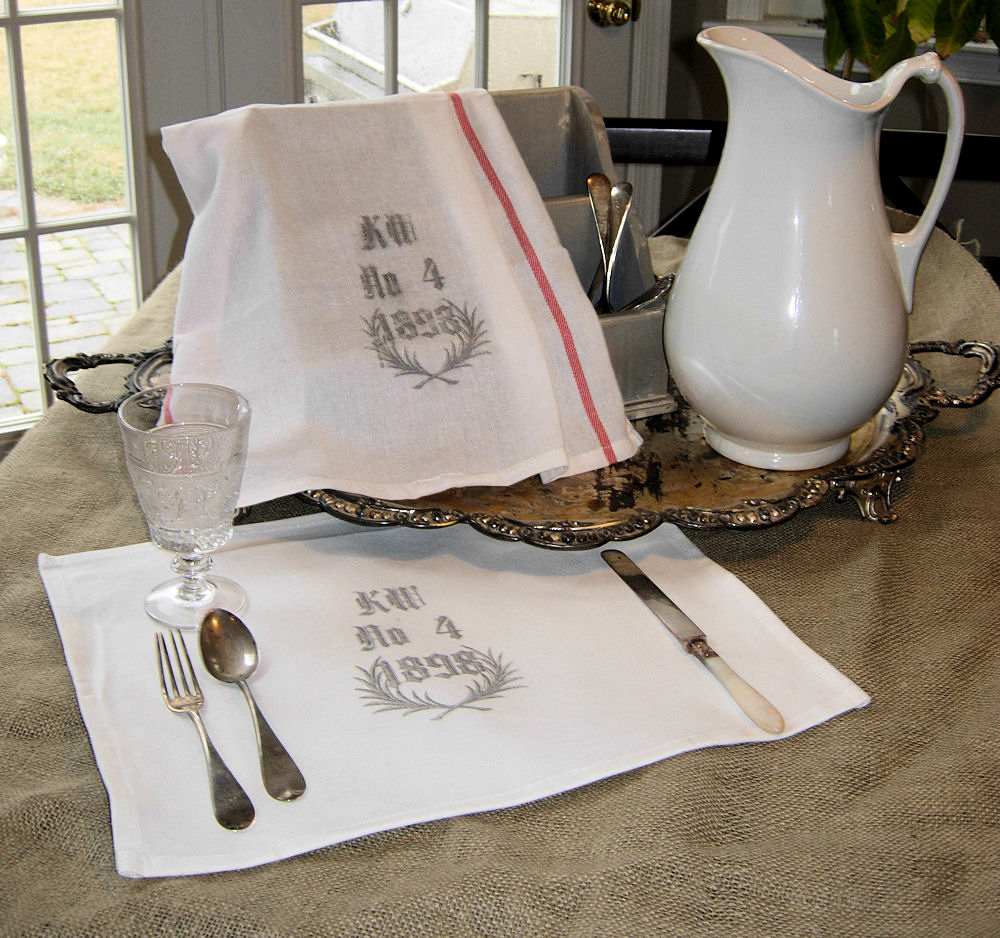
This weeks project was inspired by antique European grain sacks! These are so all the rage right now, but quite pricey for the real deal, I thought it would be fun to create a project that simulated the motif, and then use it on some kitchen towels. I also made some matching placemats as well. Both of these were made using a fun transfer technique using a cleaning product called Citra-solv!
This is the design motif that I used for the project. Yes, those are my initials, but really when you buy the antique ones you get somebody elses initials anyway, right?! Keep in mind that we will actually need to use a mirror image of the pattern for this project.
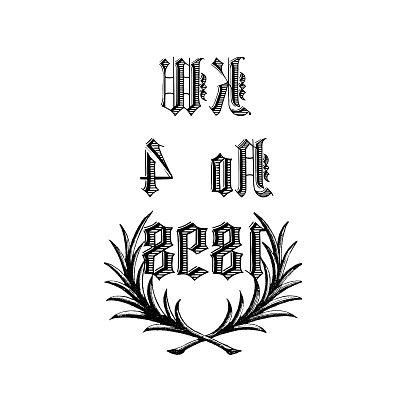
This is the version that you will need for this project. Click HERE for the PDF.
I’ve included a supply list and instructions below:
Supply List:
1) Solid Color Fabric Kitchen Towels – I like the ones at Ikea, because they have red stripes and also, because they are super cheap! (Just keep in mind that the tighter the weave on the fabric the better. Loose weave fabrics just don’t work well, as the pattern will bleed. Sorry ladies, but I doubt burlap would work for this!)
2)Citra-solv – This product comes in Lavender or Orange, I found mine at my local Health food store.
3) Photocopy of the download – Take you printed PDF to your local copy place and have a photocopy made. Not all black and white copiers work, it must be a toner based image. I made some copies at Staples and they did not work, but the ones that I copied at my local grocery store did. All of the big box copy places use laser, so don’t try any of them, you want to find an older machine, so try your local privately owned printer shop, library, bank etc. And test it first to make sure it works!
4)Paintbrush
5)Painters tape or pins
6)An Iron
7)Also- an old metal spoon, a glass jar, an old towel, some newspaper and some rubber gloves.
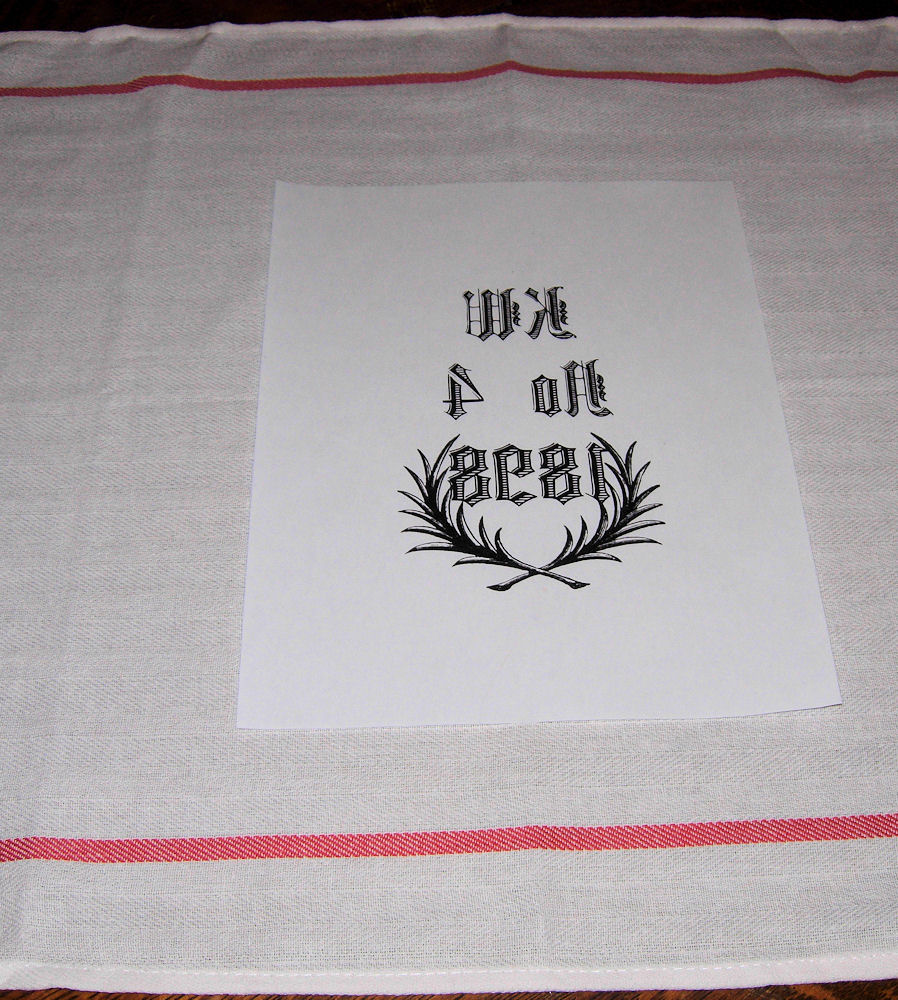
Step 1: Print the PDF, make sure you usethe mirror image version found HERE. Next take it to your local photocopy place, and have a toner based copy made.
Step 2: Position your copy face down on the towel and then tape or pin your image into place.
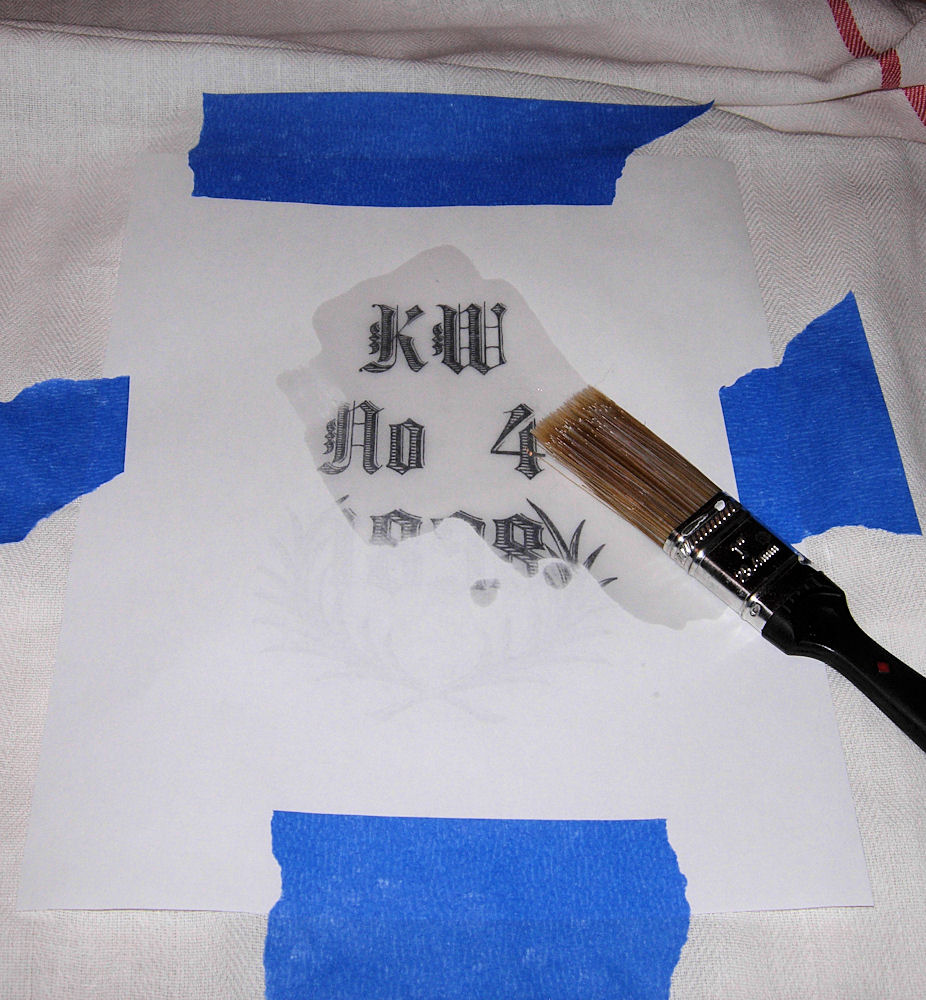
Step 3: Lay some newspaper onto your work surface (use a fairly thick stack of newspaper, you want to be able to have a little give under your fabric) and put your fabric on top of the newspaper. Put on your rubber gloves (The bottle says to protect your skin) and pour some Citra-solv into your glass jar. (Careful, it will come out quickly!) Then use your paintbrush to lightly apply the Citra-Solv. You want to get the paper wet, but don’t over soak it, or your print will bleed. (you may want to open a window, as there are fumes involved. They are pleasant, but strong. The bottle does not say they are harmful but, still… use caution!)
Step 4: Use the back of your spoon to burnish the design. Make sure you burnish the whole design, it doesn’t take super long, maybe 2-4 minutes to get a good burnish. Oh and
don’t peek!! if you peek you will not be able to get everything lined back up exactly, and you will have a big blur! Better to practice on some scrap fabric first to get the hang of it, then to peek! As soon as your done burnishing you can take the paper off and then wait for your fabric to dry.
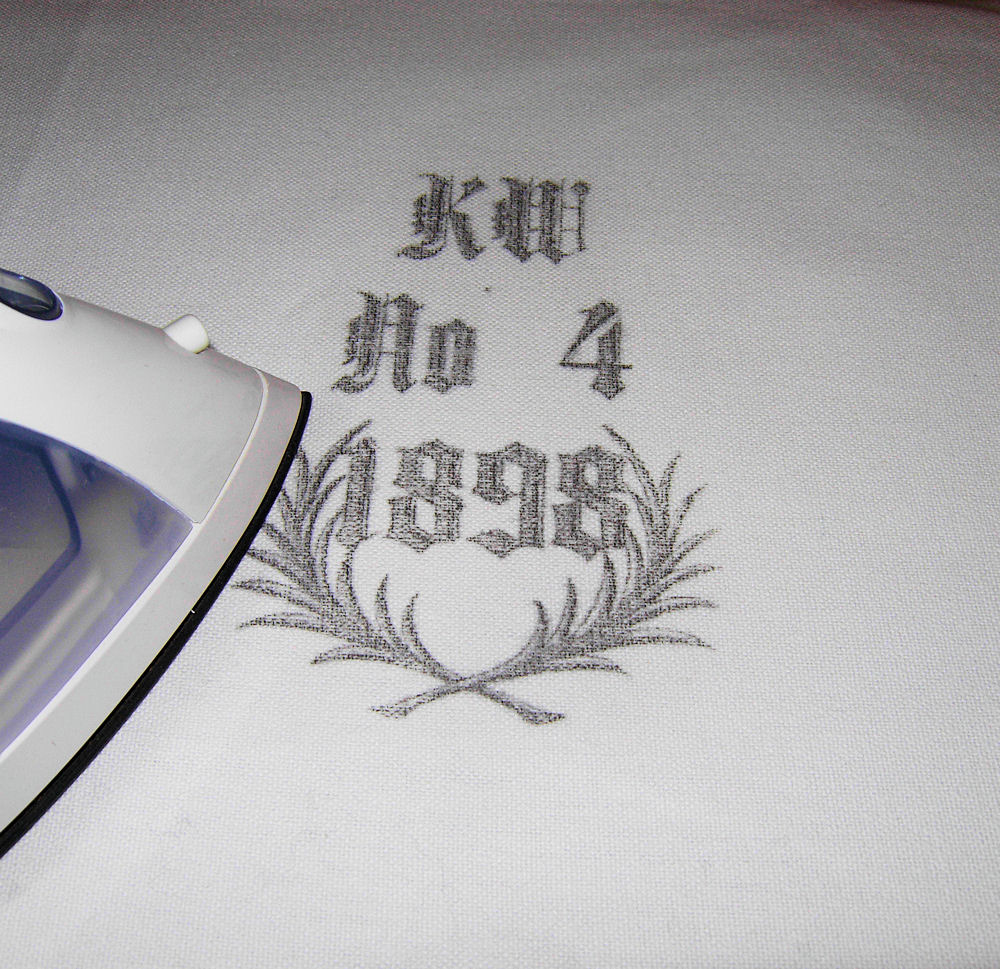
Step 5: After your image is dry, lay the old towel down on your ironing board (so you don’t get citra-solv smell on it) and then iron the image to release the trapped citra-solv.
That’s it! You can see the design on the towels is not perfect, that’s because the weave was a little to loose in this fabric. And well… also because there was a bit of a crease in the newspaper under my towel, when I was burnishing. Personally, I like the rustique look of it all and think it makes it look older.
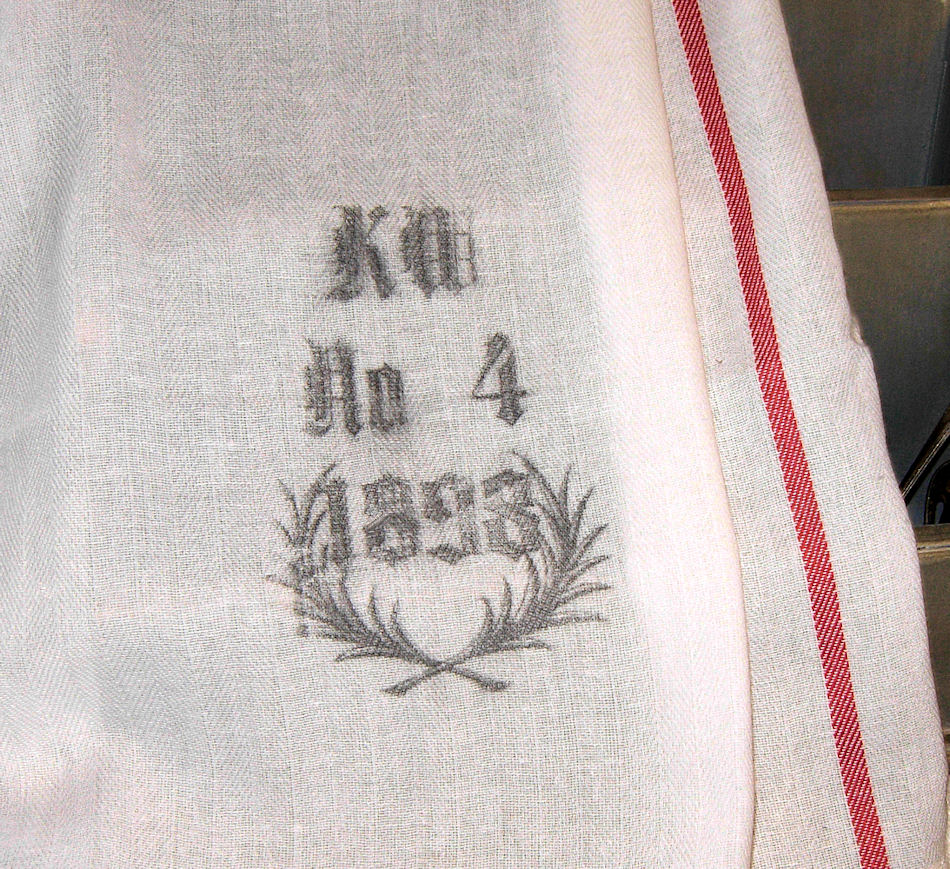
The placemat had a tighter weave and came out picture perfect. It might be fun to tea dye your towels too for even more of an old world look. From what I understand the image is permanent and will not wash out. It’s also super soft and no shiny sheen, very natural looking! I hope you enjoyed this fun transfer technique!
Be sure and check out my 12 Easy Transfer Methods post for more fun ways to transfer images onto nearly every surface imaginable!
Want more Printable options for your Towels? Check out my selection of Free European Inspired Printables, that are perfect for your DIY Projects!
XXXOOO
P.S. … many thanks to Jane from Outside of the Crayon Box for turning me on to this technique!
Welcome, I’m so glad you’re here! Browse around to find thousands of Stock Images that you can use in your projects or designs! I post new Vintage images every day, as well as projects and DIY’s too!
Victoria says
I’m going to see if I can find Citra-Solv tomorrow. One question: when do you take the paper off, do you let it dry, then remove before ironing?
Thanks!
NYHYKE says
Step 4 indicates when to take the paper off.
Beverly says
this is great. i want to try this out. thanks for sharing
Thrifty Miss Priss says
oh Karen I LOVE it! I would love to try this one day! Gotta find the right towels- but what a great idea!
Annmaree says
Neat idea!!!
Lori says
oh my gosh!!! that is so beautiful Karen…what a wonderful project…thanks for sharing!!!
Kathy @ Creative Home Expressions says
Very pretty, Karen, I love this look! This would probably make a nice pillow, too.
Karen- The Graphics Fairy says
Great, I’m so glad you guys liked this one!!
Victoria, good question! I just changed my instructions to include that part. You can take the paper off as soon as your done burnishing, and then let your fabric dry.
Karen
Sheri says
Oh my word! I love this! I used your graphics to make a “movie book”, you should check it out (and link up if you’d like!)
One Cheap B*tch says
I love these! I have to give this a go!
Jane says
Karen,
This project is fantastic! Of course my mission tomorrow will be to find some Citra-Solv!
Thanks for the great tutorial.
Jane
vignette design says
I can’t wait to try this. Thanks for the instructions. –Delores
Paula says
Karen I so enjoyed that! The ideas a running fast and furious!
thanks for all your work posting these directions for us!
paula:)
Tammy says
Great idea, Karen! Love the way those came out. Never heard of Citri Solv. Have to look for it.
Willoughby says
Gorgeous! I love it!!
Kammy says
Very cool tutorial, thanks !
Kammy
amber says
oh my goodness…where do you come up with these amazing projects!!! love it! thanks so much for sharing! 🙂
stefanie says
Gorgeous….you are truly just to talented…cant wait to try it!
Jane says
This is such a great use of the Citra-Solv transfer! Love it! I was just at Ikea and they had the perfect dish towels for this too. Rats! I had them in my hand but got all “do I really need this.”
For The Love of Old Books says
Karen,
I love what you did with this beautiful kitchen towels. They really came out so nice.
Karen
Anji Johnston says
Oh Karen – you are such an inspiration! I am going to try this on everything and I don’t care whose initials I use! Thanks
Cottage Way of Life says
Very cool project! I can’t wait to play around with this technique.
Cindy says
Hi Karen–How beautiful!!! You did an aweseom job! They are exquisite! Hugs, Cindy Adkins
PetraB says
This is just such a great project, thank you for sharing with us. I now just need to find Citra-Solv. Petra.
Angie @ The Country Chic Cottage says
Those are awesome!!! Thank you so much!
salige lavendel says
WOW, thank you for sharing this really good idea!!!! Probably I will not be able to buy Citra solv in Norway, but I will try to ask around ;(
Anonymous says
Awesome results! I’ve been playing around with Citra Solv for a while now and I must say I LOVE IT! Not only to create amazing transfer art but I couldn’t resist from trying it as a cleaner as well and it’s just fantastic. I love it… have I said that already?
That's So Shabby says
Hi Karen, this is a beautiful thing to do!! Is it possible to print out from your inkjet printer and use it??
Mrs. P. says
Oh, I just love this project!
Blessings!
Gail
randee says
those are beautiful. great tutorial, too!
jenjen says
I just wanted to say that I love your blog. Thanks for all of the wonderful graphics.
Love those kitchen towels. Beautiful!!!
XOXO
Jen
[email protected]:podge says
Wow, those towels looks great. I love the dish towels from Ikea, so cheap. I made cloth napkins out of mine. Maybe I will use your idea and monogram them or number them? Hmmmm…
Amy {The Red Chair Blog} says
How neat! Thank you!
Amie says
This a great technique I can’t wait to try it. Also I adore your graphics!
Kim -today's creative blog says
there you go again!
Cindy @ Chalk it Up! says
This looks like a really fun project! Beautiful results!
Nicole says
What a great project! Thank you for sharing!
Tiffany says
Oh, wow! I LOVE this! So natural and beautiful! Thanks!
Chellie says
GENIUS! I love this idea! Great job.
Lynette says
I so love your blog – I’m going to attempt to paint my version of a grain sack soon!
Thanks for sharing your project – it looks so beautiful!
Enchanted Rose Studio says
Those are so fabulous! Great tutorial too! Thanks, Karen!
Cheers,
Tina
Splendid Little Stars says
great project, Karen!
Gina @ The Shabby Chic Cottage says
Karen,
Could we be BFFs and just hang out and craft all day? You always have the bestest ideas!
Hugs,
Gina
Karen- The Graphics Fairy says
Hey Gina,
Sure, come on over! That’s funny you said that, because I was just thinking I need a craft buddy, so much more fun than crafting alone!
Karen
Delightful Dwelling says
I love them! The font and design is just gorgeous.
[email protected] says
What a neat idea! Thanks for sharing!
Teresa says
Oh my goodness….thanks so much love it. Thanks for sharing!
Happy Day
Kim @ Starshine Chic says
I so want to try this. Thanks for sharing. You always have the best ideas, not to mention, the best graphics.
Amanda @ Serenity Now says
Great tutorial!! 🙂 I love the design you used. This gives me a great excuse to go to IKEA. 😉 I’m visiting from Melissa’s party. Hope you might stop by. 🙂 Here’s my link to my Snowflake Banner:
http://serenitynow4amanda.blogspot.com/2010/01/diy-winter-snowflake-banner.html
Colleen @ MuralMaker&More says
Love this tutorial. I heard about Citra-Solv – maybe from you. Haven’t tried it yet, but would love to. thanks for a great step-by-step.
[email protected] says
Thanks for the tutorial. I have got a set of those kitchen towels. Might spruce them up this way.
Mitzi Curi says
Karen, thanks for the detailed tutorial for this project. I hope to give it a go sometime!
Chani says
Hi Karen, this looks great and seems to be so easy! What’s the name of the product you use (not the brand)? I wonder if I can get something like that in France. Love, Chani
Karen- The Graphics Fairy says
Hi Chani,
It’s Citra Solv natural cleaner and degreaser, there’s isn’t another name. I believe this is a uniquely formulated product that is only made by them. You can buy it online though, just Google the name.
I hope this helps!
Karen
VINTAGE HOME lifestyle says
Hi Karen…
That is so great, thank you for sharing. If I want to use another image, how do I make a mirrored copy of it?
Thanks so much…
Cathleen
Karen- The Graphics Fairy says
Hi Cathleen,
The easiest way is when you go to make copies of these, just have the copy place mirror the image for you.
VINTAGE HOME lifestyle says
Thank you so much, Karen
Cathleen
Chani says
Hi Karen, do you know if color pictures can be transferred like this too?
Karen- The Graphics Fairy says
Hi Chani,
Yes, I believe as long as your copy is made with Toner ink (not from a laser printer) it should transfer. It will be muted though, not as bright as the original.
Luna says
I think there is some confusion about printing processes. Laser printers use toner as someone points out bellow. I wonder if the distinction is not between laser and toner but between digital copiers/printers which use a laser to create light and analog copiers which use a lamp to create light. The light is used to transfer the toner, in the shape of your original image, onto a roller. The toner is then rolled onto the blank page which is heated to melt the toner onto the paper.
Although the process (called Xerography) is almost the same between the two methods the project described on this page makes me think that there are different types of toner that are optimized for the two slightly different processes. Theoretically the toner that analog copiers use dissolves in common solvents like citrisolve where as the laser optimized toner does not.
Unfortunately for this project, as of this post, analog copiers almost don’t exist any more. Non of the local copy shops or grocery stores have them nor the library. Everything’s digital.
https://en.wikipedia.org/wiki/Photocopier#How_it_works_(using_xerography)
https://en.wikipedia.org/wiki/Laser_printing#Printing_process
Term Papers says
waooo it is fabulous .
MollySunshine says
What fun! I can’t wait to start making projects. I’m also thinking that in the photocopy process the image can be resized, like making smaller, for pin cushions and little things like that. Thanks so much for such a great idea and for everything you share!
Jenni says
I know this is kind of late in the game to be posting, but I’m just now getting around to this project…well, once my citra solv arrives, anyway.
Do I have to use newspaper underneath for the burnishing step, or is that just to aid in clean up/keep work area clean?
Karen- The Graphics Fairy says
Jenni,
Yes, you do need the newspaper or something similar. You don’t want too hard of a surface under your project, or the burnishing won’t turn out as well, you want something with a little give. I used a big block of thin Styrofoam, in place of the newspaper, this last time around and it worked wonderfully!
Jenni says
Thanks, Karen!!
rkramadh says
This project is just fantastic. I love all things French and I even speak it. So this is just perfect!
I found your blog just a week ago and I am so hooked! I am even your follower now. You have the classiest projects/images ever. Your generosity in sharing the images and wonderful projects is truly unmatched. God Bless You and may the images/ideas keep flowing from your brains to my PC for ever 🙂 THANKS!!!
Anonymous says
Hi Karen, I was wondering if the same photocopy can be used several times or if it was more of a one time deal?
Thanks Brenna,
Your New Disciple 🙂
auto quotes says
These are lovely. I think to really make it authentic you need to have the design a bit faded as you did.
Education Agent says
Thats an interesting post. It was worth visiting your blog and I have bookmarked your blog. Hope to visit again.
Anonymous says
Karen, I’m a big fan of your blog, it’s really fantastic. My question is, what’s citra solv? I’m from argentina, and i don’t know how to find it here, is it similar to acetone? or similar to any cleaner? If you could explain it a little bit for me and for the others that also said that would try to find it. Thank you in advance. Congratulations again, keep on! Clary
Kristen says
I am in love with this project! It inspires me to do something similar onto burlap! Thanks for inspiring us! Now to find a copy machine that has toner…
Amy Scott says
I love this idea and am ready to do the project! So, so cute! I just can’t seem to open the PDF. I WAS able to open the “GRAINS” PDF. Anyone else having trouble?
Karen- The Graphics Fairy says
Hi Amy,
Thanks for alerting me to the broken link! I just fixed it, so you should be able to print it out just fine now!
An Zebley says
It’s been awhile since the op, but can you use the ready-to-use, spray bottle of citra-solv or does it have to be the concentrate? Thanks!
Karen- The Graphics Fairy says
An Zebley,
I’m pretty sure you need the concentrate. I have heard that Acetone works too, although I haven’t tried it for myself.
Wendy Truesdale says
Trying to do this and went to a fedex copy place to get a “toner” based copy. The transfer is not working at all! Followed these instructions to the letter. What am i missing??
Karen- The Graphics Fairy says
Hi Wendy, I’m guessing the person at Fedex told you wrong and it’s not toner based. Most large chains do not have toner anymore only laser. Try to find a small independently owned copy place with an older machine, or try your local grocery store or library. You don’t want a brand new machine, you’re looking for one that’s been around for awhile, that’s where you’ll find the toner based ones!
FarmGoneAmuckChick says
…………. You are beyond generous, kind & thoughtful in your labor of love,talent & time to all of us artists & crafters !! Feel the warmth of our hugs ,sweet one , g.
gaelle says
Karen You are so great! I love your site and you are sooo generous to all of us and patient with our questions. I have wanted to find an affordable (and quick) fabric transfer technique forever! Now if only I can find a toner based copier! Thanks so much. ~g~
Anonymous says
Ditto to all the thank yous for the terrific sharing. Looked all over my city yesterday and found Citra Solv at Whole Foods like you said. Got copies made at FedEx. The guy told me it was a toner machine but not sure I believe him. Will try the library if not. Got flour sack dishtowels at Target but love the IKEA red stripes so gotta get those – then hope to try! Thank you!
debbie says
Karen, Do you think this would work on the tops of painted furniture? I am lookin for a way to get some graphics on there without the extra film from the avery sticky paper or painting it by hand. Is there any way at all. Thanks Debbie
JazeGirl says
Going to do this method to create personalized Santa sacks for my kids with a vintage feel. Quick question for Karen or anyone else that has done this method… when you iron to release the trapped Citra-Solv, do you iron directly on the image? Do you put a towel over the top when you iron it? Just wondering if the image is safe to iron directly over the top…? Thanks.
jj says
Learned a lessen today.
Everyone says to iron the design in order to get rid of the Citra-Solv smell, etc. I did a double sided project. The first side did real well. I took it back to the ironing board and iron. Turned it on and ironed it. Great. I left the iron on low and everything set up, went back with the second side to iron and it smeared the design. The design wasn’t quiet dry enough. The extra minute or two on the first side gave it just enough time to dry. IF YOU IRON IMMEDIATELY IT WILL SMEAR. Do yourself a favor and wait just a bit before you iron.
Gosia says
Thanks for sharing
Lauralee says
I can’t get the pdf in step 1
I get this error
Sorry, you’re trying to access a feature that is no longer supported.
Teri Smith says
I have tried this 5 times on 5 different towels and while they look fantastic after they are done the image washes almost completely off when you wash. Anyone else have this problem and if you did were you able to fix it?
Anna says
Yeah, I’m thinking about putting an image onto a pillowcase or tshirt and it would be quite disappointing if it washed off…. Does anyone have an answer?
Michelle says
can the item be washed afterwards. I was thinking of putting a design on a pillow case and obviously would not want ink or citra solve on your skin
tru leigh says
Citra-solv has a website that supports all sorts of artist uses for their product.
http://www.citrasolv.com/art/index.html
Maia says
Finding an old copier should work best. I used a similar technique for a punk-inspires art project I did in undergrad. One note, I researched Citra-Solv a bit, and it looks like it has some nasty warnings in terms of health-effects in humans (e.g. carcinogenic), so I don’t know if I’d use it for anything besides decorative items. Also, any solvent should work for the technique. I had used a paint-thinner to do xerox transfers onto paper, so be willing to experiment a little.
paulette says
I have been trying to understand….ink jet laser printer AND toner based INK JET printer?? After researching and more researching, and then talking to my husband, the way it was explained to me….there is NO “ink jet laser printer” and NO “toner based ink jet printer”!!!! Ink jet is a LIQUID that prints your image and does NOT HEAT UP……and TONER is a POWDER THAT WILL HEAT UP for your transfers!! So all printers that have POWDER cartridges will work. If you have a printer that has INK… LIQUIDS as cartridges, they will NOT work to transfer an image!!! I have been VERY confuse….. maybe its just me?? I hope this helps everyone!!! It sure has helped me!! We have several printers in our home, and they all have POWDER cartridges!! The ink jet…LIQUID cartridges were VERY EXPENSIVE to replace!! Thanks, and again, it sure has helped me to understand!!!
Karen Watson says
Hi Paulette, When we talk about Toner based copiers on this site, we are talking about commercial machines used in copy shops. They are not printers, and they are not ink jet. They are stand alone machines used to make copies. I hope that helps!
SaskiaB says
If you use an image from a printer (ink jet) you can get the same results by using an acid solvent (I use white vinegar). You get the best results if you print on transparancy paper (printable overhead sheets).
Karen Watson says
Thanks for the tip! I’ve been wanting to try out that transparency technique for awhile now!
Lynn says
I’m a little confused…about the prints. You say not to use a laser printer, but laser printers are toner based. I own a laser printer and have made transfers successfully. I know an ink jet printer won’t work for this type of transfer… Am I missing something here?
graphicsfairy says
Hi Lynn,
I am so glad to hear you have had success using your laser printer. I have not so was just speaking to my personal experience 🙂
carol says
hi how does this wash when completed? thanks
graphicsfairy says
I would hand wash it Carol, just to be safe and for it to last longer 🙂
Cassie says
Would this technique work on a t-shirt fabric? A standard cotton type?
graphicsfairy says
I thinks so Cassie, I’ve never tried it, maybe try it on a sample before your actual t-shirt just to be safe 🙂
Nina says
I did my first ever transfers with Citrasolv onto leather. I have two questions for you…
1. Is this the best results I can expect, if not what should I do differently to get a better result.
2. How do I keep my tape from pulling up the top layer of leather color? I tried blue painters tape and masking tape.
Thanks in advance for your suggestions. Nina
graphicsfairy says
Hi Nina, I am sorry but have never tried it on leather so can’t really speak to it. Try practicing on scraps and see if you can improve on it, that is what I always do. Good luck!