Packing Tape Transfers
Hi everyone, it’s Andrea from The Cottage Market. Today I have another quick and easy DIY for you and I really think you are going to enjoy it…we are going to do do DIY Packing Tape Transfers, this is a great technique for transferring onto glass. In case you haven’t done them before and are a little hesitant…do not fear…I just learned and guess what? It really works and it really is easy! What I really like about them is that there are a million and one uses for them. Our examples are on glass so you can see how they are transparent but I know that you will love using them to decorate a package to making a label for a canister! I used black and white but it does work with color also…the one thing you have to remember is that you MUST use prints that are either LASER or TONER based. You can visit The Printable Transfer Section for these graphics and MANY others that are perfect for this project. If you don’t have that printer you can always go to your local office supply store and get your prints made for pennies on the dollar : ) Let’s go see how we do this…
How to Transfer Images onto Glass
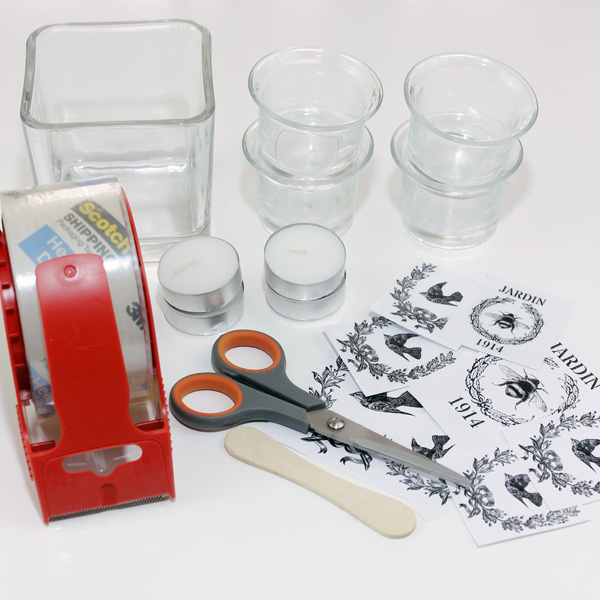
You will need Heavy Duty Packing Tape (you can use regular…but the heavy duty tape works better and is easier to work with), scissors, a burnisher (you can purchase one or use a craft stick), images of choice and your vessels.
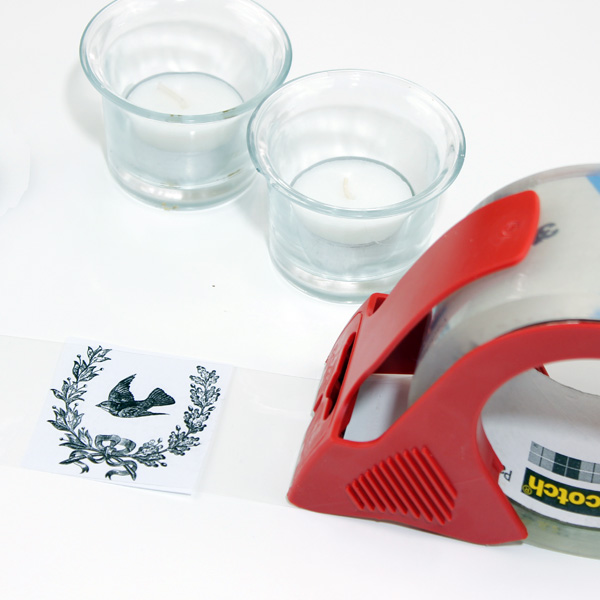
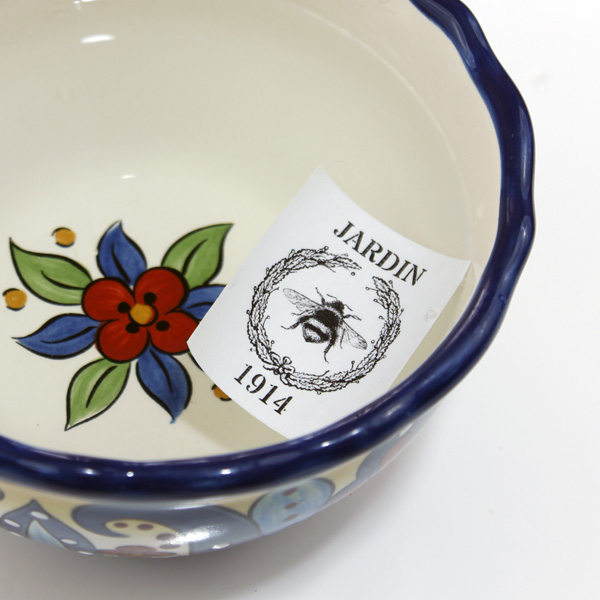
After you trim your image it is time to apply the packing tape…remember one important thing…whatever is white will be transparent. Just lie your image down and center the package tape over it evenly and press. Then cut the tape.
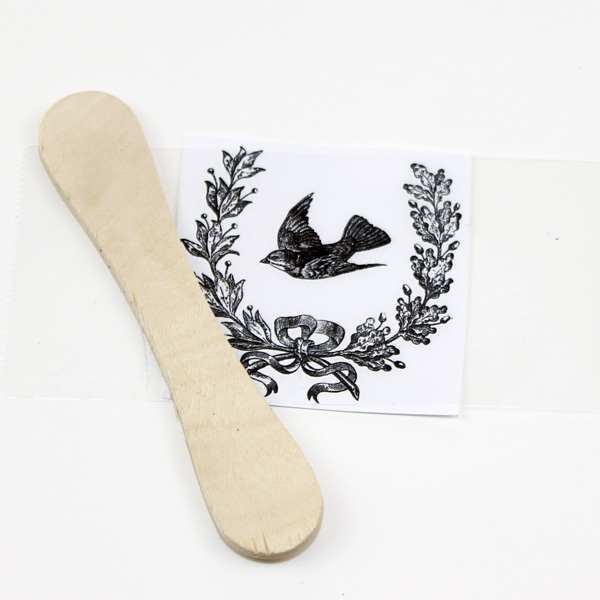
Now it is time to burnish it…make sure to press heavily over the entire space it is very important. I went over it a few times to be sure…from corner to corner…end to end to insure a great finished product.
Now get yourself a bowl with very warm water in it and place your packing tape burnished image into the bowl and allow to soak about 2-3 minutes.
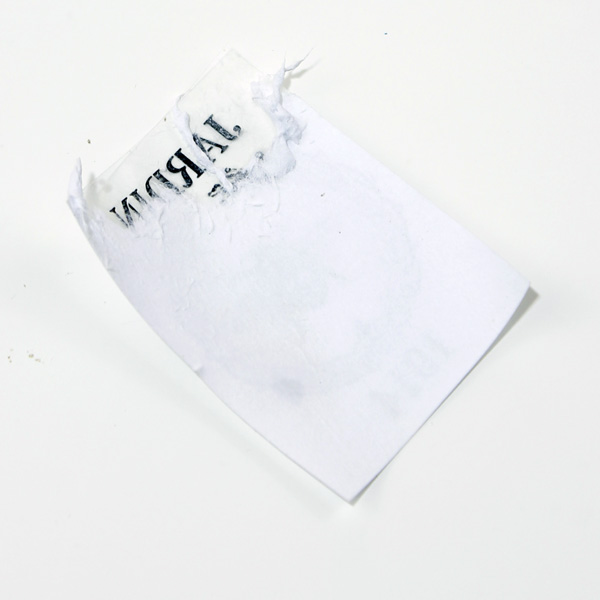
Then removed it from the bowl and place it in between your thumb and index finger and begin to rub back and forth with force…you will see the paper coming off…continue to dip it into the water and keep working it till all the white is off. DO NOT WORRY about the sticky side…it will be just like new when it dries. Also there might be a tiny bit of white residue on your tape…that too is ok : )
Now that all the paper is removed…place it on a flat surface and allow it to dry.
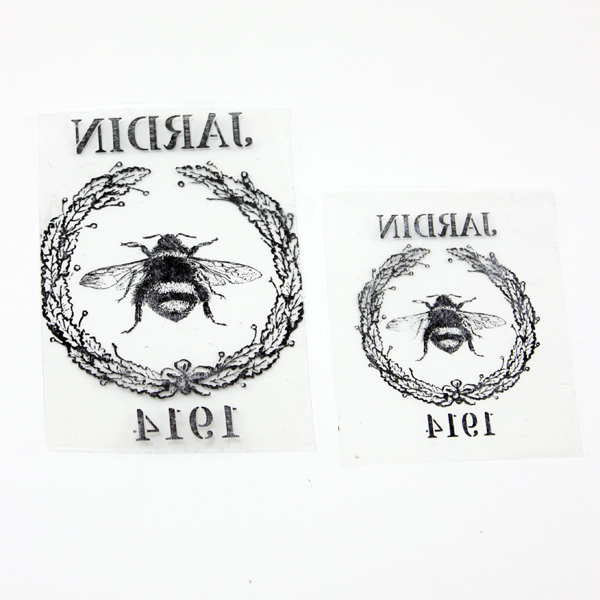
Once the stickers are dry it is time to apply them to your surface…it couldn’t be easier…it goes on just like a sticker…it is that easy! Make sure to smooth it nicely. If you have stickers that you are not going to use…just place them on wax paper for another day.
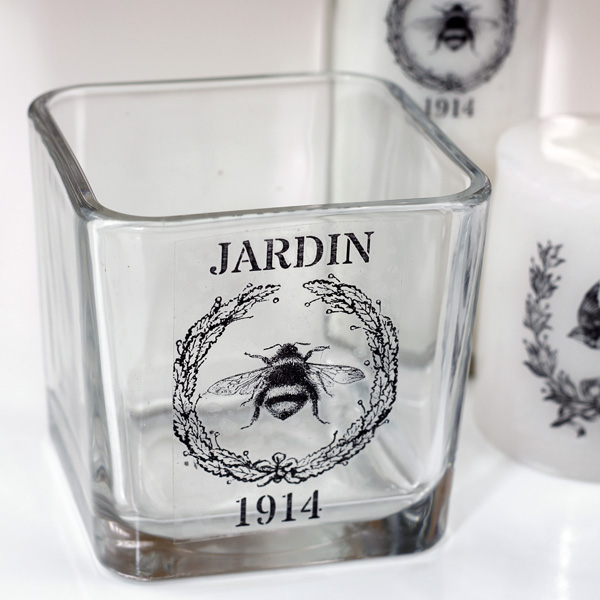
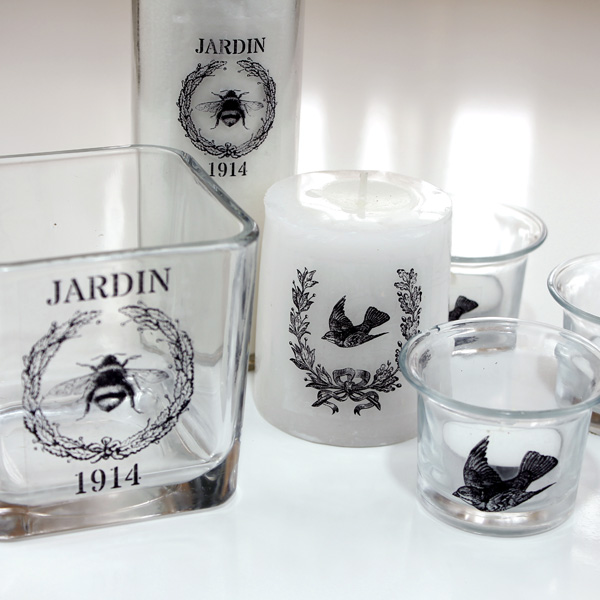
Dress us any glass piece you have…clear or color! I was thinking of making small ones all different and using them as wine glass charms…just place them on the glasses and then remove them at the end of the night when you do the dishes. They are so inexpensive you can choose new graphics each time you have a party! Dress up a package…label your canisters…with all of the graphics at The Graphics Fairy you can have different graphics for years!
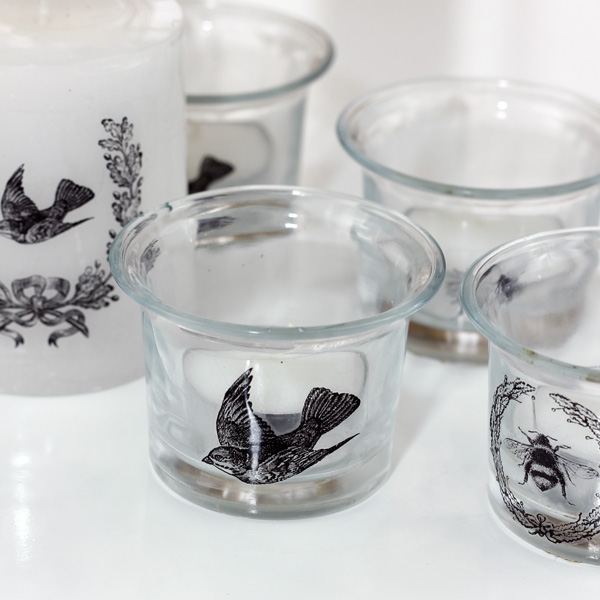
You can make tiny ones for small votives or you can double your package tape making sure that the edges but and cover the entire image for larger ones. SOOOOO many possibilities!
Sure hope you have tons of fun with this…the more you do it the better you get at it!!! I will see you again really soon and if you want to visit in the mean time…come and see me over at The Cottage Market…it’s where I hang out. Here’s wishing you all a very HAPPY…Safe…Wonderful…Loving…Compassionate…Healthy NEW YEAR!!
Hugs…Andrea
For more fun Image Transfer Methods and Techniques be sure and check out the post Easy Image Transfer Methods HERE!
Ірина says
О . дякую! Це чудова ідея! Я дуже давно читаю ваш блог, дякую за ваші прекрасні роботи!
Karen Watson says
Дякую!
Aaah says
This was leaving a white layer on the tape with the image any tips on that?
graphicsfairy says
This was actually a guest post by Andrea over at The Cottage Market, but one thing she does stress is this, “the one thing you have to remember is that you MUST use prints that are either LASER or TONER based”. Could that be the problem? Perhaps, just keep trying, I always say “practice, practice” 🙂 Good luck!
Linda says
Andrea, where is the Cottage Market?
graphicsfairy says
Hi Linda,
The Cottage Market is Andrea’s blog where you can see all of her amazing creations and posts. You can visit her at http://thecottagemarket.com/
janet cooke says
I believe that white will rub right off, it may be simply a layer of paper.
Betty says
I can’t wait to try this. Thanks, and Happy New Year!!
Karen Watson says
Happy New Year Betty!
Michelle says
My ink come off every time I rub the paper off. I’m doing it easy.. Help
graphicsfairy says
Hmmm, did you make sure your print was laser or toner based like she mentioned in the post? That is really all I can think of.
Lauren says
This is totally amazing!!!! I cannot wait to try! Thank you for sharing! What an awesome new transfer method! 2016 is going to rock!!!!
Karen Watson says
Woohoo! Thanks Lauren!
Sue says
Have to try these have the perfect vase. Happy New Year.
Karen Watson says
Have fun with this project Sue!!
JANESSE says
Was the paper regular printing paper? And does it matter if it was ink jet or laser printer?
graphicsfairy says
Hi Janesse, she states in the post, “the one thing you have to remember is that you MUSTuse prints that are either LASER or TONER based.” 🙂
Milly says
Laser or Toner only. Inkjet will not work.
Cathy says
I have a question… once you apply the tape to th4e object, do you pull the tape off and does the image remain behind, or do you need to leave the tape on the item? I get confused there! Thanks!
Karen Watson says
Hi Cathy, the image becomes embedded in the tape, so you want to keep the tape, don’t pull it off! 🙂
Lisa says
When I rubbed the paper off from the tape, a lot of the ink was also removed. Can you please tell me what I did wrong?
graphicsfairy says
Hi Lisa,
This is actually a guest post from Andrea over at The Cottage Market. One thing she stresses is , “the one thing you have to remember is that you MUST use prints that are either LASER or TONER based.” Perhaps that is the reason? You may want to re-read her instructions just to be sure and give it another shot, I find practice makes perfect! Good luck 🙂
Michelle says
I’m having to same problem
graphicsfairy says
Hi Michelle, the print has to be toner or laser based, that is the only thing I can think could be causing it. Good luck!
Sonya Blacker says
I’m a little confused. What do we print the picture on to start? After it dries, how does it stick to the item? Do you leave tape on? I’m sorry..I have fibromyalgia and brain doesn’t function sometimes.
Karen Watson says
Hi Sonya, You print the image on paper. Then you stick the tape to the paper and then you rub the paper away, but the ink stays on the tape, it gets trapped there. I hope that helps!
Sonya says
When you are ready to transfer..is it just the image that stays or does the tape stay on there too or does it peel off?
Karen Watson says
The tape stays on, it becomes a clear sticker.
Sharon says
My tape comes off in the water, why, I am using warm water and paper isn’t sticking in the water? Help
graphicsfairy says
Hi Sharon,
Did you burnish (press down heavily)your tape to your image? , Andrea over at The Cottage Market, who posted this technique stresses this step. “ burnish it…make sure to press heavily over the entire space it is very important. I went over it a few times to be sure…from corner to corner…end to end to insure a great finished product.” I’m not sure other than are you using the proper packing tape? I would suggest re-reading Andreas instructions, and try again. Practice makes perfect 🙂
Grace says
Can I wash the object with transferred image
graphicsfairy says
Yes Grace, but I would only hand wash it just to be safe 🙂
Dawn says
Me too. I read things over and over and it doesn’t go in.
Marie G says
I’m thinking that you did this using a laser printer? It seems that inkjet print would dissolve in the water.
Karen Watson says
Hi Marie, I’m pretty sure Andrea just has an inkjet printer.
rkramadh says
What a fabulous project. I bought this tape last year and promptly forgot about it. I just bought a white pillar candle to decorate with printed tissue paper. Instead, I will use this idea to decorate the candle. Thanks so much!
Karen Watson says
You’re welcome!
Sass says
Yep, I think laser only.
She says, ” I used black and white but it does work with color also…the one thing you have to remember is that you MUST use prints that are either laser or toner based. You can visit The Furniture Transfer Section for these graphics and MANY others that are perfect for this project. If you don’t have that printer you can always go to your local office supply store and get your prints made for pennies on the dollar : ) “
Ange says
I tried this technique today and it was a lot easier than I thought it would be. The only thing I did wrong was after the white paper came off I dried the tape with a towel. Which was a wrong thing to do because it left fuzzies on the tape. Thanks for sharing this cool project.
Karen Watson says
Hi Ange, That’s great, I’m glad you liked it! You definitely do want to keep all fuzzy things away from the tape!
Marie says
That is a fabulous “how to” in the 1st weekly newsletter! Thank you so much, Andrea! I will definitely be trying this! I also think this transfer method would work on china!
Karen Watson says
Great idea Marie! Let us know if you try it on China!
Arlene says
Yes,it works on China and ceramics. Try it on a piece of tile. You’ll go nuts trying it on all sorts of objects. I teach crafts at a retirement home and I just love all of these easy fun things to do.
Karen Watson says
Thanks Arlene!! I love the tile idea!!
Mimi says
Arlene,
Please email me if you do not mind. I am starting a new job in a retirement center and would love to get some of your popular craft ideas. [email protected]. Thanks! Mimi
Dionna says
Plz share some of your ideas with us too. I love DIY and arts and crafts. Ty
Veronica says
Yea, works on literally anything that clear packing tape will stick to…
J. Mac Neal says
Thanks for this! Great transfer technique to know. I have a laser printer, too, so it should be a technique I’ll certainly try out. But I do have a minor question….
Are extra stickers you’ve created placed sticky side DOWN on the wax paper? Either up or down, maybe it would be best if waiting-to-be-used stickers were contained in something with a lid till you’re ready for them another day. It’s always something to consider if you have kids and/or pets. I live with a fluffy cat and a forced-air heating system, lol. There are ALWAYS stray dust particles and cat hair around to contend with when I do a project that involves exposed sticky tape, drying paint, or glue. Sigh.
Karen Watson says
Hi J, yes, sticky side down. Imagine a bandaid with the papers on it to protect the stickiness until you are ready to use it… same principle. 🙂
Andrea says
I can’t imagine that this works! Of course I’m going to give it a try!
wilhelmina says
Thanks for sharing with all of us. Always wanted to put nice stickers on my pamper hamper gifts. Enjoy a wonderful and peaceful 2016.
Karen Watson says
You’re welcome Wilhelmina, I’m glad you found it useful!
Annie B says
This is amazing! I wonder if I can make this work?! Something new to try out.
Karen Watson says
Yes, give it a try!
Andrea says
I made some yesterday and I’m one who has to try something before I totally “get it.” The next batch will be perfect. Look for glass objects with flat surfaces if using anything larger than an inch or so. My round Mason jar didn’t come out too well with a 2″ design. Great fun though.
Karen Watson says
Thanks for the tips Andrea!
Pam says
I’m having a difficult time figuring out how the image sticks to the glass after the tape has been stuck to the paper, wetted, and then scraped. How does the sticky stuff last and not get gummy? And how long will it last on the glass? And what about the shine from the tape and the edges? Is the glass safe to wash after the image is on it?
Karen Watson says
Hi Pam, my understanding is that it just stays sticky! Why not give it at try on a test piece and see how it goes?!
Marie from The Interior Frugalista says
Andrea, this is AWESOME – I am definitely giving this a try! Thanks so much for the tutorial and Happy New Year!
Maggi says
OH, MY GOD !!!! This is just beyond beautiful !!!! and easy!!!! . so pretty !!!!
Karen Watson says
Yay! Thanks Maggi!
Vera says
I have kept 2 pcs of candle a looong time, not knowing what to do with them. Now I know what to do, I’m going to dress them up with these gorgeous sticker. Thanks for sharing Andrea!
Susan Homeroad says
Thanks Andrea! I can’t wait to try this 🙂
Kris says
Going To try this in my clear canisters to label them. Right now they are painted and I can’t wash them. This way I could always re-label them when necessary. Love this idea. Thanks.
Maria Santiago says
Hello dear Karen. I surely will try tais asap! But I have one question: we apply the “printed tape” on the outside of the glass/jar? If we make it for a gift or sell it, will the tape remain there even if we wash it? Thank you so much! Hug from Portugal
Karen Watson says
Hi Maria, I think this method is best for decorative pieces. I don’t think the transfer could hold up to a washing.
Alison says
What does burnish mean? I want to try this with my nieces, but I do not understand that reference. These items look awesome!!
Karen Watson says
Hi Alison, burnishing is basically rubbing with a tool. Burnishing tools work best, see the link on this post, but you could try a spoon if you don’t have one.
Melissa says
Do you have any idea if it would work if someone drew on the paper with a Sharpie? My son is autistic and art is his thing. This would be an amazing gift for family and teachers!
Karen Watson says
I’m not sure Melissa, but you could always have him write on the paper and then make a laser copy of it, to use with this method. That is a great gift idea!
Alexis says
Melissa, not sure I’d you’re interested, but I just discovered that hobby lobby (and I’m sure others) now sell toner pens. Heidi Swapp brand I believe, though there may be competitor brands. Get this instead of a sharpie and you’re good to go! Maybe 2 dollars with a 40% off coupon at hobby lobby.
Arno says
You could also follow this project for your son, but instead of printing on the tissue paper, have him draw with color permanent markers. We did this as Christmas presents and worked well. Works best if the tissue paper is stuck to other paper, otherwise it moves around when you try to draw.
http://petapixel.com/2015/03/23/how-to-transfer-your-photos-onto-wax-candles/
Diane says
This was such a fun project! The instructions are perfect. You have to try it and not worry about messing up. It seems like soaking tape in water, the tape would loose all of the adhesive and never get sticky again, but it does!! Can’t wait to do more!
Karen Watson says
Thanks so much for your feedback Diane!!
Nessie says
How lovely. I just have a new inkjet printer, is that going to work as well?
Thanks for replying ?
Karen Watson says
Hi Nessie, No, it won’t please see the first paragraph of this post. You need a laser or toner based copy.
Katharine says
This is such a great idea!
Karen Watson says
Thanks Katherine!
tami says
once on a glass does the image stay if you wash it after using the glass?
Mrs Parker says
Thank you! Ha, I don’t have to buy one of those expensive thing-a-ma-jiggies! This is brilliant! Why didn’t I think of this? I’ll tell you why, it would take the fun out of seeing new creations. Again, thanks!
Karen Watson says
I’m glad you enjoyed it!!
Lisa says
Hello-
My image transferred great, however there doesn’t seem to be any “stick” left on the tape. Any suggestions on how to use something else for the “stick” aspect?
Karen Watson says
Hi Lisa, Did you use the Heavy duty packing tape or the regular? I think the Heavy duty is supposed to be sticker.
Rose Vaughn says
This sounds like such a fun creative idea not only to make things for mySelf but to share with everyone I can think of thanks soo much gonna Tryit first thing in the morning! Happy,happy!
Karen Watson says
Happy creating Rose!
Cheryl Sullivan says
You have given me a fantastic idea for a Crucible Candle for my son who is in Marine Corp Recruit boot camp training right now. The have what is called a Crucible. It’s 54 hrs, 45 mile hike with full gear, 36 stations to complete and 29 teamwork stations with 6-8 hrs sleep with 4-5 meals. So we burn a candle during this time for them and pray they make it. They enter this part recruits and exit it Marines!
Karen Watson says
Great idea Cheryl! Wishing him the best! My step son just went through something similar in the Army, very grueling, but a huge confidence booster!
Sharon says
Question: I have an ink jet printer – what if I print the design and then copy it? Will that work?
Karen Watson says
Hi Sharon, yes, that’s exactly what you want to do! Just take it to your local copy place and have a laser copy made.
Lisa says
What a great idea especially for making personalized gifts.
Cynnamama says
I tried twice and the ink came off. I have inkjet which I don’t think it’ll work. :/
Karen Watson says
Hi there, if you check out the instructions in the first paragraph, you’ll see that you want to use Laser or Toner copies. 🙂 So just print off your designs and then have copies made. I hope that helps!!
tillie says
I will be labeling my new clear acrylic makeup containers to say “Mine”…. Lol
Thank you
*looking out the window for UPS man
Karen Watson says
Haha! Great idea!
Joanne A. says
This looks simple enough and perfect for a centerpiece idea i am thinking about. Does this work as well with color images or only black&white? thanks!
Karen Watson says
Joanne, we haven’t personally tried with color image, but one of our readers said that she has done it successfully. Just make sure that you are using a laser or toner copy.
Detra says
Thanks for sharing! I just bought some adorable white ceramic soup bowls with handles for a wedding gift and have been wondering what to do to add a personal touch. What a perfect idea. I’ll probably spray a clear coat over the image so it stays on in the dishwasher.
Karen Watson says
Hi Detra,
No, it won’t work in the dishwasher. This is best for decorative pieces only.
Jessica says
With ink jet printer I cut freezer or wax paper to 8 1/2 x11 adhere it to card stock for stability print it the either apply and remove tape like a sticker image now on tape or if it’s a porous surface like wood or fabric barnish directly to. Item. Your printer sheet can be used over and over since you transfered picture!!!
Karen Watson says
Thanks for the tip Jessica!
Ann Williams says
That is amazing! I can’t wait to try.
Magdala jabouin says
Very smart. I just love smart ideas and the people who share them with others. Thanks and I will try this soon and make sure to post them. Be blessed! !!
Karen Watson says
Thank you Magdala! We hope you enjoy this technique!
Frida says
Hi, I just tried this project. Althought very pretty ,it does not work with inkjet…at least not with my inkjet printer. What I’m thinking is : use gesso over the glass then paint with acrylic and then apply the sticker. Finger crossed.
Lovely project !
Karen Watson says
I Frida, that’s correct, it does not work with inkjet. We do have the instructions for using Laser or Toner ink, bolded out in the first paragraph. So sorry you missed that part! Just take your printed image to your local copy place and for a few cents you can get a laser copy for your project. 🙂
Jess says
Hi! Thanks for the tutorial. Just to be clear… You are actually creating a sticker that sticks to and stays on the glass, right? Technically you are not transferring the image to the glass? I’m a little confuse, lol!
Karen Watson says
Hi Jess, Yes, you are essentially transferring the image to the tape (so technically it is a transfer technique) and then you get a sticker for your glassware. Normally you buy decals to do this, and they can be expensive and then there is still a bit of a process. (I purchased an expensive brand of printable decals and after printing on them, the ink rubbed right off.) This is cheaper and easier!
jennifer says
Thanks for this post! I think there would be less confusion for this article if it was titled “How to Make a Clear Sticker”. It’s really not transferring an image using package tape 😉
Karen Watson says
Hi Jennifer, You are in fact transferring the image from the paper to the tape. But I see what you mean. I can’t change the title now though, since it will break the link.
Sandy says
Hi I was wondering if you just print pictures and such off the printer? What paper do you use? Maybe if you have time you can email me. Thank you.
Karen Watson says
Hi Sandy, You print them out and then take them to your local copy place to make a laser copy. Inkjet won’t work. I hope that helps!
Delaney says
Hello,
I was wondering if there was a way to make this permanent? Will it come off if you wash it?
Karen Watson says
Hi Delaney, sorry but no you can’t wash with this, it’s essentially like a decal.
Tamara says
I’m doing it right now ^^ (How to spend a nice sunday ? ^^ )
I’m waiting for the tape to dry, I hope it’ll become sticky again…
The print is IN the tape, but still a little white too… I hope it’s enough !
Will tell you the result ^^
Karen Watson says
Have a fun crafting day Tamara!
Tamara says
So ! To let you know, pages from old books don’t work x)
And the second try was great !! I might clear it better the next time, there were few pieces of paper left that I didn’t see when it was wet.
Thanks ^^
Karen Watson says
Thanks Tamara! If you want to use old book page, just make laser copies of them, and then you can use them!
Carlijn says
Nice idea! Work really well with colours as well 🙂 I’m using it to make stickers for my home brewed beer!
Karen Watson says
Good to know! Thanks!
Rona says
do you leave the sticker on? if i understood correctly its a sticker not a transfer right?
Karen Watson says
Hi Rona, the image is transferred to the tape and then you use the tape like a decal. I hope that helps!
Dawn says
To Melissa with the autistic son: If you have him draw his design with a Sharpie, you can photocopy his drawings and use the photocopies (because they are printed out with toner) as the image to stick your tape on. My 9 year old daughter did this and had a ball designing her own stickers!
Also, if you want to do a big design (I am hoping to transfer some old photos to the glass in a picture frame to use as decor pieces), I have read that you can do the same method on clear contact paper (buy at an art supply or crafts store) so you don’t have to piece and line up your packing tape!
Karen Watson says
Great tips Dawn!
Claudia says
What a great idea. And so easy to change for another style if wanted. Thank you, Andrea.
Angie says
So once the tape is on the glass. This is NOT dishwasher safe right, only hand wash.
Karen Watson says
Yes, exactly Angie!
kathyb says
brilliant!
Karen Watson says
Thanks Kathy!
Bertha says
I wonder if you can do it with Dollar Tree Contact paper? Then you can make larger one.
Karen Watson says
Hi Bertha, Yes, we have a post for that here! https://thegraphicsfairy.com/clear-contact-paper-transfers/
Jen says
I did this today in color & black & white and it worked perfectly
Karen Watson says
That’s great Jen! I’m so glad it worked for you!
Ben says
Thanks for the tutorial. I have one question, will these transfers wash off? Thanks again.
Karen Watson says
Ben, it works like a decal. So I would use it for decorative projects only.
Janice says
You can also use colored magazine pages that are clay based (will smear when wet). Use the same process, tape to picture, burnish, soak (I used soapy water) use your finger on the sticky sided (where the picture transferred to) and rub until the paper is released and most of the residue is gone. Let it dry and apply like a sticker. I DO believe that your method (printer ink) would work very well perhaps better than the option I suggested. It is fun to try either way. No major costs involved.
Karen Watson says
Thanks for the great tip Janice! That sounds like fun!
Angela Croissant says
This is fantastic! Thanks for sharing this with us!
Karen Watson says
Thanks Angela! I’m glad you enjoyed it!
Teneil says
Does it matter if I print the image using a laser printer or inkjet printer?
Teneil says
Nevermind! I see that it must be laser or toner based
Karen Watson says
🙂
Jude Dealy says
Just found this project. Will be trying it soon. Congratulations not only on your ingenious idea but also your patience!
Karen Watson says
I hope you enjoy this technique Jude!
Miyoka says
This is so awesome! Thanks. I tried it and I think I may have rubbed off too much. The sticker only sticks in the middle. Any suggestions?
Smytha says
I dont know what I am doing wrong, but this isnt coming out the way you have pictured at all 🙁 I printed the images, mostly black and white, and then I put the tape on them and burnished. I put them in water and waited….either the paper dosent come off all the way or the ink fades to almost invisible, and neither are very sticky after.
graphicsfairy says
Hi Smytha,
I’m so sorry you are having issues with your project! This is a guest post from Andrea at The Cottage Market, unfortunately, Andrea has taken the Summer off due to Health issues. Did you try using the brand of tape that Andrea recommends in the supply list? You can click the link to see more info about it. Here is a link to my Top Tip for working with transfers post, https://thegraphicsfairy.com/top-tip-for-working-with-transfers/
I hope that helps 🙂
Lynn says
I wiped my back side of photos off with paper towel now it won’t stick to my glass .what can I use to make it stick to my glass.thanks
graphicsfairy says
Hi Lynn,
This tutorial was done by Andrea over at The Cottage Market, you mention photos, in her instructions she says , “the one thing you have to remember is that you MUST use prints that are either LASER or TONER based.” is your photo laser or toner based? I hope that helps 🙂
Christina says
Great post! I have a quick question, after I laid my stickers to dry, the tape is kind of cloudy and white, but yours are so clear. Do I need to do a second rinse of the sticker to get it to be that clear? Thanks so much!
Tammy says
I have the same question 🙂
graphicsfairy says
Hi Tammy,
So sorry but I don’t have a good answer for you 🙁 This was a guest post from Andrea over at The Cottage Market and she is taking the summer off. The good old “practice makes perfect” maybe 🙂 Sorry couldn’t be more helpful!
Christine says
Just leave the milkyness. Its there because of the moisture contained in the gum after you dunked it in water. Use a hair drier on the sticky side and see it disappear almost instanty. Use caution, I use the highest heat setting and get burned often or use something to weight your stickers down while you blast it.
Shelley says
Help! When I put my paper and tape into the water, the paper immediately separates from the tape with no image. Is my water too hot?
graphicsfairy says
Hi Shelley,
This project was a guest post from Andrea over at The Cottage Market, she is taking the summer off so we can’t ask her advice. One of the things she does mention in her post is “the one thing you have to remember is that you MUST use prints that are either LASER or TONER based” She also recommends that you use heavy duty packing tape. I don’t know about the water temperature. Maybe give it another try with cooler water and see if it makes a difference. Sorry to not be able to be more specific 🙂 Good luck!
Theraisa Fleig says
Huh, interesting! Its kind of like those temporary tattoos you can get for kids. I will have to give this a try. How does the tape hold up to heated surfaces, like being on glass from a lit votive/tea candle? Does this process work on other surfaces? Like plastic, metal, wood, etc.?
graphicsfairy says
Hi Theraisa,
This is a guest post from Andrea over at The Cottage Market. It should hold up fine to the heat of a votive or tea candle with no problem. She mentions transferring to canisters, but as for other surfaces, you may just need to give it a try 🙂 Let us know if you do and how it worked out! Good luck 🙂
raquel guerrero says
Simplemente maravilloso apenas lo leí y me puse a hacerlo, y ya! en unos minutos está hecho, muchas gracias por compartir .
graphicsfairy says
Eso es maravilloso Raquel! Disfruta 🙂
Nancy VanderHave says
I have a question. I have made little snowmen out of clay pots (painted white). I want to put the grandkids names on them. Will this work on white paint?
graphicsfairy says
Hi Nancy, I think it should, maybe try it out on a sample piece of something first just to be on the safe side 🙂 good luck, it sounds adorable 🙂
Yia Vang says
People are confused but it is so easy ! And it should have been added that if you do not have a laser printer, you can still print your own design on your regular inkjet printer and take your print to the shop to make a photocopy. Then use the photocopy for this project. Inkjet does not work because it dissolves in the water. Also, if you need a better way to understand how to do it, marthastewars.com has the same thing explained. She has an article about it made like 10 years ago.
Leslie Newman says
This is a really great project! I tried this with a wine glass and it came out nice! I also blotted with a paper towel and it had an opaque look to parts of the sticker so I trimmed it away. Also, I had to trim very close to the edges of my image so that there aren’t any bubbles and its easier to smooth out around the glass’ rounded edges. I also applied a little semi-gloss gel medium on the sticky part and around the edges of the image since I think my tape was a little weak on the stickiness- it sticks nicely anyway but I wanted to make sure it stayed there!! It came out great and I can’t wait to try them again! Thank you!!!
graphicsfairy says
Wow, such great ideas Leslie! Thanks so much for sharing 🙂
Leslie says
Thanks! Question: one of your pics has a candle with one of your tape stickers… did you shrink wrap the candle first and apply the sticker on it, or was this heat embossed?
graphicsfairy says
Hi Leslie,
You apply the tape directly to the candle or whatever else you want to use. If you read the tutorial, Andrea takes you through the process step by step. Good luck 🙂
Gaqulin says
that’s nice though I know this method I wanted a new way to transfer photos into objects without the transparent tape …
graphicsfairy says
Hi Gaqulin,
Here is a link to my favorite transfer methods, maybe you will find one you want to try 🙂 https://thegraphicsfairy.com/12-easy-image-transfer-methods-for-diy-projects/
Kristin Jennings says
I am wanting to use this on a silicone to go coffee mug. I saw you can’t wash it but do you think it would hold up hand washing it (ex just rinsing the outside?)
graphicsfairy says
That should be just fine Kristin 🙂
Annabella says
Hi!
This looked really neat so I tried it straight off. Problem is, all the paper didn’t come off and left the transfer looking cloudy. Stuck it on a white canister and it looks o.k.ish but… Tried it a few times, same result; any advise? Love the site!
graphicsfairy says
Hi Annabella,
This is actually a guest post by Andrea over at The Cottage Market, I can’t really think of why it isn’t working for you if you followed her instructions exactly. I can only suggest, make sure the water is very warm and to burnish super well. You might hop over to The Cottage Market and ask Andrea 🙂
donna says
Didnt work for me, either. The water was definitely warm, and I burnished it to death. The image floatd off in the wter 🙁
graphicsfairy says
Hi Donna,
I am sorry you are having problems with this technique. This is a guest post from Andrea over at The Cottage Market, one thing she stresses in her tutorial is, “the one thing you have to remember is that you MUST use prints that are either LASER or TONER based.“
Anabela Castelao says
Hello, thank you for sharing this transfer technique with tape. Please inform if the images to be transfered to glass can be printed to normal fotocopy paper from in normal inkjet printers. Won´t the ink blur when the images are put in water? Thank you.
graphicsfairy says
Hi Anabela,
The post states, “the one thing you have to remember is that you MUST use prints that are either LASER or TONER based. ” so that they won’t blur 🙂
Anabela Moreira says
Right. Sorry. Only saw that indication after sending my question. I suppose buying a good quality tape is important. Not the one we buy here in Portugal at the chinese shops. It didn´t work very well.. Not enough gluing power. Will try again with a good brand. Thank you for sharing.
Another way of transfering these prints is with the decall paper from Crafty Computer Paper in England: http://www.crafty computerpaper.co.uk. Just print in laser printers or inkjet at home and in this case applying after a spray sealer and when it´s dry just place it in cold water and the motif comes off with an excellent adherance on anything. Ther´s white and transparent decall paper. Disadvantage: a bit expensive postage price, but really quick and resistant.
graphicsfairy says
Thanks so much for the info Anabela!
PAT says
LOVE YOUT RANSFER GOOD DIRECTIONS ETC CAN YOU MODPODGE OVER THIS STICKER IF YOU ARE DOING A PLATE OR GLASS I JUST DISCOVERED THEY MAKE A DISHWASHER SAFE MODPODGE THANKS
graphicsfairy says
Thanks Pat, I am sure you could 🙂
Albert DAgostino says
After reading the comments above, there seems to be confusion over a number of points:
1) You must use a LASER printer and NOT an ink-jet. Laser images are of a WAX substance which does not dissolve in water. Ink-jet inks are a DYE and WILL dissolve and smear in water.
2) You must burnish the tape and the paper with a lot of pressure. This is dome to insure that the wax image of the laser print becomes imbedded deeply into the GLUE of the packing tape – this is the point of transfer.
3) The paper must then be separated from the tape by soaking in warm water. Do not rub the paper to hard because you may remove some of the glue on the tape. This would destroy of remove some of the image.
graphicsfairy says
Thank you so much Albert for taking the time to explain in such detail and so accurately!!! Have a wonderful day 🙂
Rebecca says
I have to admit, I was sceptical about this at first. I’m making come candles for my wedding so figured I’d give this a go as it might look less messy than my previous attempts. But wow I was so impressed – and I only used regular sellotape to test it first time round!
Now I just need to find a good method to transfer to wood without confusing things with American products which I don’t have access to.
graphicsfairy says
Yea!! So glad it worked out for you 🙂 Congratulations on your wedding!
JB says
Brilliant idea. I will try that one especially the transferring of the image into a glass.Thanks!
Dawn McKinney says
ok, so these aren’t transfers.. these are removable decals, because you are not “transferring’ the image to the item, only to the adhesive side of the tape.. you are making a decal out of the tape, and adhering it to the item. I think what is confusing people is the term “transfers”… thinking the image itself is being transferred to the item using the tape adhesive as the medium.. when actually, the tape is being made into a decal.
Edward says
Wow! The end products look pretty cool.. It’s really a great idea. I’m going to try this for sure.. Thanks for sharing!! 🙂
graphicsfairy says
Thanks Edward, enjoy!
Gisell says
Hey, I’m sorry to say that this don’t work. I tried it many time. Got 2 pages of each of pictures for wine glasses and it didn’t stick. Tried it on a champagne glass didn’t work, tried it with mod podge didn’t work. IF you can suggest another method I will highly appreaciated. Thanks
~Gisell~
graphicsfairy says
I am sorry it didn’t work for you Gisell, we have so may readers who have shared their projects using this method, but here is a link to some of my other favorite transfer methods you might like, https://thegraphicsfairy.com/12-easy-image-transfer-methods-for-diy-projects/ Good luck 🙂
Heidi says
This worked beautifully – thanks for a great DIY!
graphicsfairy says
Oh yea! I am so glad you liked it Heidi 🙂
Liz says
It did not work for me, did everything as shown. The whole thing peeled off. Will try again…
Liz says
Ok, I tried it again and this time it work perfectly, not sure what I did wrong the first time. I spent about 5 minutes rubbing and pressing the image with a ruler and then I submerged it in warm water and let it soak for about 2 minutes. The white paper peeled off easily without damaging the black ink. Thank you! 🙂
graphicsfairy says
Oh yea!! So glad you were persistent, sometimes it just takes a few tries 🙂
Paula Iacono says
When you wash the vessels, does the image come off?
donshay says
hey Im doing this on a plate, but having guest sign the plate with a marker I know to have the maker dry i have to put it in the over. Do you think its safe to put the sticker in the oven?
graphicsfairy says
I am not sure about that, the oven may melt the tape, perhaps try it on a sample piece first to test it out. Good luck 🙂
Christine says
I’ve been doing this for some time. Since I do a few at once I’m pressed for time so I use a hair dryer to get some or all of the moisture out quicker. Dry it on the tacky side. I also find that the heavy duty tape and the cheaper versions both have their strengths and weaknesses. The cheaper versions are not too tacky so the paper comes off easier provided you did your burnishing thoroughly. The heavy duty tapes are easier to work with if your prints are small. For larger projects I use clear self adhesive rolls. The sticky back type to cover school books with.
Sara says
Thanks for this ! Worked perfectly. Is there any way to stick just the image without the tape ? Is there any way to take the tape away and just keep the image there ?
graphicsfairy says
Hi Sara,
There are so many different ways to transfer images, here is a link to some of my favorites, https://thegraphicsfairy.com/12-easy-image-transfer-methods-for-diy-projects/ I hope that helps 🙂
QweenButterflyy says
This absolutely worked! Im excited because now I can finish customizing my husband’s mug for his birthday! Thank you for this easy tutorial!!
graphicsfairy says
Oh yea! Good luck, I am sure he will love it!!
Amanda Thompson says
I have tried this over and over with different types of tape and the same thing happens every time. The image transfers to the tape just fine, but the tape loses all its stickiness so I can’t do anything with it. It won’t stick to the glass. Can you help?
graphicsfairy says
Hi Amanda, this was actually a guest post from Andrea over at The Cottage Market. She does state in her instructions to make sure you are using laser or toner based prints, other that that I am not sure why it isn’t working for you. Sorry I couldn’t be of more help. Here is a link to Andrea’s site, maybe she can assist you, https://thecottagemarket.com/ Have a great day!
Joy says
Hi Andrea,
First time reading your blog. I found a link to you from Unexpected Elegance on YouTube. I thought my memorial ornament was not going to come to be this year. I saved red roses from my mom’s funeral and dried them out back in January in hopes of doing an ornament for my 7 siblings. I tried Cricut vinyl and it wasn’t working out well with the tiny print I needed. Just found rub on letters on Amazon but read lining them up straight can be very tedious and tricky. Then I would have to order multiple packs to get enough for 8 ornaments and mistakes. I had almost given up until this afternoon. I just tried what you posted and after a few attempts. I’m in tears. Knowing I can assemble all 8 ornaments now to get them ready to give on Christmas day to my siblings for our first Christmas without mom this year. I wish I could share a picture with you of my precious ornament somehow. Thanks for helping me make memories to last a lifetime. God Bless you!
graphicsfairy says
Thanks so much for sharing your story , I am so sorry for the loss of your mom, I am sure your siblings will absolutely love the thoughtful gift of the ornaments and such a lovely way to remember your Mom. Wishing you and your family a very Merry and Blessed Christmas.
Ms. M says
Question, you put th sticky side of the tape onto the image to be transfered and burnish the non sticky side? …..
graphicsfairy says
Yes that is correct 🙂