{This post contains affiliate links}
Six Simple Ways to Alter Photos Using PicMonkey
Today I wanted to share some simple ways you can edit, update and work with vintage photos from The Graphics Fairy. I thought it was important to give some suggestions that don’t require special software or downloads, just an editing program where everything is done directly on the internet.
If you haven’t visited PicMonkey.com yet, try it! It’s a great program to edit your photos easily and there are tons of effects you can add to your images to make them unique. Today I’m going to show you six ideas!
BEFORE YOU START
Before you begin, you’ll need to have the image from the Graphics Fairy you want to work with downloaded and saved to your computer. For this project, I used the glamour girl. You’ll also need to have your internet browser opened to PicMonkey.com, an online photo editor.
Go to PicMonkey, and click on “edit a photo” at the top. Select the photo you saved on your computer, and it will open in the online photo editor.
*NOTE: There are multiple ways to edit photos and get similar looks in PicMonkey. I’m trying to focus on simple effects in this post to help those new to this program. There is a ton of room to play around and really create something special, so don’t think you have to stop with what I’ve given in this post!
1. ADD TEXT TO AN IMAGE
Open the image you’d like to edit. On the left side of the screen, select the text editing tool icon, marked “Tt”.
Scroll down until you find a font you like and click it. Now click the “Add Text” button. A moveable box appears that says “type your text here”; click and type your text in the box.
The floating style text editor allows you to change text color, size, alignment, and transparency. The long vertical box in the text editor (when clicked) pulls up an eyedropper tool, which lets you match a color from your photo exactly. When you’re done, hit the green “Apply” button to add the effect. Hit the save button up top, and you’re done. Easy-peasy, right?
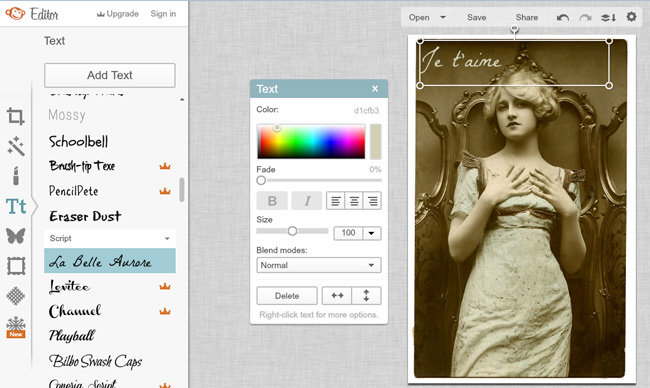 If you’re trying to copy this exact image, I used the La Belle Aurore font, color: d1cfb3, fade: 0, size: 100, blend modes: normal.
2. CROP AN IMAGE & ADD A FRAME
Open the image you’d like to edit. On the left side of the screen, choose the cropping icon, the first icon that looks like two overlapping right angles. If you have a specific ratio you want the image to be, select it in the first “fixed proportions” drop down. If you want a specific size image, you can change the pixel dimensions.
Drag the sides of the crop area, until you highlight what you want to keep, then hit “apply”.
When you’re done with all edits, save your image by selecting the “Save” button up top. If you want to add a frame at this point, continue to the next step.
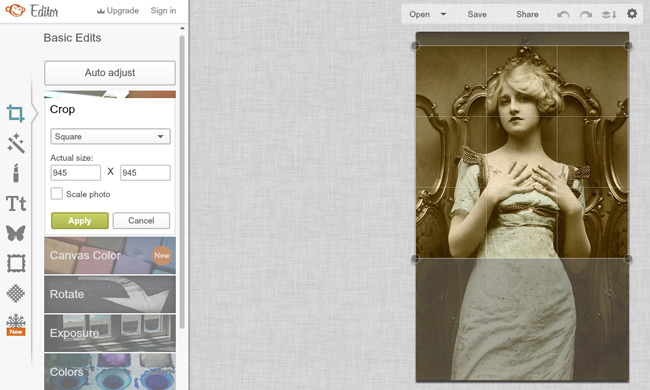 If you’re trying to copy the exact process, I chose square proportions, and cropped my image to 945 x 945.
Now add the frame. I wanted to make my newly square cropped image a Polaroid, so with my image open, I selected the Frames icon (the sixth down on the left that looks like a curvy frame). There are lots of frame styles to choose from. I chose a Polaroid style.
Check the transparent box if you think you may want to layer the Polaroids with other images or backgrounds. You can also rotate the image at this point (also great if you like the look of a group of Polaroids overlapping or in a pile).
Hit “Apply” to accept the change, and save the image (use the button in grey up top) to save the image to your computer.
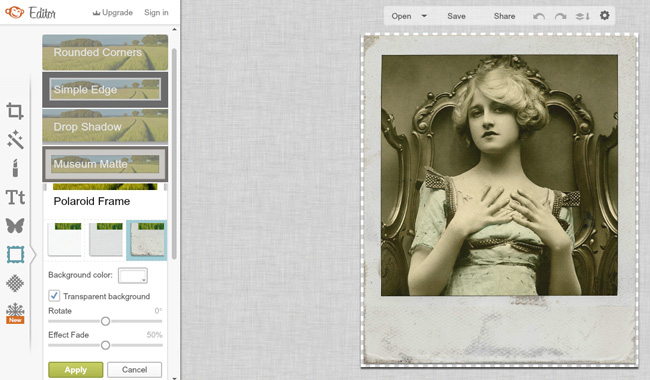 If you like this exact look, I chose the third Polaroid frame style, with a transparent background, Rotate: 0 degrees ,and Effect Fade: 50%.
3. MAKE A BLACK & WHITE PHOTO
Open the image you’d like to edit. Choose the Effects icon (second icon down on the left and it looks like a magic wand with sparkles). Scroll down to the “Black and White” effect.
Hit “Apply” to accept the change, and save the image (use the button in grey up top) to save the image to your computer.
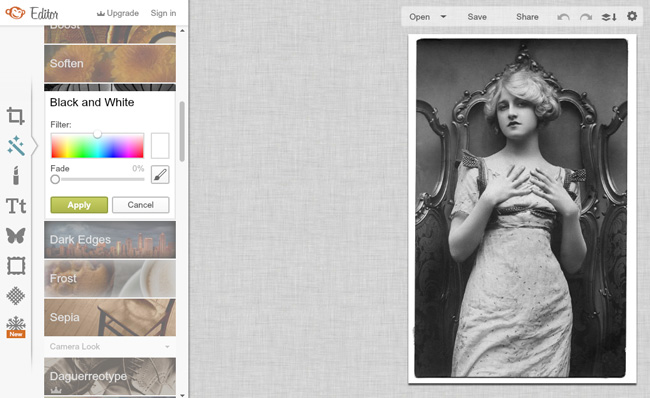 For this exact look, I just left the presets alone. I chose a white filter, fade: 0%.
4. TINT A PHOTOGRAPH
Open the image you’d like to edit. Choose the Effects icon (second icon down on the left and it looks like a magic wand with sparkles). Scroll down about two-thirds of the way down through the effects and choose the “Tint” effect.
Select any color that you’d like to tint your photo. I chose a light blue, but you can click on any color of the rainbow! The advanced drop down box lets you select different lighting conditions, and the fade option lets you play with how strong you want the effect versus how much you want the original photo to peek through.
Hit “Apply” to accept the change, and save the image (use the button in grey up top) to save the image to your computer.
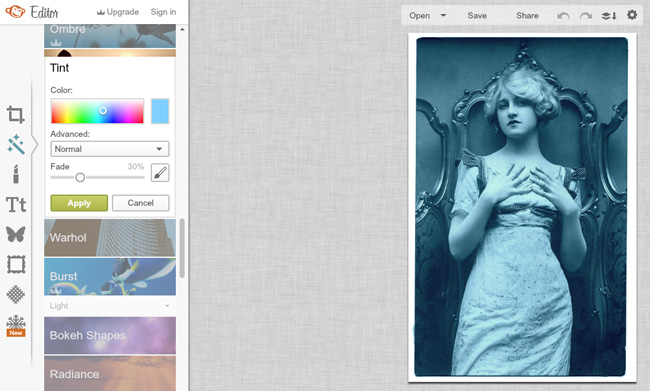 For this exact look, I chose a light blue from the color palette. I chose Advanced: Normal, Fade: 30%.
5. ADD TEXTURE TO A PHOTOGRAPH
For this project, I wanted to add a subtle texture to the photo so it looked like twinkling lights and very ethereal. Open the image you want to work with. Choose the “Textures” icon on the left side of the screen (near the bottom and looks like a crosshatch texture). Scroll down to the “Space” texture, I chose the second space effect.
The move option lets you move the texture (which you’d want to do, if say, there was a huge dot on her eye). The blend mode is a neat option that lets you change the lighting of the texture (with the lighting options for this texture, you can get everything from a subtle falling snow look, to dark age spots on a photo). You can also play with the saturation and fade of the effect.
Hit “Apply” to accept the change, and save the image (use the button in grey up top) to save the image to your computer.
 If you want this exact look, I chose the second space texture, set the Blend Mode to multiply, Saturation: 95% and Fade: 70%..
6. TOUCH UP YOUR PHOTOGRAPH WITH COLOR
There are many ways to do this, but I’m going to show you how to selectively add color to this photo only using one menu area. First, open the photo you want to work with. Scroll down to the “Touch Up” icon, which is on the left and looks like a lipstick.
TIP: When you’re adding colors in small areas, like lips, you will want to zoom in. You can do this by hitting the “+” sign in the lower right of the screen, then scroll to the area you want to zoom in on.
TIP: If you get heavy handed or color outside the lines with these “Touch Up” type effects, there usually is an eraser icon next to the “Brush Size” option. Hit that and you can erase portions of the effect you just added without undoing all of your work. You can also use the “Undo the Last Action” button (it’s the grey arrow pointing to the left at the top of the screen).
FOR THE LIPS: I chose the first pink option, the 5th circle in the color palette, set my brush size to 6, Hardness: 35%, Intensity: 60% and Tone: -46%. I followed the natural lines of her lips. Hit “Apply” to accept the change, and move on to her cheeks.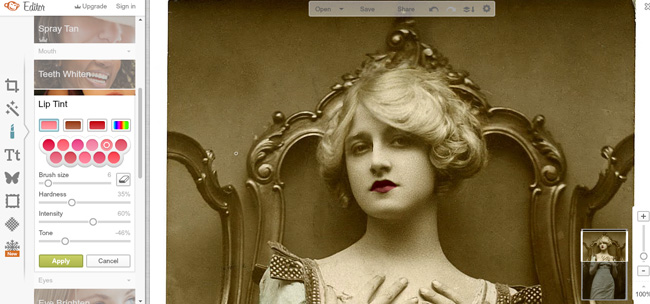
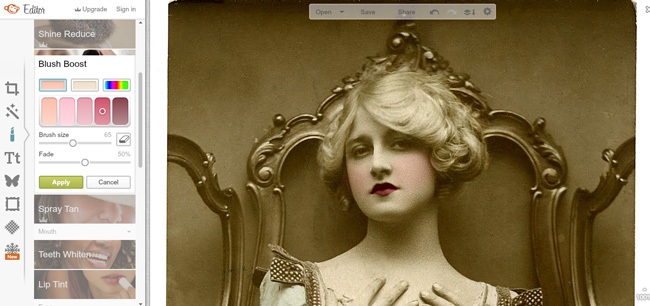
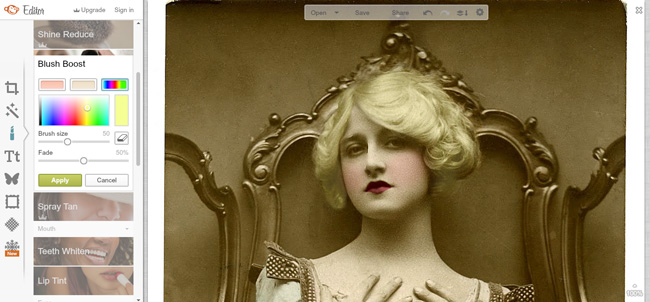
FOR THE CHEEKS: In the same “Touch Up” editing menu, scroll back up to “Blush Boost”. I chose the first pink option, the 4th color in the color palette, set my brush size to 65 and Fade to 50% and added color to her cheek area. Hit “Apply” to accept the change, and then you can move on to her hair.
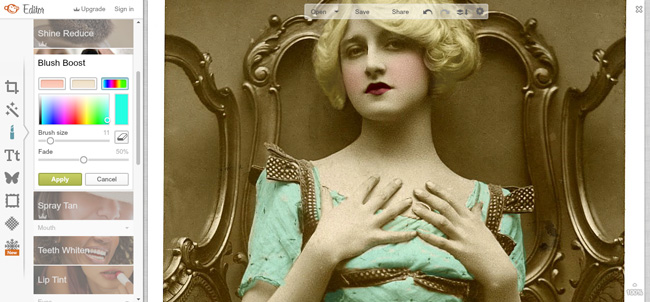
FOR THE HAIR: Stay in the same “Blush Boost” menu. Choose the rainbow palette and choose a light yellow color. My brush size varied between 10 and 50, and I left the Fade at 50%. I added color to her hair. Hit “Apply” to accept the change, and move on to her dress. TIP: if you’ve colored in an area and you want to play with the color, just move the color selection in the rainbow palette before you hit “Apply”. So, you could change her hair color to pink, or purple, or whatever color you want without redrawing her hair.
FOR THE DRESS: Stay in the same “Blush Boost” menu. Choose the rainbow palette and choose an aqua color. My brush size varied between 5 and 100, and I left the Fade at 50%. I added color to her dress. Hit “Apply” to accept the change, and save the image (use the button in grey up top) to save the image to your computer.
Thanks for letting me show you a few things you can do in PicMonkey! I have a bunch of other ideas to share in future posts, but I hope you enjoy playing with vintage photos on the site using these techniques.
****************




Amy fraunfelter says
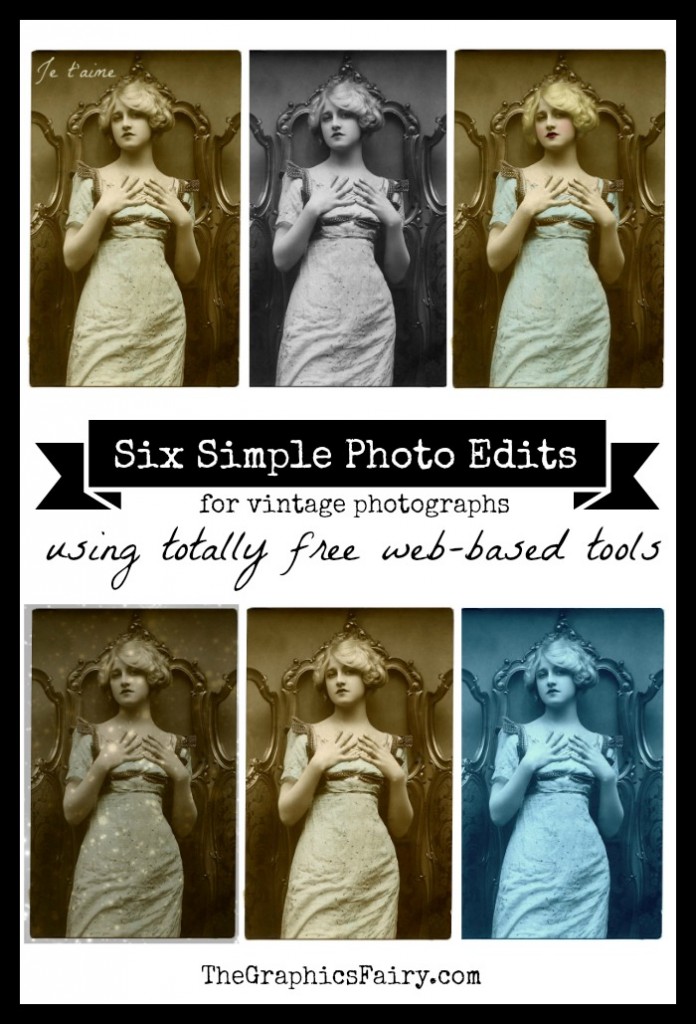
Hello, thank you for the info on pic monkey! I have used them in the past. I LOVE the top right one, is that the original? And if not did I miss how you did it? I love that look and back in the 90’s I had a set of markers that you dipped in a solution and then went over the picture to create it (we have come a long way LOL). Thank you!
Emily says
Hi Amy – the directions for the one in the upper right of the graphic is #6 in the list above. I just colored it in digitally using the lips and blush options in PicMonkey —- I remember those markers on black and white photos too!
Becky says
Great tips, thanks so much for sharing!
Margaret A (Granmargaret) says
Thank you very much for this.
Linda K says
Thanks so much for taking the time to post this tutorial. I am going to give it a try.
Leah Wise says
Thanks for this tutorial! I use Picassa a lot, but haven’t tried PicMonkey. Can’t wait! 😀
Kathy Holcomb says
thanks so much Karen. This is so useful and fun!
Tina Coco says
Thank you so much for taking the time to provide all this info! I’ve never tried picmonkey, but I’m sure going to give it a try!
Emily says
You’re welcome Tina, have fun!
Honey says
I was just trying to simply edit some photos for my mom’s 80th birthday party this weekend. This was fast and easy thanks to your tutorial. Thank you so much.
Kathy says
I hope this helps with posting photos on my jewelry site, they have to be a certain size. I’ve been looking for photo editing software.
Emily says
That’s great Kathy. It sounds like you’ll mostly be working in the crop menu then. If you have specific dimensions, just type them in the boxes and hit “scale photo” and drag the crop area of the photo to what you want and you’ll always have the correct size photo for your site.
chris says
I tried it and the lips went well, however when I tried most of the other features it says you hsve to upgrade and pay monthly??? So I couldnt do any eye colors back ground etc. Your reply would be gratefully received as I have been longing to find something free in order to do these kinds of effects. thanks
Emily says
Chris – yes the effects shown in this post all are basic & what I did in this post was all done completely using free features. You may want to try the editor in Pixlr — http://pixlr.com. That is web-based and like photoshop you can lasso out backgrounds & correct red eye etc, and it’s free from what I’ve used of it. If you’re doing very advanced touch ups to photos all the time, you would be best getting photoshop or photoshop elements (elements is less than $100 on sale) — with those you can get all sorts of photoshop actions for your photos. You can also upgrade PicMonkey if you want something web-based. The free options I use in PicMonkey to edit my photos are in the basic menu — mostly adjusting exposure and cropping. I don’t personally do a lot of touchups or changing eye color.
LeAnne says
Thanks for the tips! I LOVE PicMonkey but don’t use it enough…this is a great tutorial and I am PINNING it!
Julie S says
Great post! I haven’t tried picmonkey before, but will definitely give it a go. Thanks!
Jerosha says
Thank you so much for sharing with us this picmonkey tutorial. I actuallu had no idea what picmonkey was about BUT thanks to your kindness coz now I’m going to explore and try =D God bless!
Jennie @ Got My Reservations says
Well, I tried to pin this post. Your settings don’t allow me to import a photo — maybe?? — and even using your Pinterest button, I can’t pin this post.
Karen Watson says
Hi Jennie,
Sorry about that, I’m not sure why it didn’t work for you! I just tried it and it’s working fine for me. Maybe there was a glitch this morning? If you try it again and it still doesn’t work for you, let me know what browser you use and I will see if I can figure out what the issue is. Thanks!!
Jennie @ Got My Reservations says
Thank you for posting this! I use PicMonkey all the time and I think I’m finally going to actually purchase the next level. Pinning today!