Picmonkey Photo Editor
Hi there and welcome! This post will help with understanding PicMonkey basics — what PicMonkey is, how to get started, and a little about the different versions available (Basic and Pro). We discuss the concept of the Hub and Layers, and how to add images to PicMonkey and save your project.
We think you’ll agree that this is a super fun online Photo Editor, that can help you take your photography, or Vintage Image Designs, to the next level! If you’re not ready yet for all of the bells and whistles that Photoshop, or Photoshop Elements have to offer, then this web based software (www.picmonkey.com) might just be the alternative that you have been looking for. We hope you find this information useful!
(This post contains affiliate links)
We’ve posted several PicMonkey tutorials on the blog in the past. One of the top questions we receive is, “how can I modify the graphics I find on The Graphics Fairy?” The challenge many readers face is that the image editing software provided on your computer when you buy it is either a) non-existent, b) not powerful enough or intended for the types of edits you want to do, or c) difficult to work with without reading advanced tutorials.
This is why we’ve been steering readers, who aren’t graphic designers or who don’t own Photoshop, to PicMonkey. PicMonkey is very user-friendly, it’s free to test drive*, and there are two subscription versions (called Basic & Pro). The subscriptions are well worth it if you are going to be editing or creating images more than a couple times a month. PicMonkey is great to gain confidence and learn to edit images, but many designers use it because it’s user-friendly and the built in effects and templates are very professional looking.
I’ve tried to summarize many of your general PicMonkey questions below.
What PicMonkey is & How to Get it
What’s PicMonkey again?
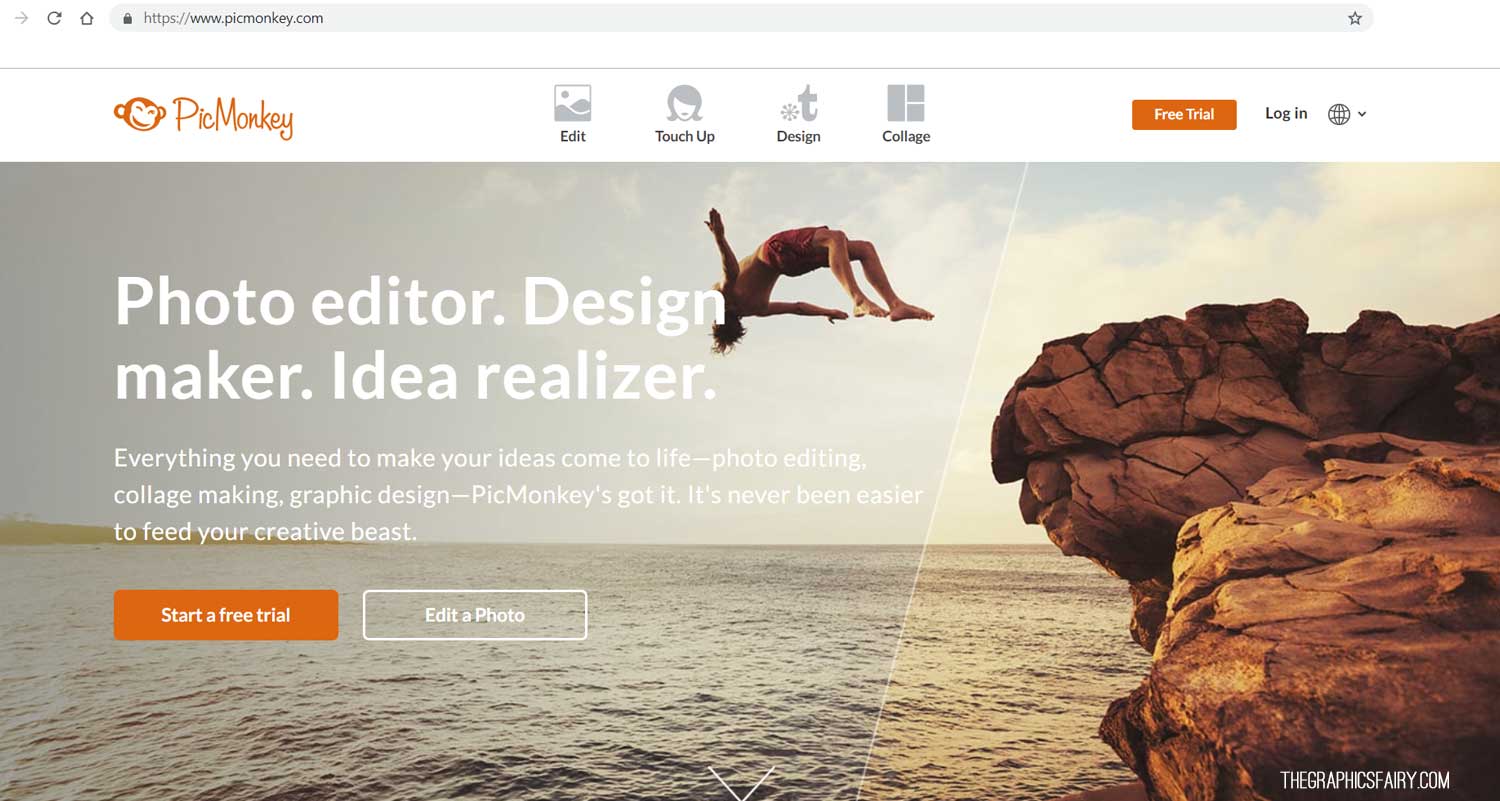
PicMonkey is an online website where you input an image, edit it through an online interface, and then can save it within PicMonkey, or save it back to your computer. You are not opening software stored on your computer or downloading anything; it’s all done online. Here is what the site looks like when opened on Google Chrome:
*Is there a free version?
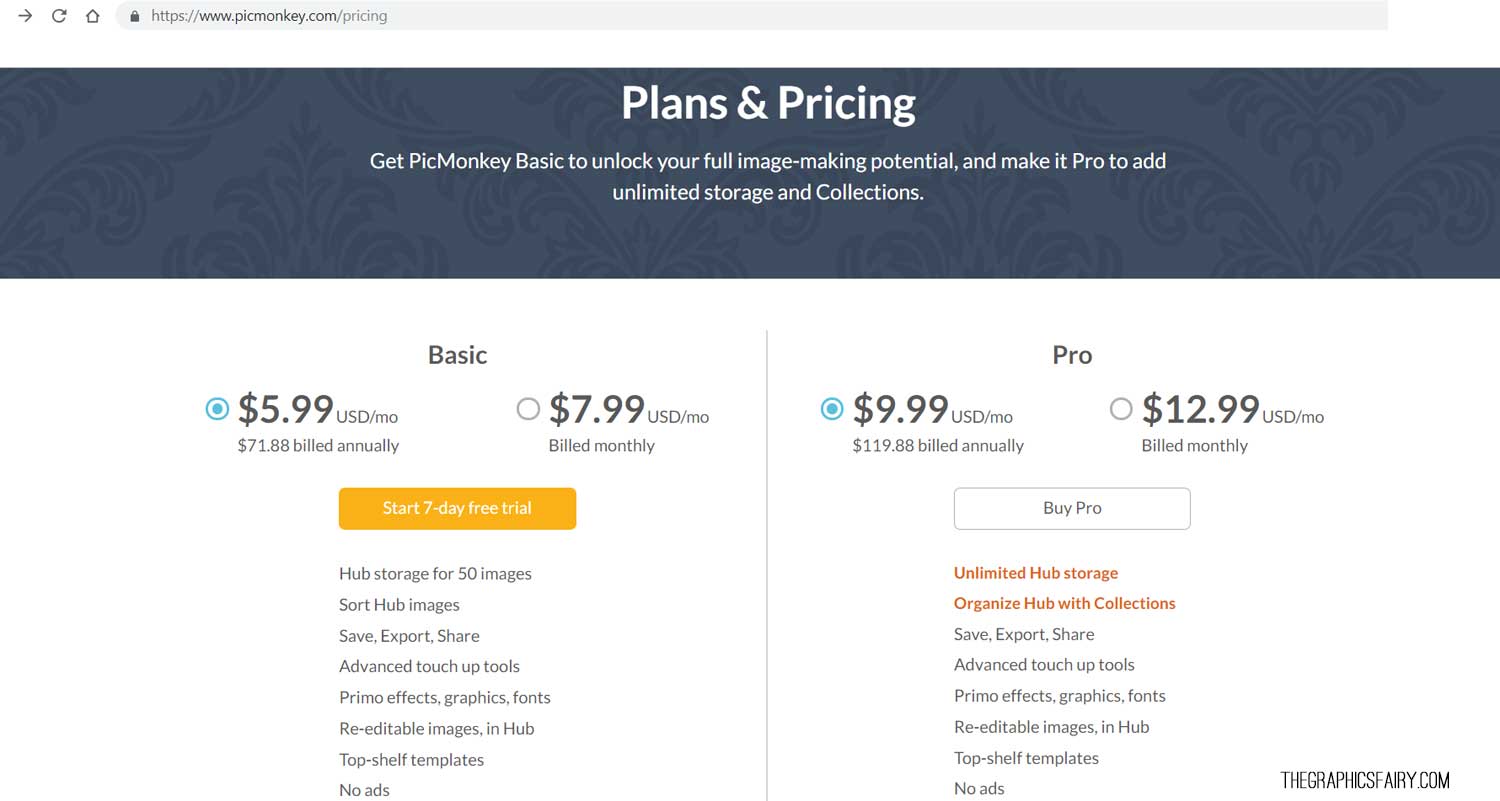
You can test drive the PicMonkey interface for free. You’ll need to start a free trial in order to upload an image and play with the effects. You CANNOT SAVE the file without getting a 7 day trial subscription. I always recommend a free trial so you can play with the service, and save your graphics. If you like PicMonkey’s interface and the options offered, then get the subscription. You can purchase a month to month plan if you aren’t ready to commit to a full year. Click here for pricing information.
Which subscription plan do I need?
There are two plans, Basic & Pro; Basic is $7.99 per month, Pro is $12.99 per month. There are big discounts for purchasing a full year. Both plans give you access to the same main features. The differences between the plans are the “Hub”, image organization, and export.
- Basic: Best for normal to average users. Less storage space, but can sort images by categories. Upload and work with .png, .svg, or.jpg. Export as .png or .jpg.
- Pro: Best for multiple uses/week, hours/week users. Unlimited Hub storage and more robust image organization. Upload and work with .png, .svg, or .jpg. Export as .png, .jpg and .pdf files.
We recommend starting with a Basic plan if you’re unsure, then upgrading if you find you use PicMonkey a lot or need to export as a PDF.
Logging In and Getting Started
Where do I start?
Go to PicMonkey.com. Sign in at the upper right if you have a subscription or trial. PicMonkey will still let you play around and edit, but remember, you can’t save anything without the free trial or a subscription.
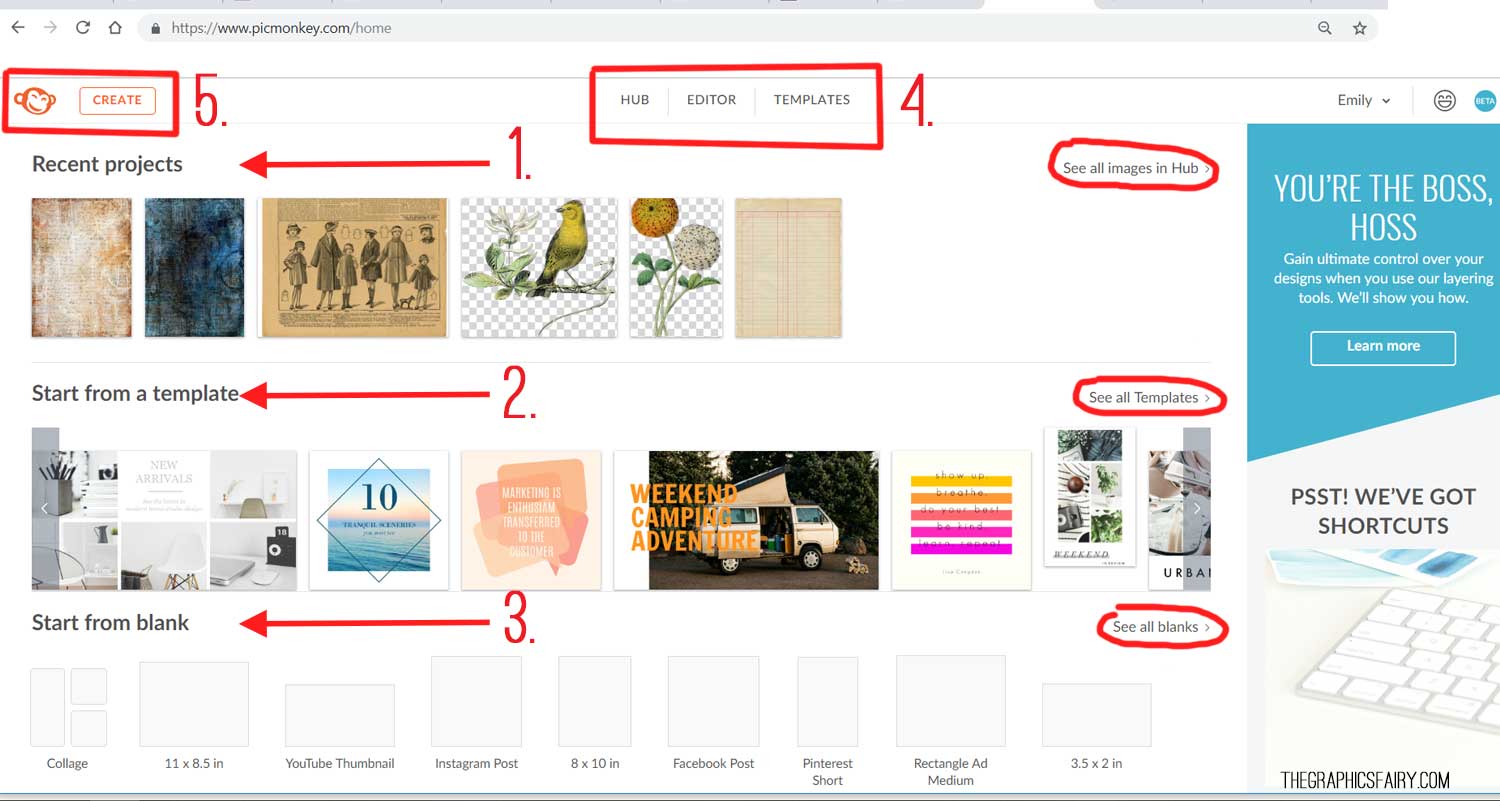
Your login screen will look like this. See below for explanations of each of the numbered sections:
Once you have registered and logged in…. Your account view will have three sections in the main body of the screen:
- (1) Recent projects: files you were recently working on
- (2) Start from a template: pre-designed templates you can customize (think “catchy ad layouts”)
- (3) Start from blank: blank canvases in popular sizes
In these 3 sections, you aren’t seeing everything. Click on the text to “See all…” at the right of these sections for more options (in screenshot below, this text is circled in red).
This screen gets a little repetitive. There are multiple buttons that will take you to the same place.
At the top (4), there are three buttons: Hub (your files), Editor (design your own project from scratch), Templates (pre-designed catchy layouts). In the upper left (5), there is the monkey’s face. Hit that icon any time you want to get back “home” to this view. The Create button is another menu that will guide you through what you want to do (e.g., open an image from the computer, go to the Hub, use a template, etc.)
Remember….where you start depends on what you want to do:
- Hub: Have a project you are returning to? Have a single graphic to upload / already uploaded that you want to use or modify?
- Editor: Ready to create a project from scratch?
- Start from blank: Do you already know you are going to create a project in a specific, common size?
- Templates: Want something pretty for social media already designed that you can swap out a few graphics? Find it easier to start with something & edit it, than with a blank screen?
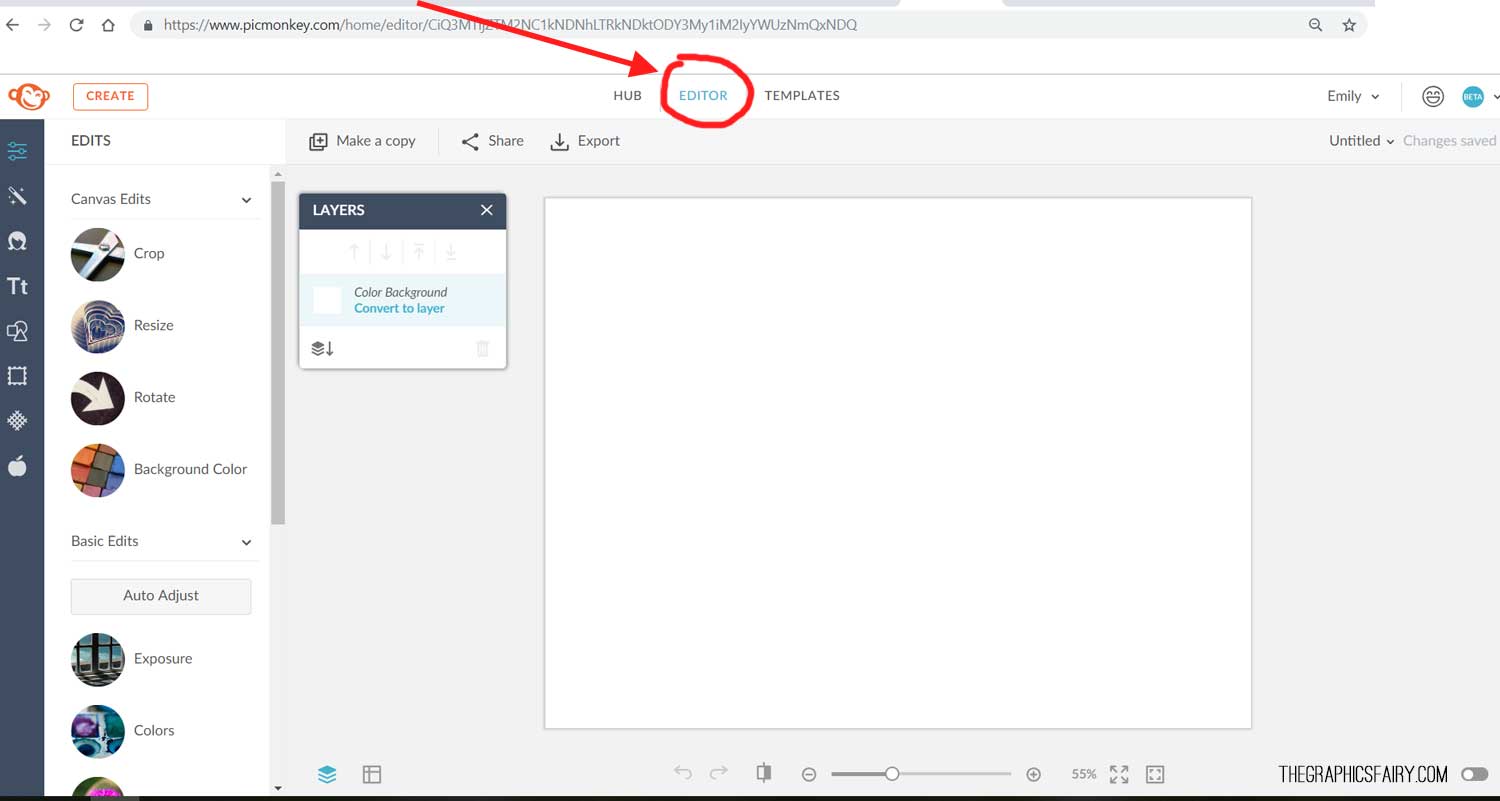
Because I like to build projects from scratch, I personally use the Editor most often. It’s at the top & center of this screen. I find I can adjust the canvas that comes up, and I go to the Graphics tab on the left and add in all of my images from there. You may find you like to always start with a different option. Below you can see what the Editor looks like when opened. We will come back to the Editor after I explain a few more concepts.
Important Concept: The Hub
What’s the concept of the Hub?
The Hub is PicMonkey’s way of storing your files and projects. It’s easy to revisit what you were working on.
This matters because PicMonkey only exports as .png and .jpg (or .pdf if you have Pro version)…. those are flattened files whose components can’t be re-edited individually. If you have a project with lots of elements or layers (think multiple images, text, effects) applied, you will have PicMonkey’s equivalent of a photoshop file (think re-editable project file). Since the history of individual edits is lost when exporting as a flattened image file, the project needs to be saved in the Hub to preserve those elements and track the changes. This way, you can go back in and edit the individual pieces of the project (change effects, move graphics) at a later date.
In the past, the Hub and this concept of a re-editable project fie, didn’t exist. It was possible to work on a digital project for hours, export it, and never be able to go back in and tweak the project. This made it difficult to do more complex designs using many elements.
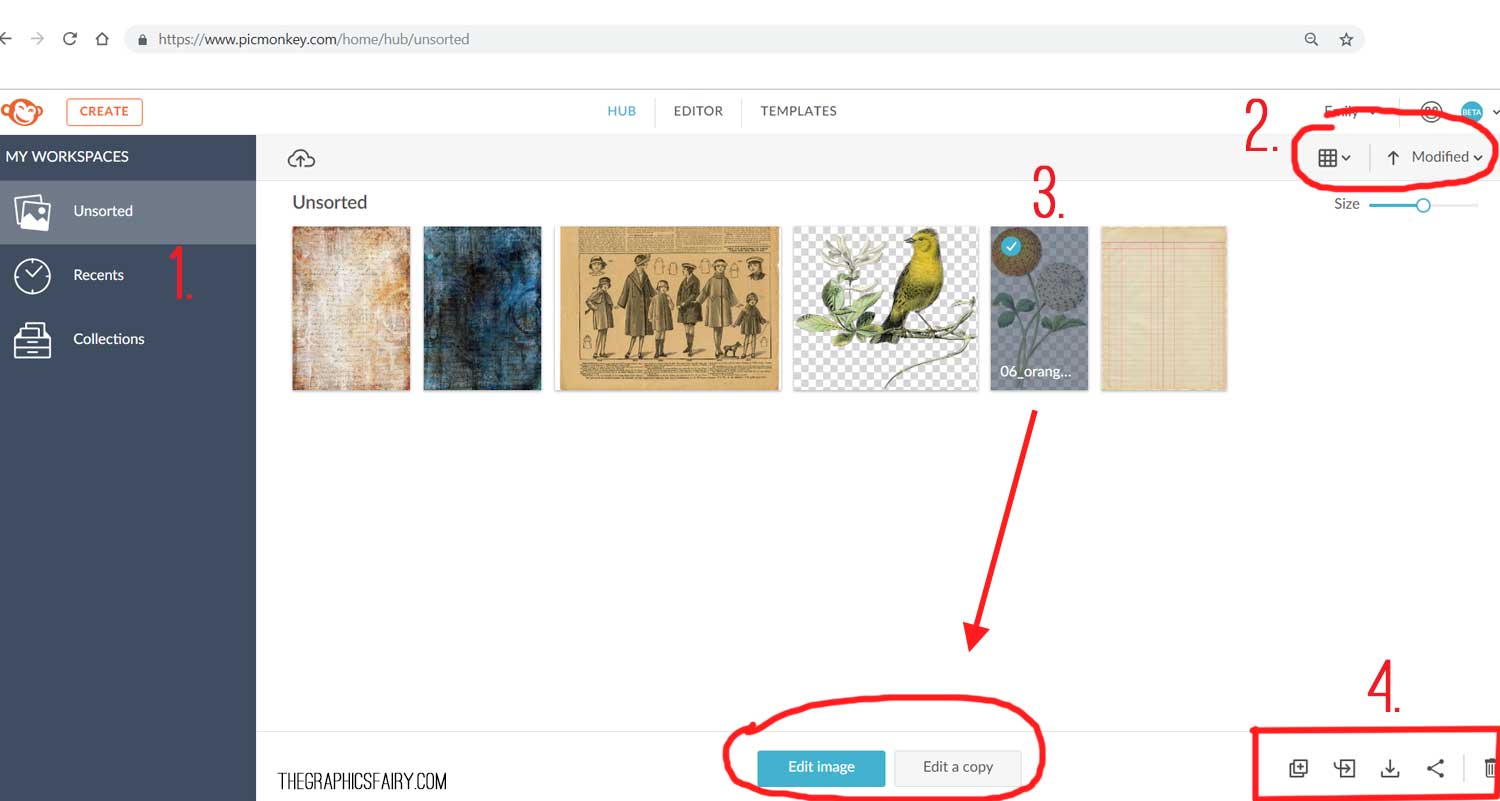
If you go in to the Hub from the main screen, you will see something like what’s above. Again, lots of ways to do the same task.
Section 1 gives options for how you want your images displayed. I only have six images above, so I am okay, but imagine if you had 40 images or projects stored. These options would come in handy. Section 2 is similar, you can specify how you want the preview to look (list, gallery view, name, date etc.).
Hover over the image you want and click to select it (3). You will see options appear at the bottom to edit the image itself or edit a copy (recommended). Click on multiple images to select them. You can either right click, or choose an option in the lower right (4), including move, copy, delete.
Working in the Editor
What does the Editor look like?
I prefer to work in the Editor for most PicMonkey projects. The Editor is found in the top center of the screen.
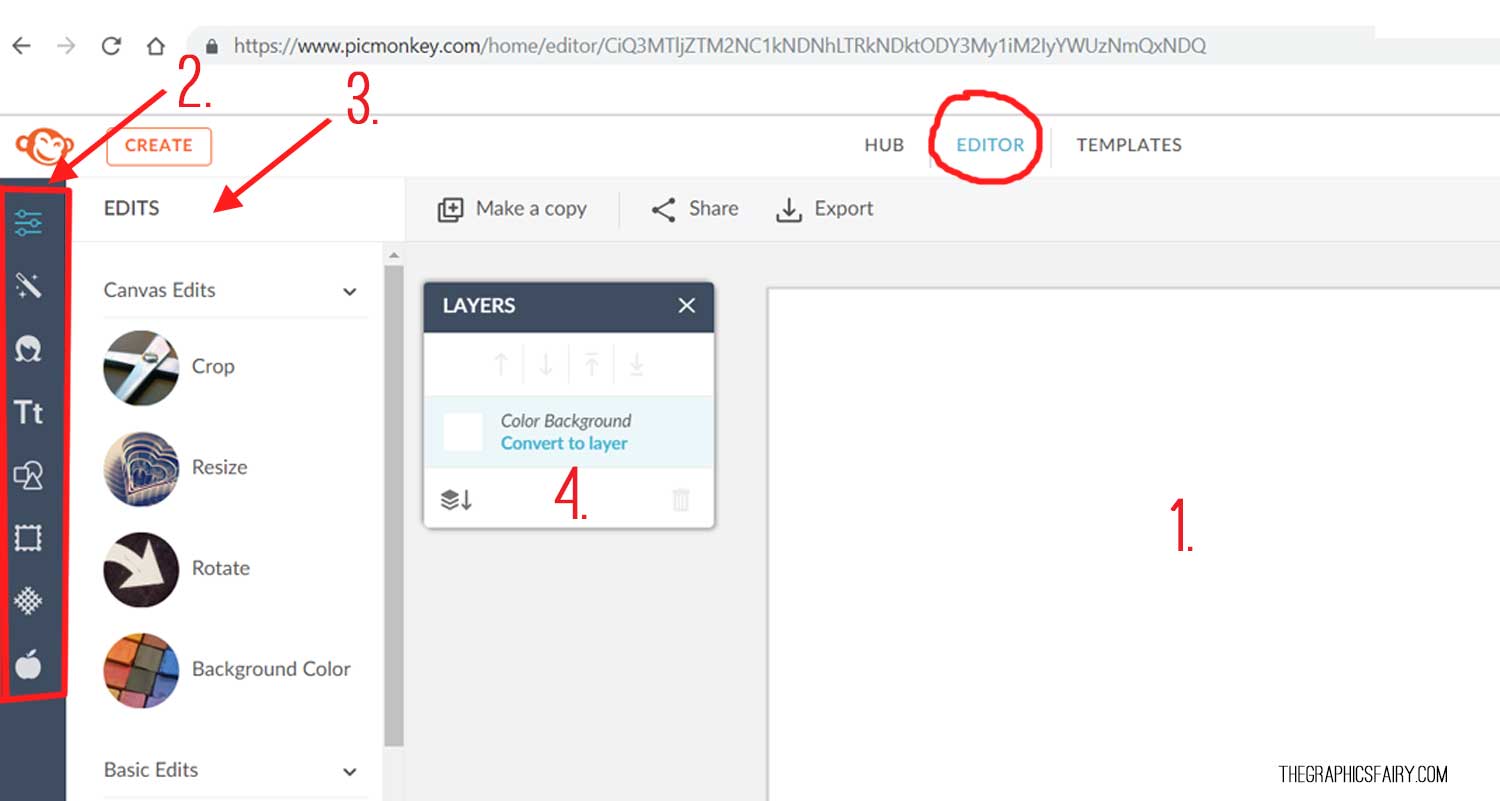
The Editor opens with a blank white canvas (1). On the far left there is a set of key icons (2). Each major section has a corresponding menu of options (3). I use the Edits, Graphics, and Textures menus most often.
- *Slider icon / Edits menu: common basic & advanced edits (e.g., crop, rotate, resize, sharpen, clone, curves)
- Magic Wand icon / Effects menu: variety of image filters (e.g., boost, soften, vignette, orton)
- Face icon / Touch Up menu: photo touch-ups (e.g., blemish fix, eye bright, spray tan)
- T icon / Text menu: add text
- *Three Shapes icon / Graphics menu: add your own graphics or select from PicMonkey’s clip art library
- Frame icon / Frames menu: add preset frame
- *Crosshatch icon / Textures menu: add preset texture or background
- Apple icon / Themes menu: pre-selected fonts, graphics, textures coordinated around common themes
Important Concept: Layers
What’s the concept of Layers?
Layers is not a unique concept to PicMonkey. In short, layers let you mange and edit individual components of an image. This way, you can move and apply effects to individual images, and go back at a later date and edit parts of the composition.
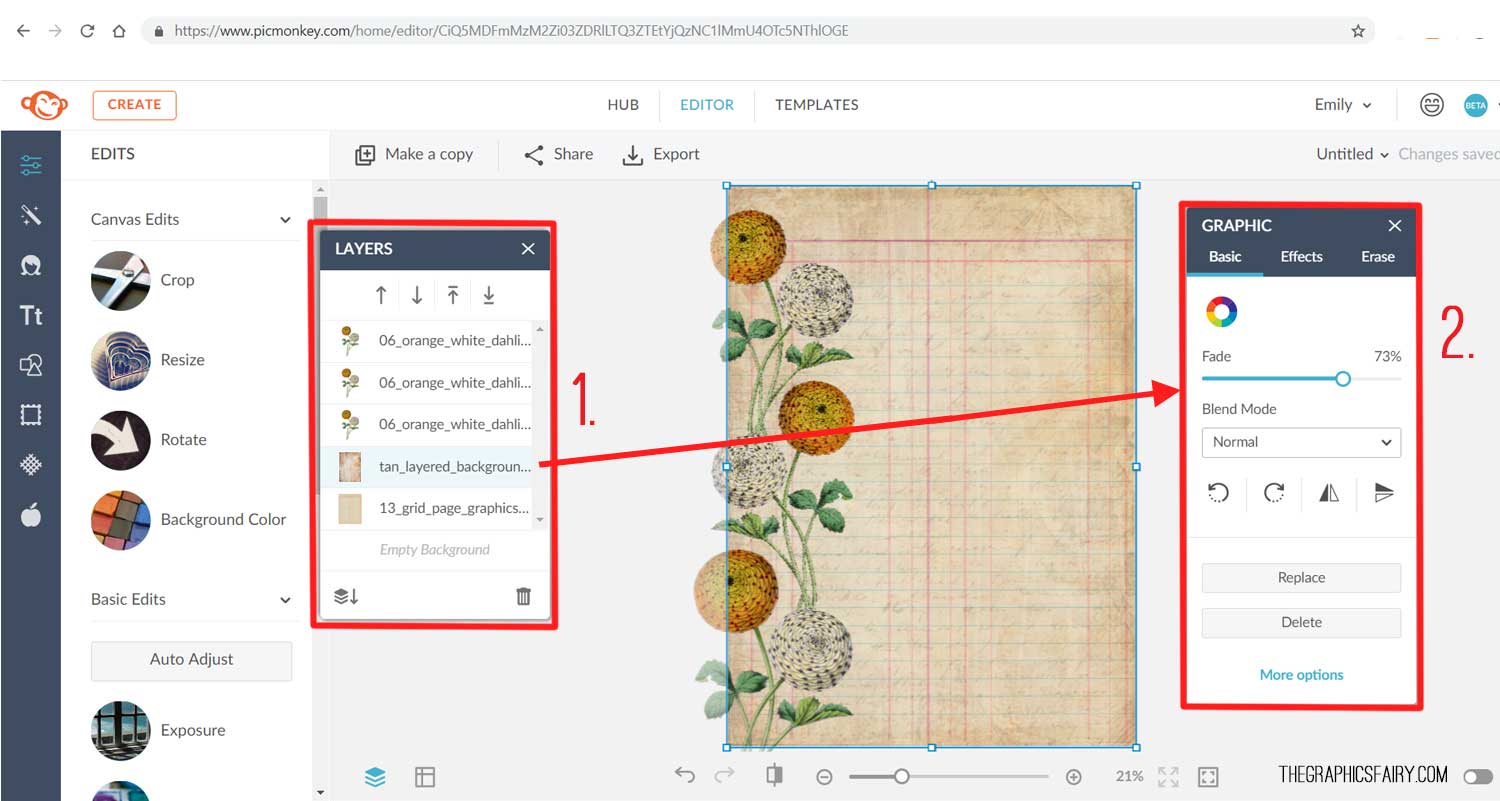
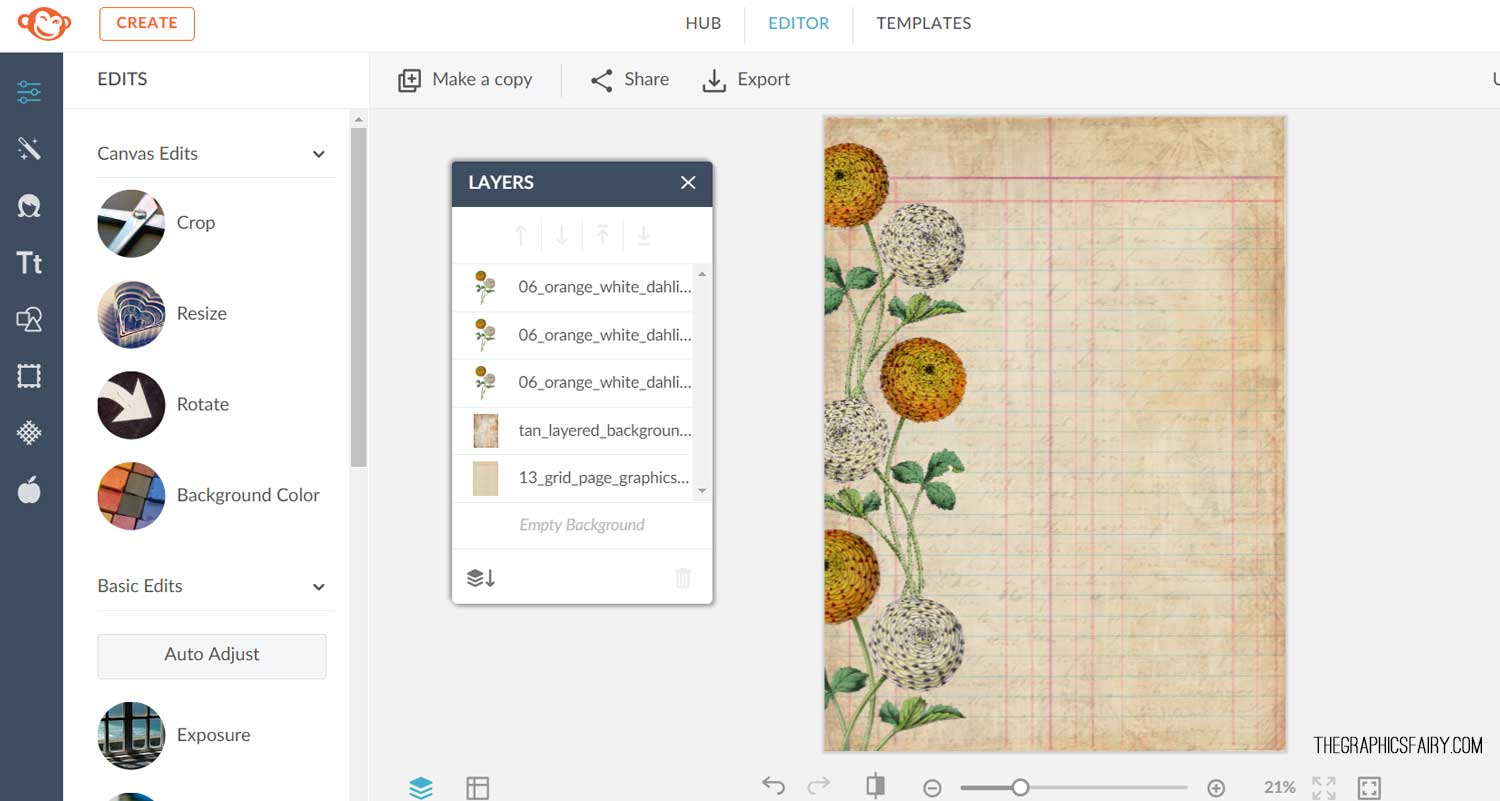
In the project below, I have made a custom paper using five images (a grid paper, a tan textured background, and three sets of flowers). You can see the layers I used in the Layers panel (1). The original tan textured background is pretty dark, but you can see how I selected the tan textured background in the Layer panel (1) and how I applied an individual edit (I adjusted the Fade to 73%) in the individual Graphic menu (2). Without layers, the fade effect would fade out all images (paper, texture, flowers) instead of just the texture.
Layers at the top of the Layers panel (1) indicate they are in front of the layer or layers below them. In the example below, you can see how the flowers are sitting on top of a texture, which sits on top of the grid page layer.
Editing Basics
How do I resize my background?
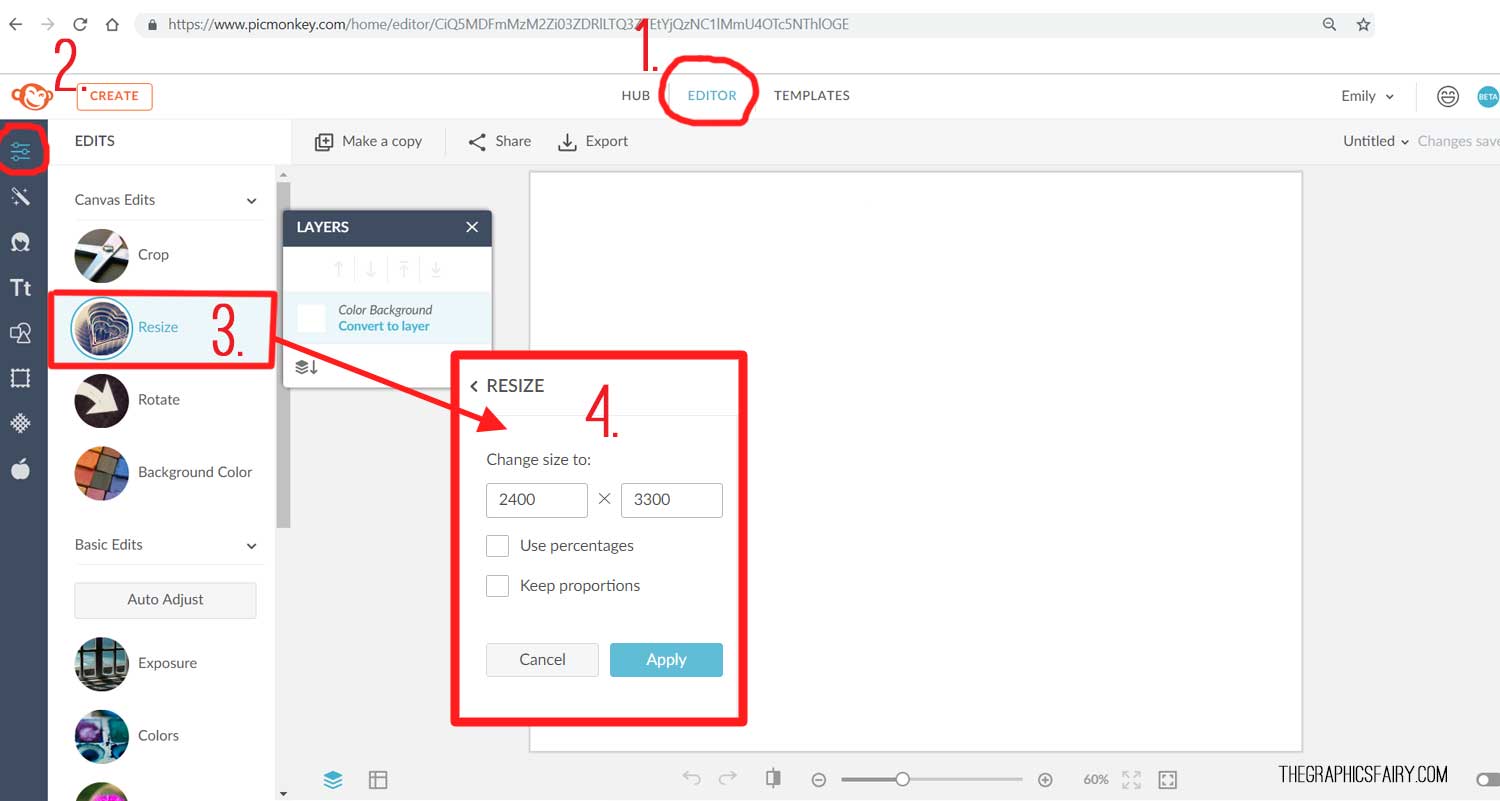
Open PicMonkey and navigate to the Editor (1). Make sure you have selected the Edits icon (looks like little sliders) (2). Click Resize in the Edits menu (3). The Resize menu (4) will let you choose your dimensions. I had a specific size in mind, so I unchecked the “keep proportions” box. I specified my size settings to 2400 pixels by 3300 pixels, which is 8 inches by 11 inches. Hit Apply to accept the change.
How do I create a transparent background canvas?
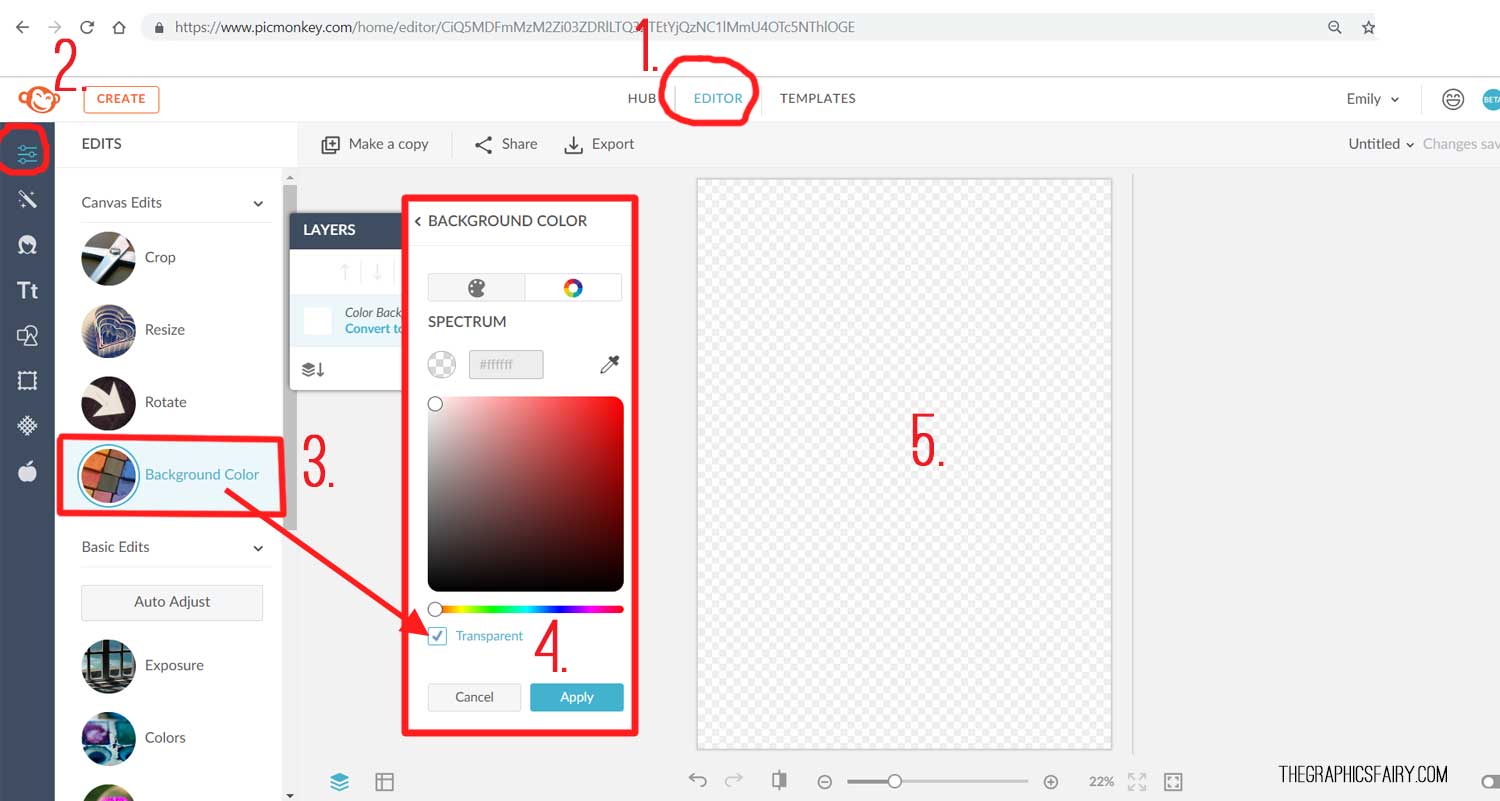
Open PicMonkey and navigate to the Editor (1). Make sure you have selected the Edits icon (looks like little sliders) (2). Click Background Color in the Edits menu (3). The Background Color menu (4) will let you choose any color. Click the box at the bottom that says “Transparent” to make the background see-through. Hit Apply to accept the change. You canvas will go from the default white, to a checkerboard, which symbolizes transparency.
How do I add an image?
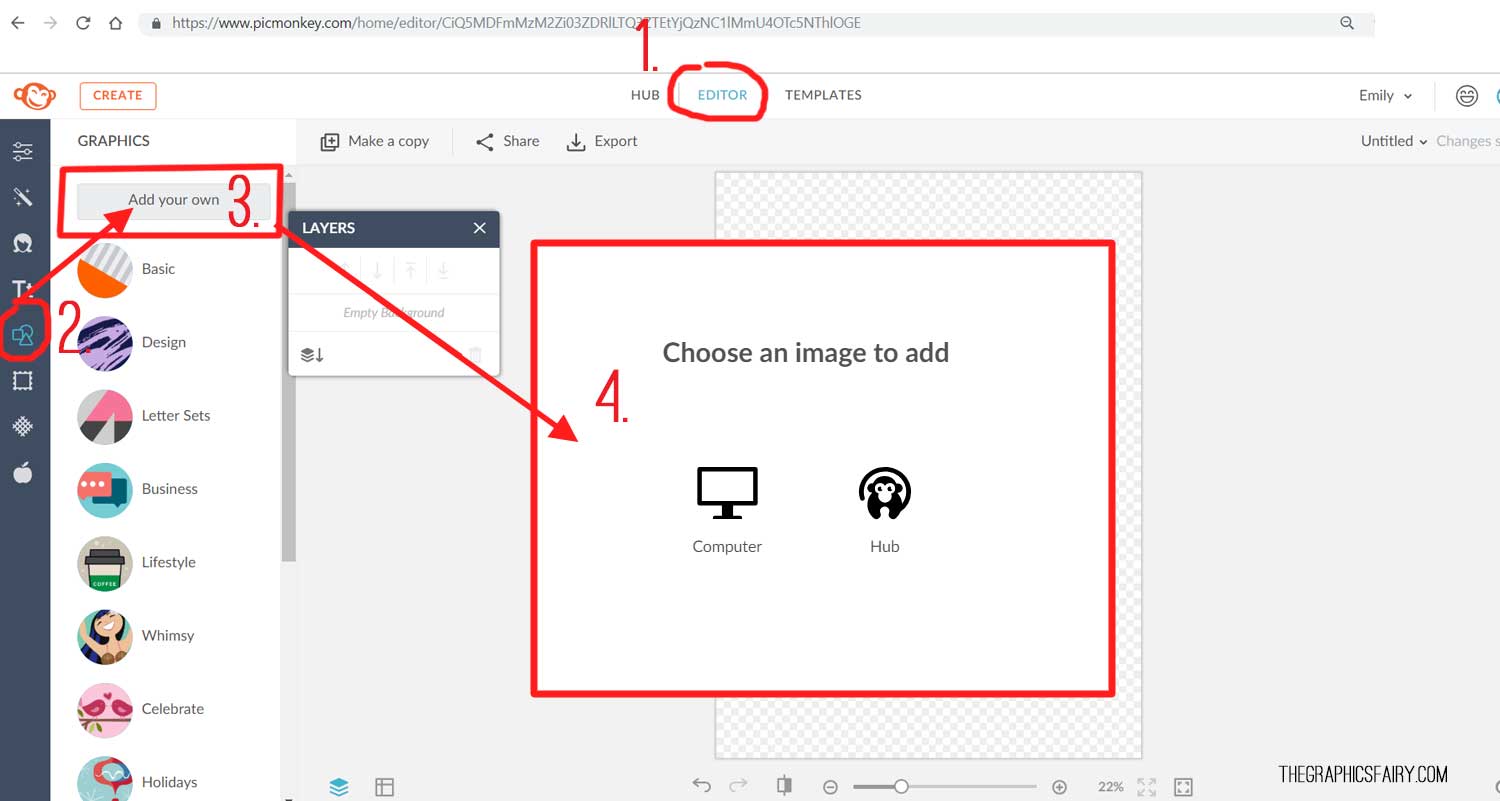
Open PicMonkey and navigate to the Editor (1). Make sure you have selected the Graphics icon (looks like three shapes) (2). Click “Add your own” at the top of the menu (3). The next screen you will see (4) asks you where the image is. Select Computer if it is stored on your computer, select Hub if the image was already stored in your Hub image collections. Follow the prompts to locate and add the image.
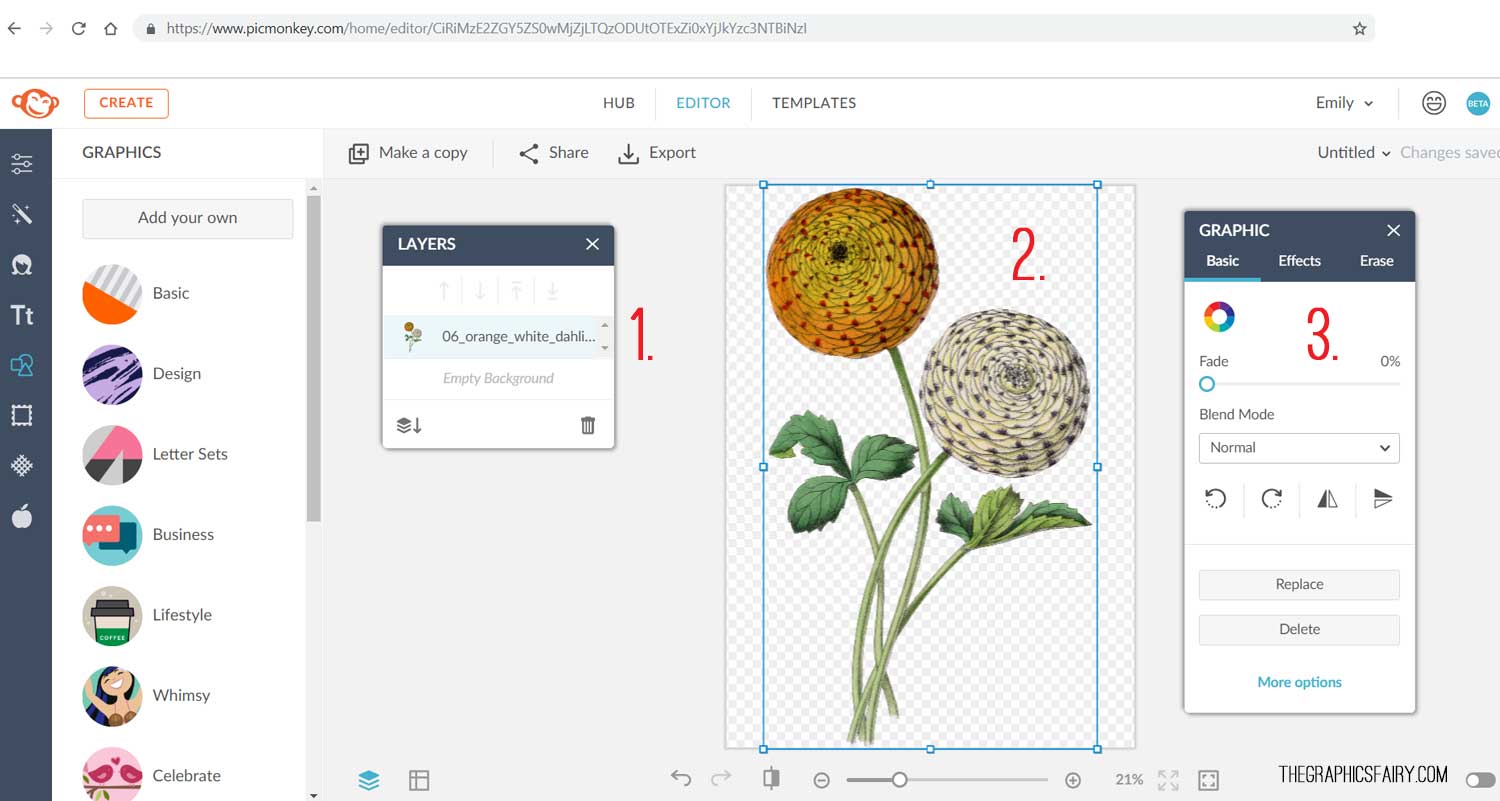
Notice how your image looks when added to a blank canvas. The image layer has been added to the Layers panel (1). The image appears on the main canvas. The original flower image had a transparent / cut out background. To preserve that transparency in our new file, we changed the background canvas from white to transparent earlier. You you can see the flower layered over that checkerboard transparent canvas (2).
Since our flower layer is selected in our Layers panel (1), there are blue lines around the image on the canvas (2). Click and drag the corners to resize the flower on the main canvas. An image-specific menu pops up (3), which lets me modify that individual flower image. Section 3 (the Graphic sub-menu) is where I could flip my image, rotate it, fade it in to the background, add a shadow effect, or erase portions of the image.
How do I save my file / project?
Below is a simple background I created by duplicating the flower image, resizing the flowers, and repositioning them. I added a grid paper and a texture and placed those below the flowers (click & drag in the layers panel to reposition layers). The only other edit I did was to put a fade on the brown texture layer. You can see the 5 layers that make up this project listed in the Layers panel.
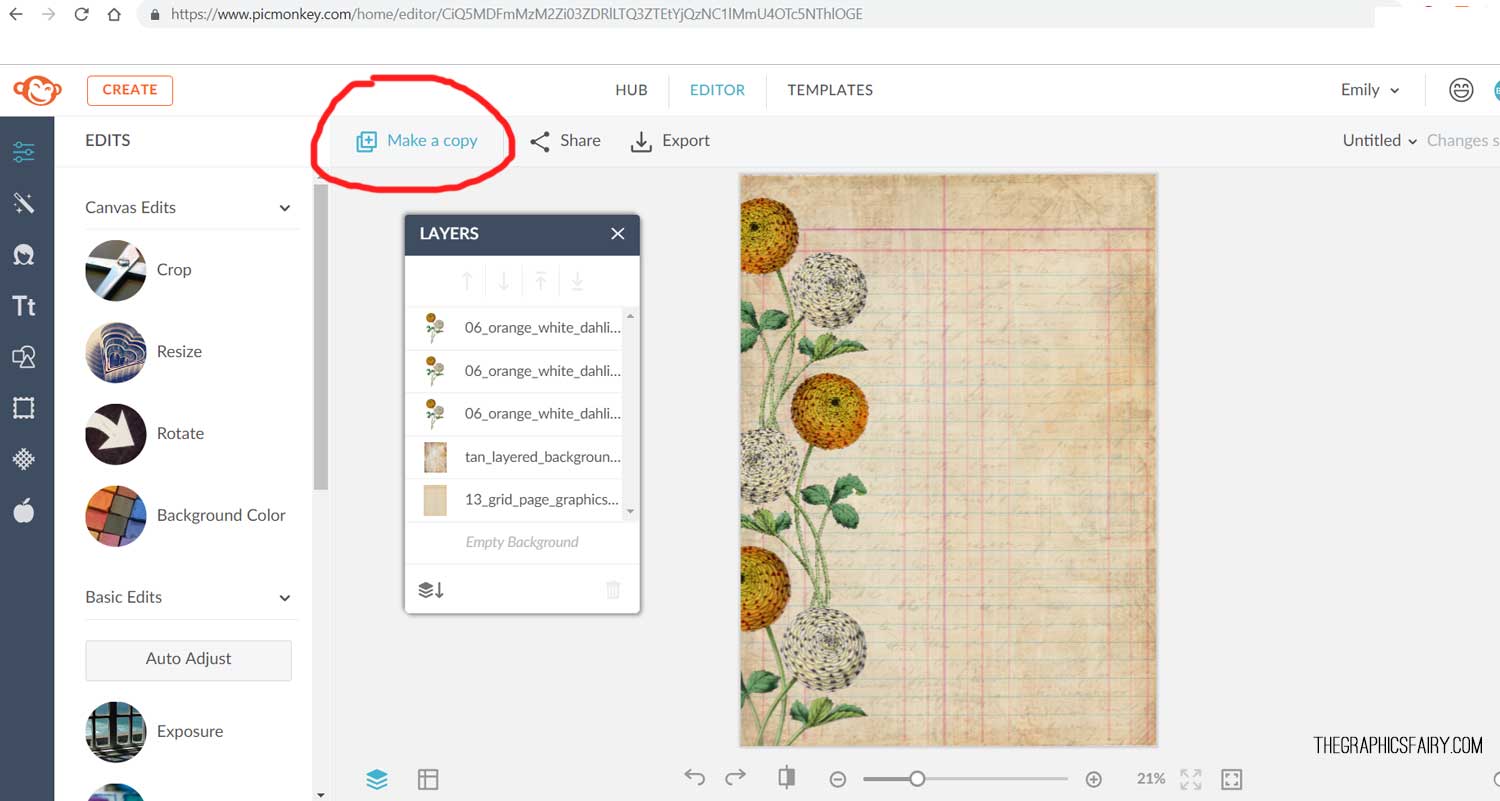
If you have a multi-layered file like I have above (a project), and you think you may want to go back and edit it, reuse it, or modify it at any time in the future, you need to save the file as a project. Go to the Make a copy button. This will ensure you keep the project with all the layers, and a flattened version you can export.
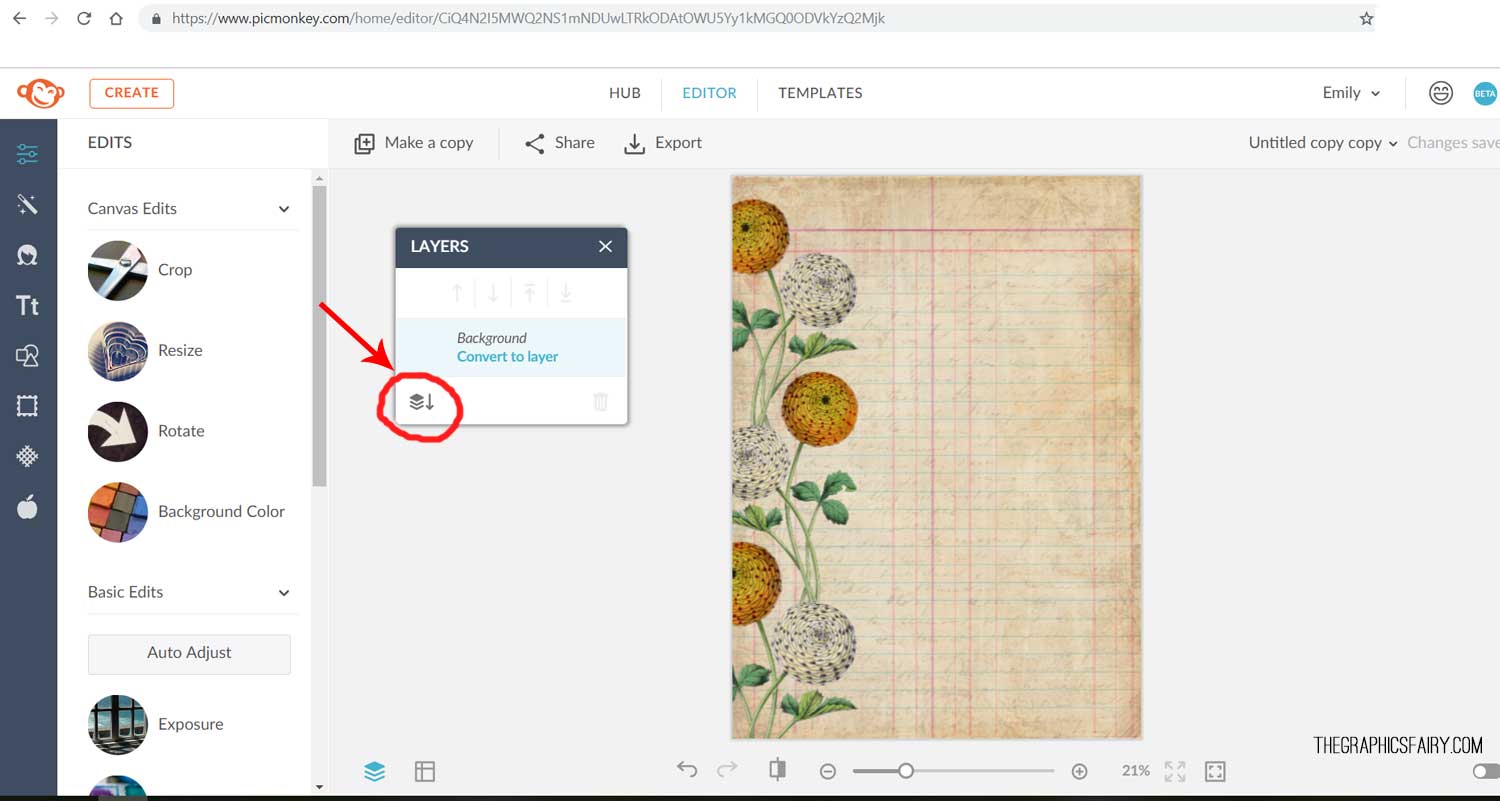
After you make a copy, you can flatten the copy. Hit the Flatten all layers icon (looks like a stack of papers with a down arrow). Note below how my Layers panel now only has a single background layer. This means I cannot individually edit the flowers or the papers. But I can export this image!
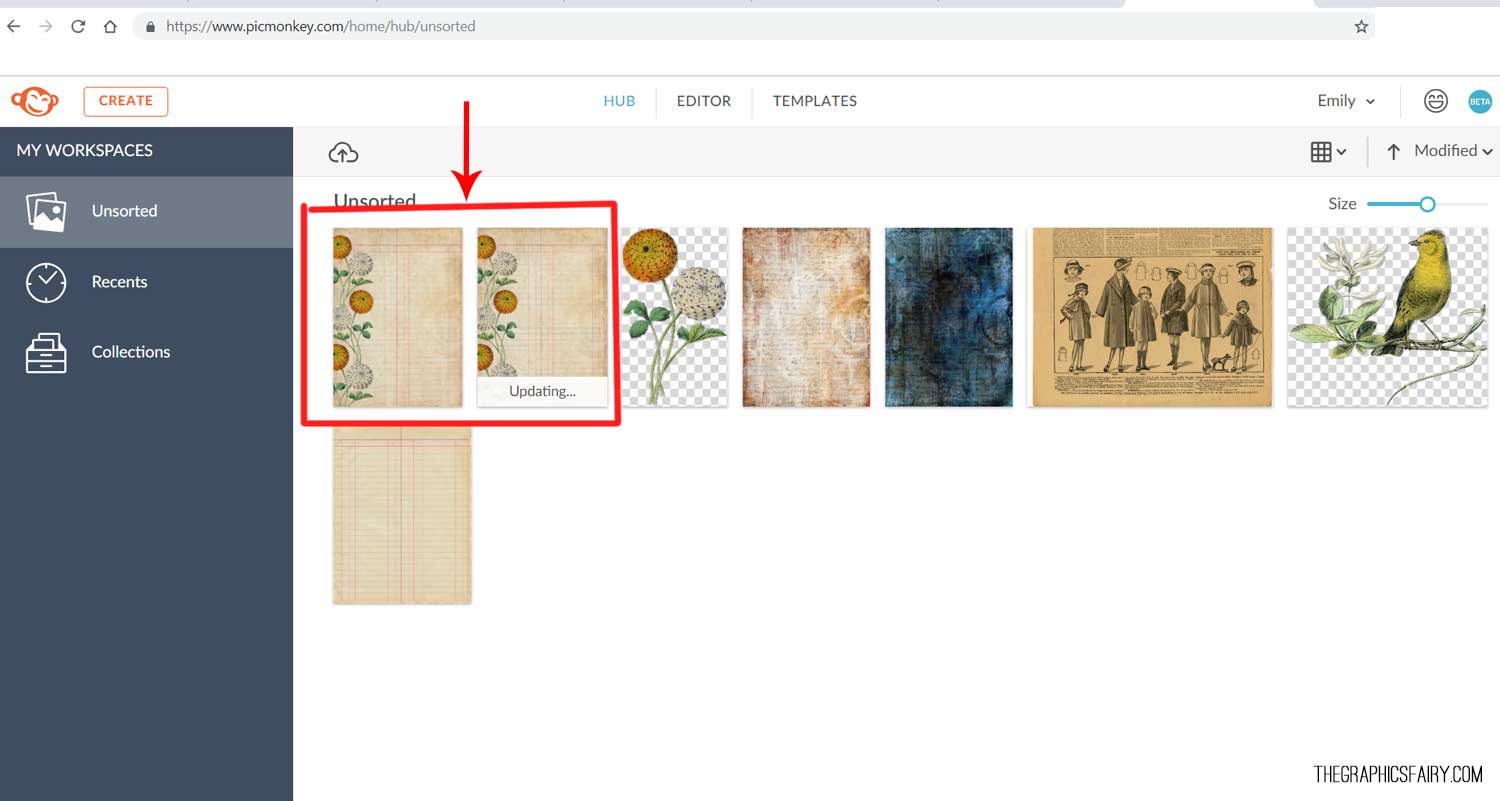
Note the if I were to check my Hub, I would see the original file with all the layers (currently shown as updating… It was a big file!), and the flattened version I just created.
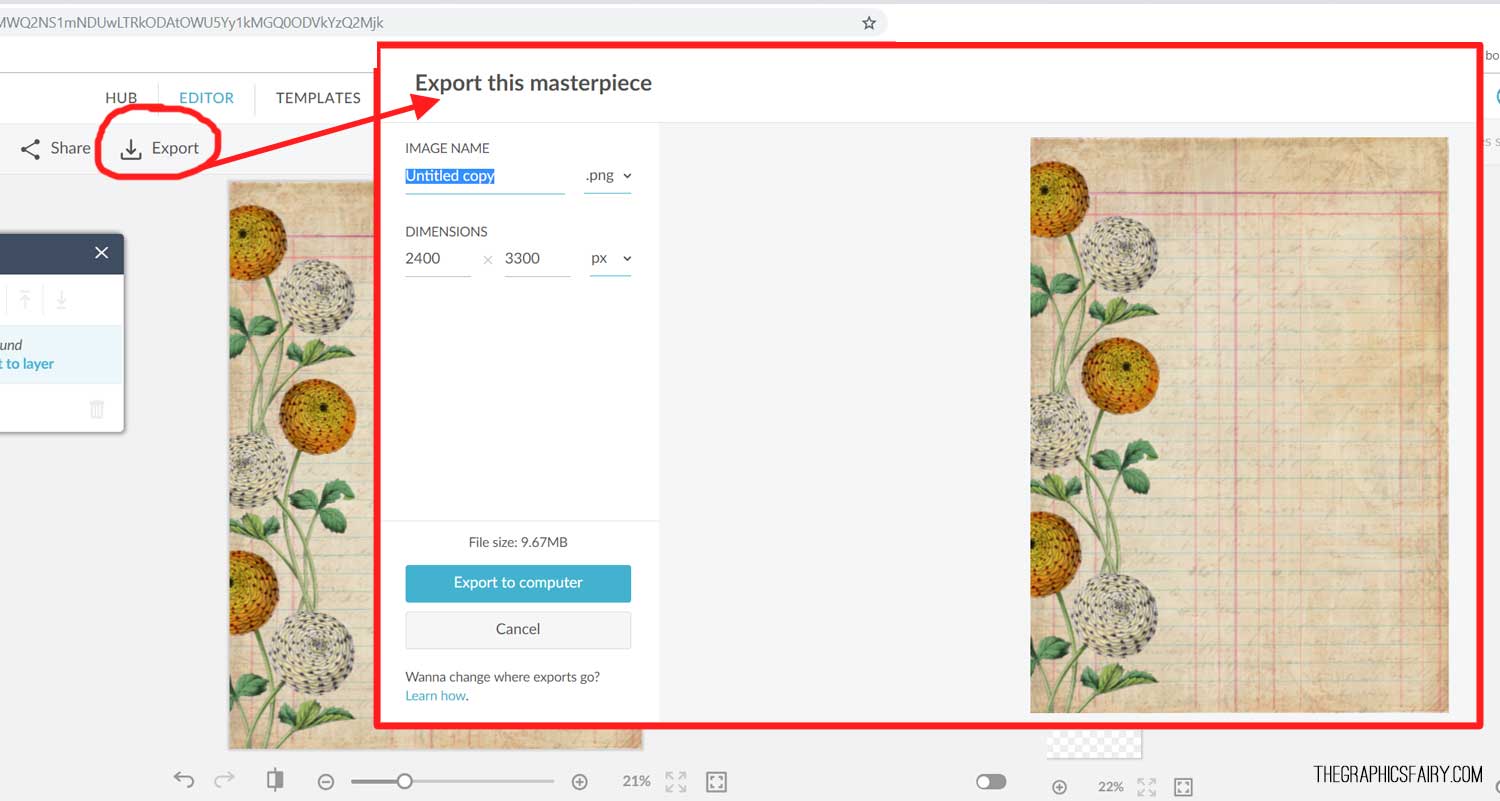
When you’re ready, hit the Export button at the top of your Editor. The next screen (shown below) will give you options for your export. You can name the file, choose the file type, or change dimensions. Click “Export to computer” to save the file to your computer.
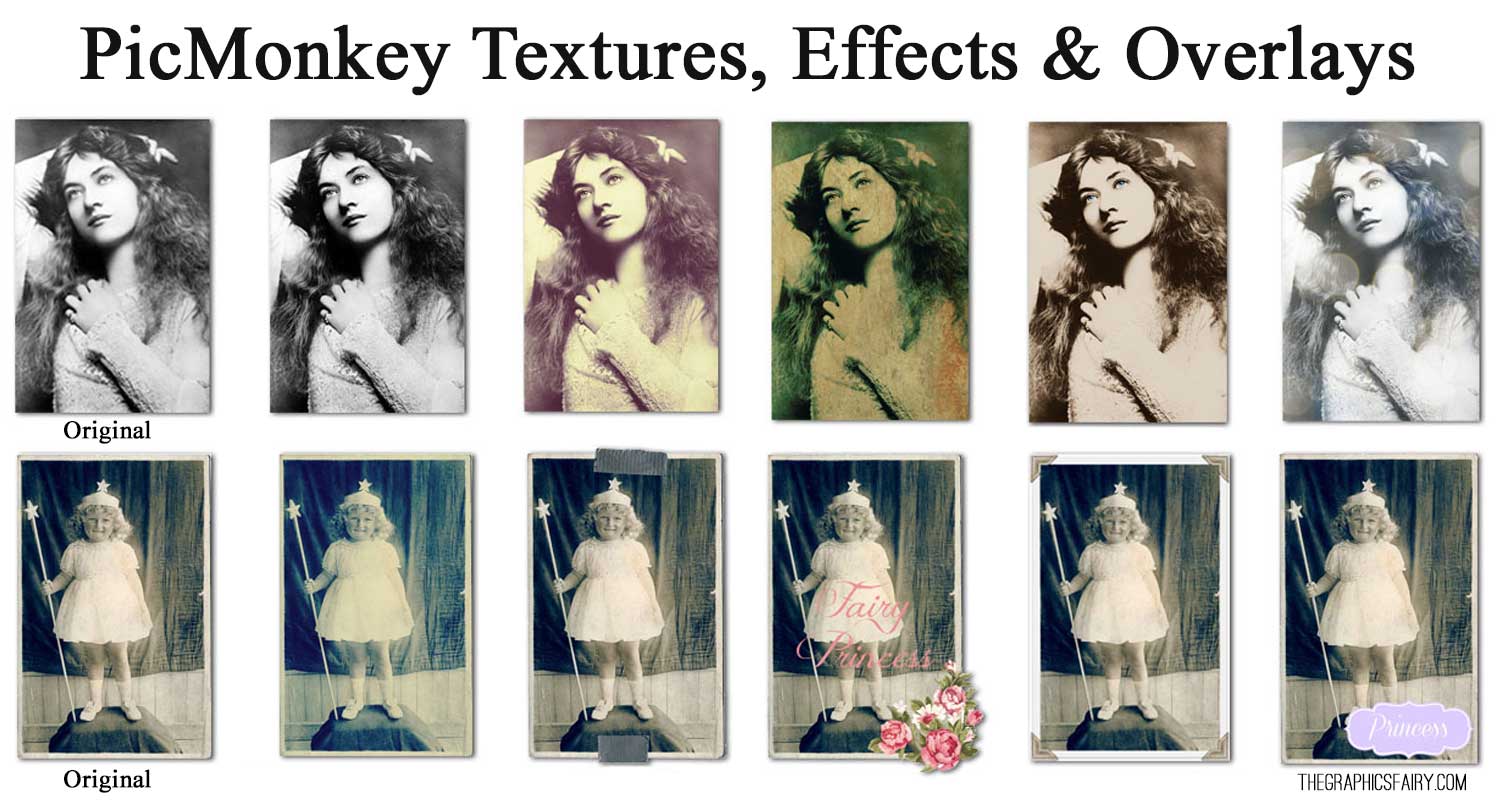
This is a very basic tutorial that covers what PicMonkey is and how to add images. There are tons of effects you can play with. We will cover other image edits and effects in other tutorials. Below are a few photos manipulated with textures, effects & overlays applied. This only scratches the surface of the edits you can make, but it gives you an idea… This is a very basic tutorial that covers what PicMonkey is and how to add images. There are tons of effects you can play with. We will cover other image edits and effects in other tutorials. Below are a few photos manipulated with textures, effects & overlays applied. This only scratches the surface of the edits you can make, but it gives you an idea…
Thanks for stopping by today and we hope PicMonkey may be a solution for you to edit the graphics on the site.
Welcome, I’m so glad you’re here! Browse around to find thousands of Stock Images that you can use in your projects or designs! I post new Vintage images every day. Need more info about my site? Try my FAQ page.



Michelle says
Hello Graphic Fairy. I adore you! I still do a lot of collage free hand but since I found out all about Picmonkey on your site my life hasn’t been the same!
I was wondering if you know of a way to add “wings” to old images using Picmonkey? I want to add the wings behind the person. So far I print out the old image, cut out the wings, glue them on, then place them somewhere else. Although….I could just print out 2 photos, then glue the “winged one” over the 2nd photograph! But I’d rather do it simply with Picmonkey. Do you have a tutorial for that?
Thank you so much,
Michelle
Karen Watson says
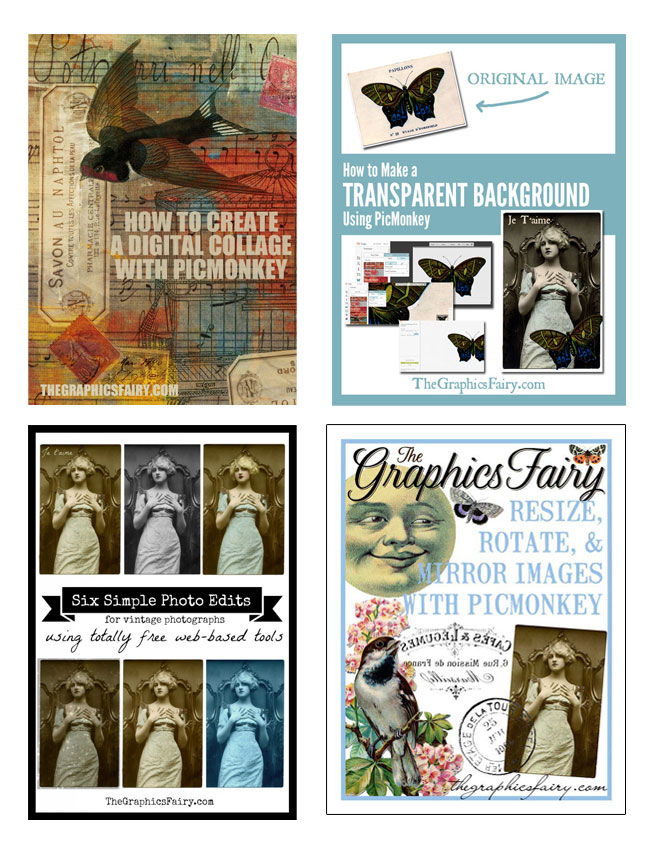
Yay! I’m so glad you’re having fun with Picmonkey Michelle! We have all of our best Picmonkey tutorials linked here https://thegraphicsfairy.com/best-picmonkey-image-editing-tutorials/ The one about “How to create a Digital Collage” should be pretty helpful to you for this. I hope that helps!
kay says
Thanks, Emily and Karen for all the great graphics and tutorials. I am stuck right now, trying to cut and paste a sheet music graphic from graphic fairy. I always copy image and paste into print shop which is then stored in My Documents. I’m not able to paste the image onto the blank canvas in PicMonkey. What am I doing wrong?
Thank you so much in advance for helping me out!
Kay
Rupa says
OMG! I have been away from the blogs etc for a few weeks while traveling outside of US. I so desperately wanted to create some collages without having to learn PS and here is the article I needed! I hadn’t seen picmonkey collage tut from 9/2, I am being thrilled to have that tutorial and can’t wait to try! I love collages but didn’t know how to make some with the million images I have collected over the years. THANK YOU SO VERY MUCH FOR EVERYTHING YOU DO KAREN, YOU ARE NOT A FAIRY, YOU ARE AN ANGEL!
Jane Stansell says
Thanks very much. This will be very valuable to me.
Glenda says
Just wanted to give you a heads up that the PicMonkey Royale link isn’t working. Love your site. Thanks.
Shari says
You are my (go to) for digital crafting and designs…Thank you so much for your awesome resources! Great team effort!
Betty of The Gossamer Tearoom says
Thank you for these introductions to Picmonkey. I use a very old version Photoshop right now, but I might turn this laptop over to my husband for his use and get a new one. I’m not sure if I really want to pay the fees to use Photoshop after I get my new laptop, however. I would definitely want to give Picmonkey a try in that case.
Betty
Carol says
Thank you for this as I need all the help I can get! 🙂
Gaby says
Thanks for the post! I use Picmonkey a lot ! is great!