Today’s tutorial will help you create a holiday photo card in PicMonkey! I’ve been meaning to make my own photo cards for the Holidays for a while now. There are many pre-made cards out there, but somehow the graphics, colors or messages aren’t exactly what I need.
Today I’ll show you how to create a 5″x7″ holiday photo card that can be printed and mailed. I’m going to use a web-based tool called PicMonkey. This project would have been near impossible to to create in the past without expensive software.
Before you start, select your photo. I knew I wanted to use a square picture of my kids, so I cropped the photo in PicMonkey before starting. I also made sure the other graphics I wanted to use were downloaded on my computer and ready to go. I use the aqua lattice background and snowflake from The Graphics Fairy site.
Now we’ll get started. We are essentially creating a 5″x7″ blank canvas and then adding layers of images through the Overlays > Your Own menu.
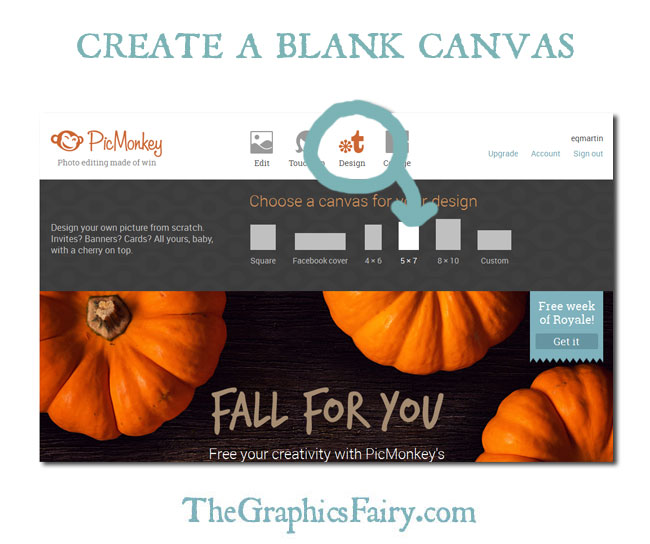
Create a Blank Canvas. First go to the PicMonkey site and create a blank canvas (hover over Design, click 5×7).
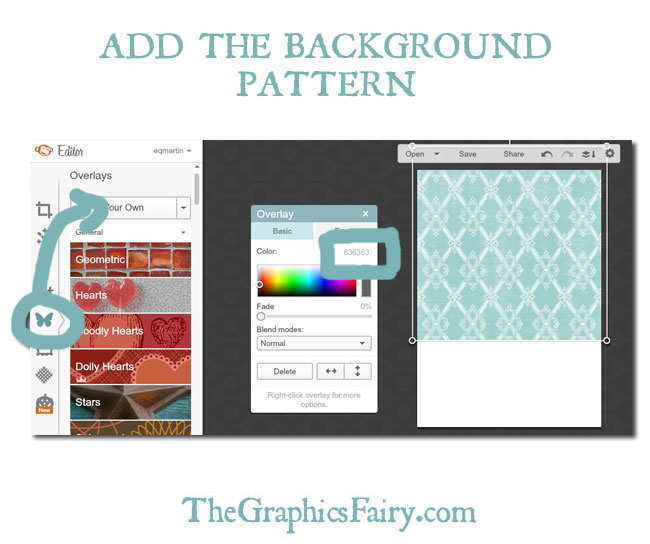
Add the Background Pattern. Go to Overlays > Your Own and select the aqua lattice background. Pull the corners to enlarge the image. I also modified the color slightly so it wasn’t so bright (in the pop-up overlays menu, I changed the color to 636363).
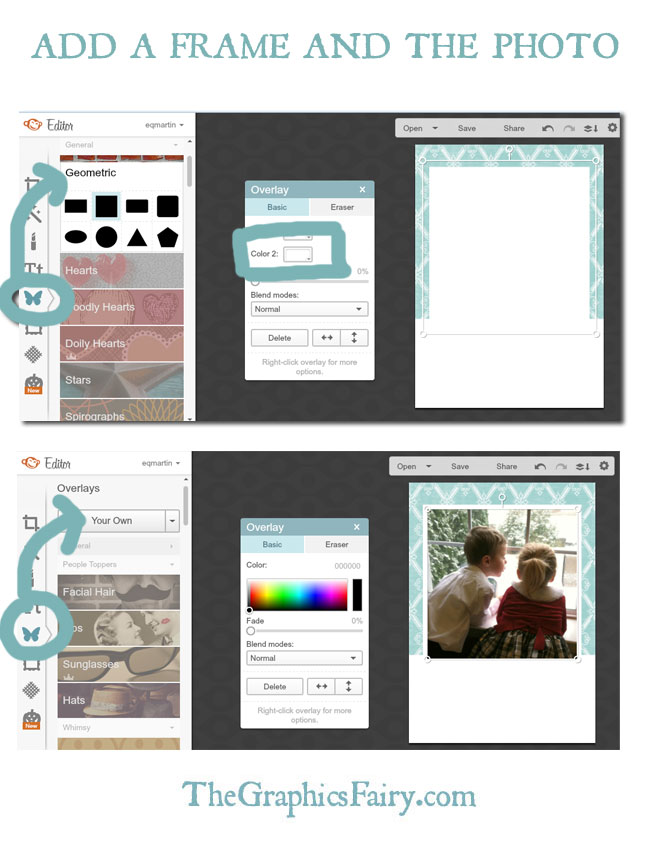
Add a Frame and the Photo. Add a white square box (Overlays > Geometric) and choose the square. Change the color to white. To add the photo, go to Overlays > Your Own and select the image. Resize the image as needed.
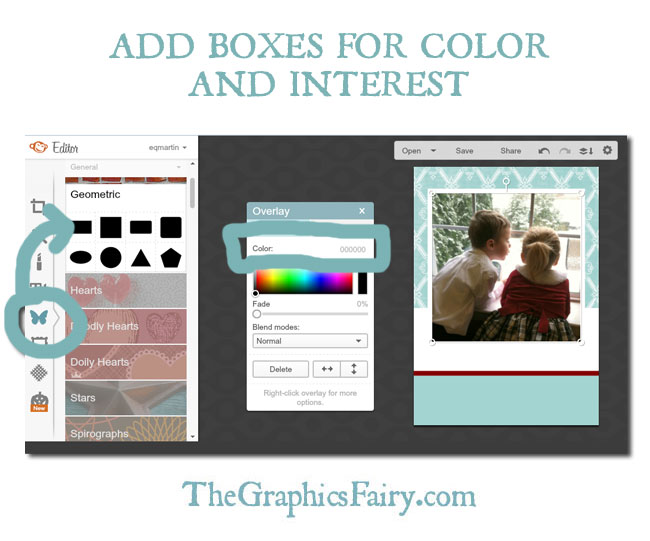
Add Boxes for Color and Interest. I added three boxes using the same process. Go to Overlays > Geometric and select the rectangle. To color coordinate, you can use the eyedropper tool in the Overlays pop-up menu to select a color from the image. I added the blue rectangle first, (color A4D4D1). I added a thin red box, matching a color in her dress (color 8EOOOO). I then added a white box to transition from the top of the card to the bottom (right click the photo to bring it back in front of the box again).
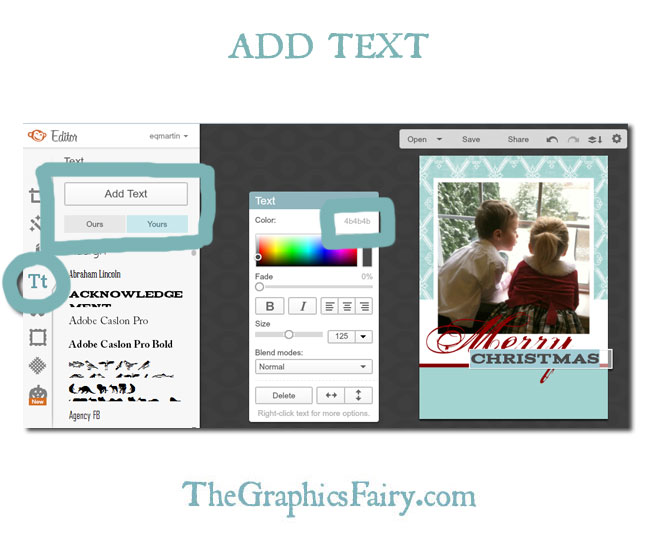
Add Text. Next I added text using the Text > Add Text option. PicMonkey lets you use fonts stored on your computer as well as their fonts. I used two commercial-free fonts I had on my computer, and one font from PicMonkey. In the example, Merry is written in the font Porcelain (color 8EOOOO, text size 520). Christmas is written in the font Acknowledgement (color 4B4B4B, text size 125). The message was written in PicMonkey’s font called Didact Gothic (all caps, color 4B4B4B, size 72). *Note: You’ll need to download the Porcelain and Acknowledgement fonts and install them on your computer if you want to use them and don’t have them.
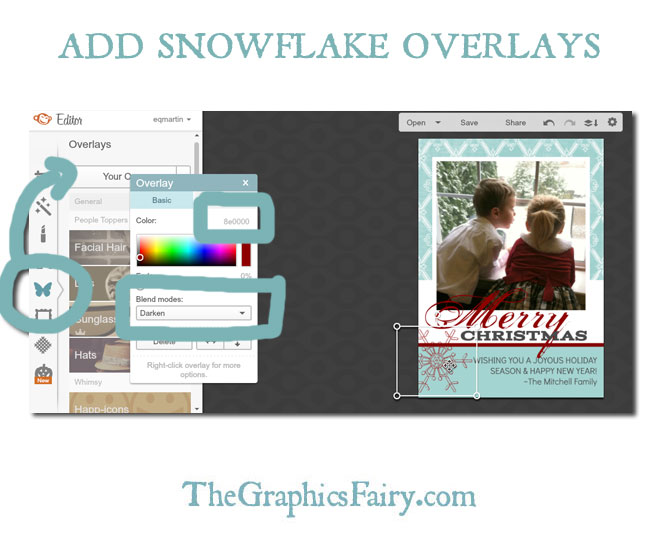
Add Snowflake Overlays. To add the snowflakes, go to Overlay > Your Own and select the image. In the Overlay Pop-up, change the Blend mode to Darken (to get rid of the white background) and I changed the color to 8EOOOO to match the other reds in the card.
Make Final Tweaks and Save. Make any final adjustments and hit the Save button at the top of the screen. You will now have a 5″x7″ photo image that can be printed. I usually take my photos to my local warehouse club or big box store to print the photos and save my ink. Be sure to ask for a 5″x7″ print. An A7 envelope from the craft store will work well. A7 envelopes are 5 1/4″ x 7 1/4″.
A few other helpful notes:
- If you don’t want to make a 5″x7″ card, you can make any size you want. When you enter PicMonkey, hover over Design > Custom and enter your measurements. Envelope sizes are typically 1/4″ larger vertically and horizontally than the card itself.
- Not all card sizes use standard postage (e.g., square envelopes). If you design a card, make sure it fits in standard envelopes beforehand.
- Be sure to download & install any fonts you want to use for this project. This way they’ll be available in PicMonkey under the “Yours” fonts section.
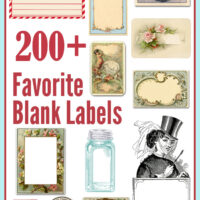
If you want to start with a mostly blank card template, here is the image below:
Welcome, I’m so glad you’re here! Browse around to find thousands of Stock Images that you can use in your projects or designs! I post new Vintage images every day. Need more info about my site? Try my FAQ page.







Sharon says
Thanks so much, this is great! Whats the best place to print the cards?
Carolyn Nicander Mohr says
Excellent inspiration and instruction! I just linked to this article from my blog post on how to use your own fonts in PicMonkey at The Wonder of Tech.
I never knew about the eye dropper tool to match colors in PicMonkey. I have been using a Google Chrome plugin instead. Very handy!
Have a very happy holiday season.
Carolyn
Karen Watson says
Thanks so much Carolyn!
Vickie says
You have a graphic artist gene, don’t you!? How lovely.
JULES says
A big THANK YOU !! i use picmonkey but was struggling a bit but you have explained it so well! and thanks so much for your gorgeous free downloads your very kind (and talented) x