
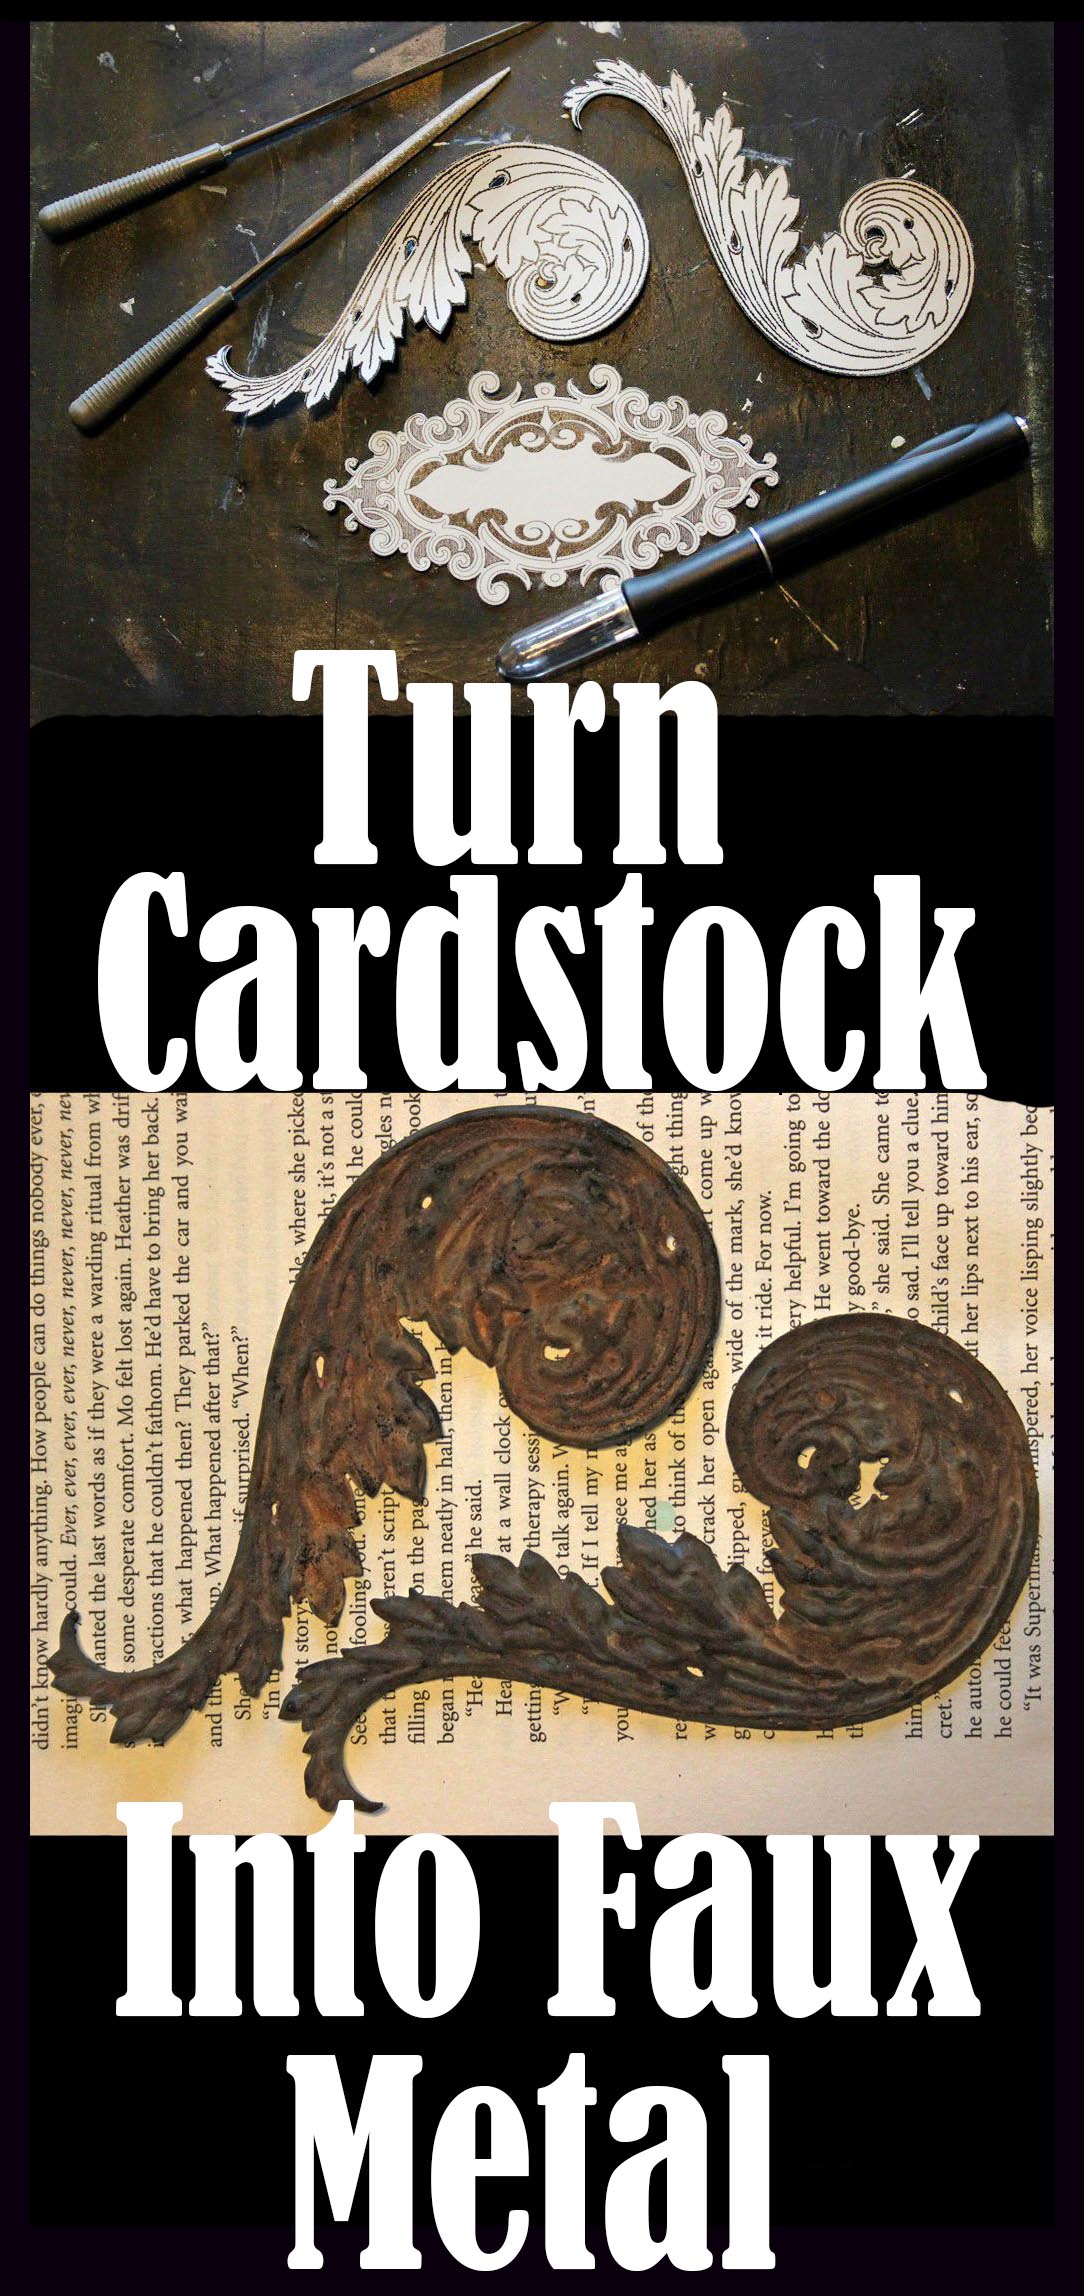
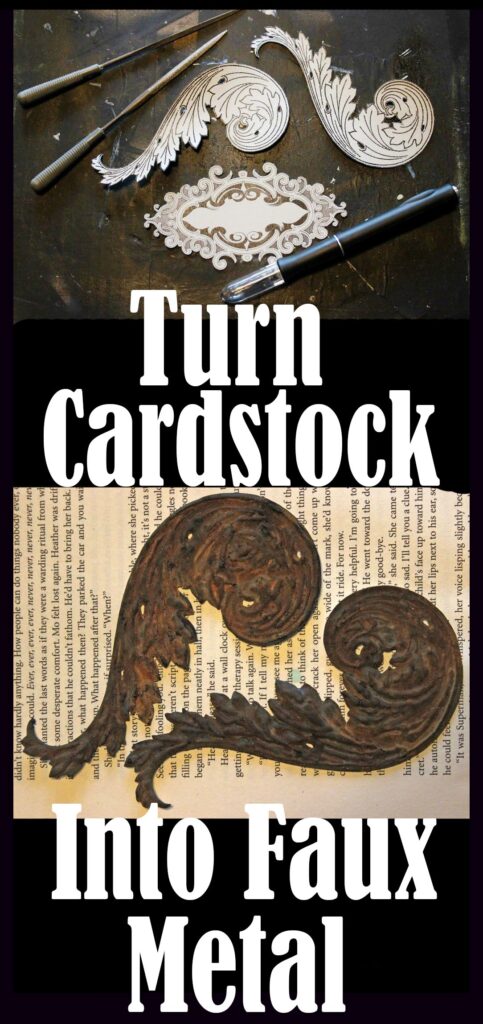
DIY Faux Metal Embellishments for Crafts
Hello there! It’s Heather, from Thicketworks. I’d like to share a marvelous Mixed Media Art technique with you for creating DIY Faux Metal Embellishments for Crafts… and we are going to be starting with ordinary Cardstock! With this method, you can add another dimension to the images that Karen provides for us here.
I love the look and feel of antique and patina-encrusted surfaces. I also love classic scrollwork and fancy vintage designs, but can’t afford to pick up antique pieces to play with. To satisfy my lust for (faux) ancient embellishments for my projects, I make my own, with a little help from TGF and the hardware store.
So, here’s my process – the basis of which I learned from the talented David Neat, in his wonderful book Model-Making: Materials and Methods. Mr. Neat might be a little queasy when (if) he sees the sloppy way I’ve abused his meticulous methods, but hey.
Be prepared to devote several hours to this, due to drying times. Have fun!
For this project, I started with these gorgeous images from The Graphics Fairy: Fancy Scroll and Frame. I printed them on heavyweight cardstock, using a laser printer. (Ink-jet prints will run when we apply wet media and aren’t suitable for this project).
‘Cause we are gonna make a fine mess. Yup. Grab your old shirt, or be prepared with a good story to explain the stains.
Supplies for DIY Faux Metal Embellishments for Crafts
To complete this project you’ll need the following:
- Heavyweight Cardstock
- Access to a laser printer, or have the images printed onto the cardstock by your local copy shop
- Scissors and a craft knife (sharp!)
- Magnifying glasses (if you’re blind like me)
- A Glue Stick
- An emery board or fine gauge files
- A work surface you don’t mind getting messy
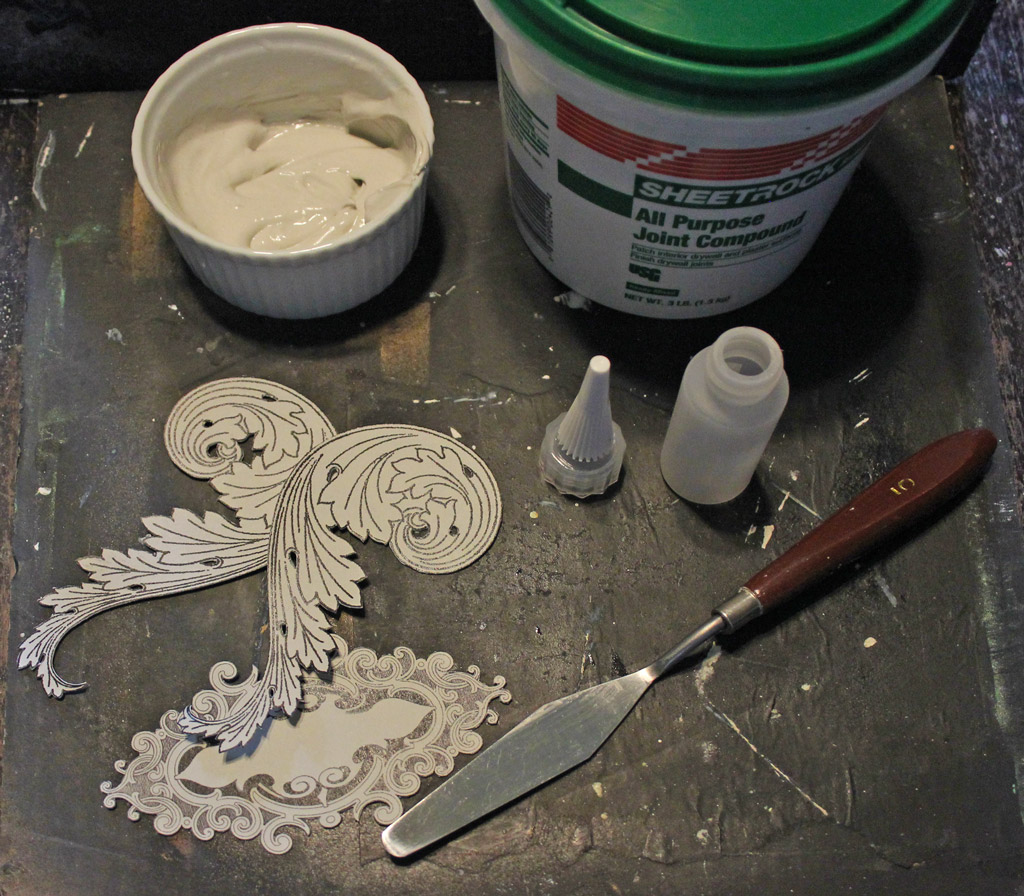
- Joint Compound (from the hardware store)
- Water
- A small container to mix your goop in
- A palette knife, to transfer your goop into the little bottle with
- A fine-tipped bottle, or fancy cake decorating tips/bag that you can never use for food again. Darice makes cheap plastic fine-tipped bottles.
- An orange stick, or similar little tool to scrape mistakes off with, unless you’re perfect, (which of course you are).
- A heat tool is optional but will speed drying times
- Gesso or DIY chalk paint
- Modern Masters Reactive Metallic Copper Paint, Green Patina, and Blue Patina
- or craft paints in suitable colors to simulate verdigris
- Modern Masters Reactive Metallic Iron Paint and Rust Activator
- or craft paints in suitable colors to simulate rust
- Inka Gold metallic rubs in Copper and Silver
- Distress Stains of your choosing (water them down for best results)
- Distress Inks of your choosing
- Patience
Tutorial
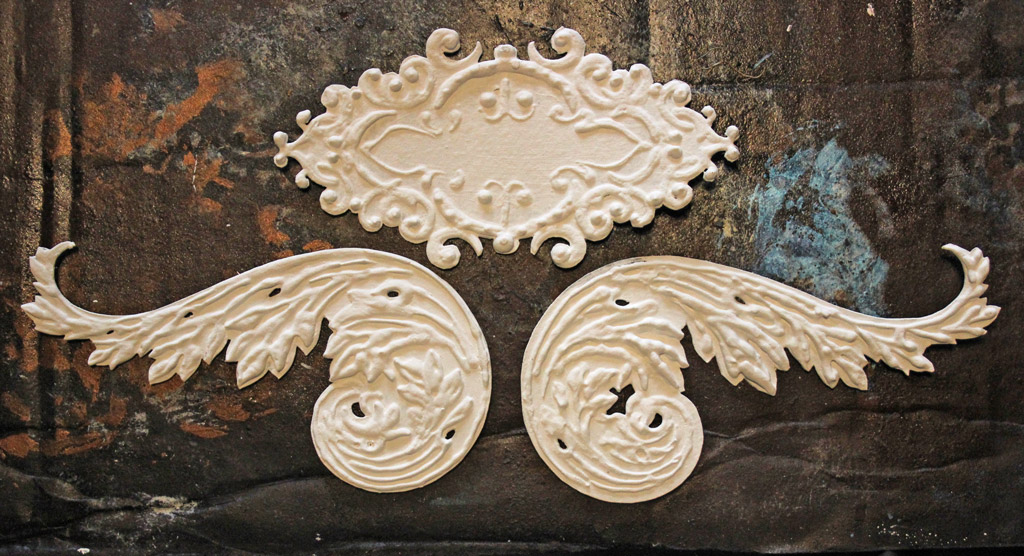
1) Once the images are printed, cut them out roughly, and glue them to another sheet of heavyweight cardstock, using a glue stick. This double thickness of cardstock serves as the base for the embellishments.
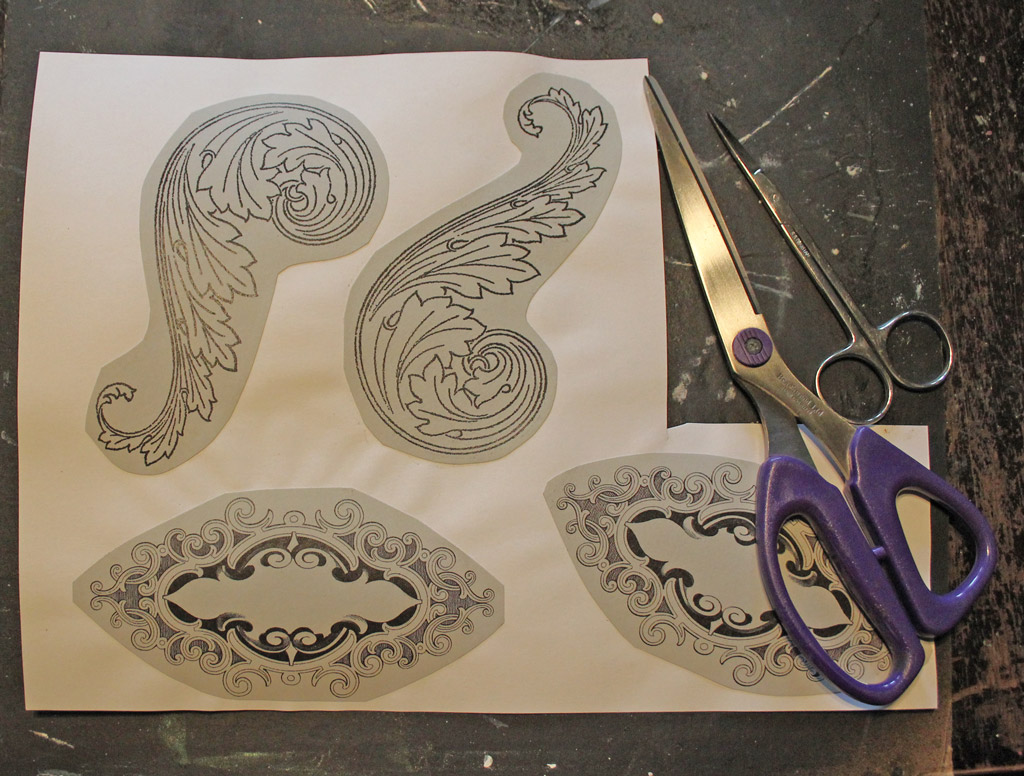
2) Once the glue has dried completely, carefully fussy cut the images out, using a variety of scissors and a craft knife. Waiting for the glue to dry is boring, so go play with the dog or something for a while. You’ll be glad you waited when you begin cutting.

3) Once all of the images are fussy cut, neaten the edges using fine files (an emery board cut into little pieces would work for this).
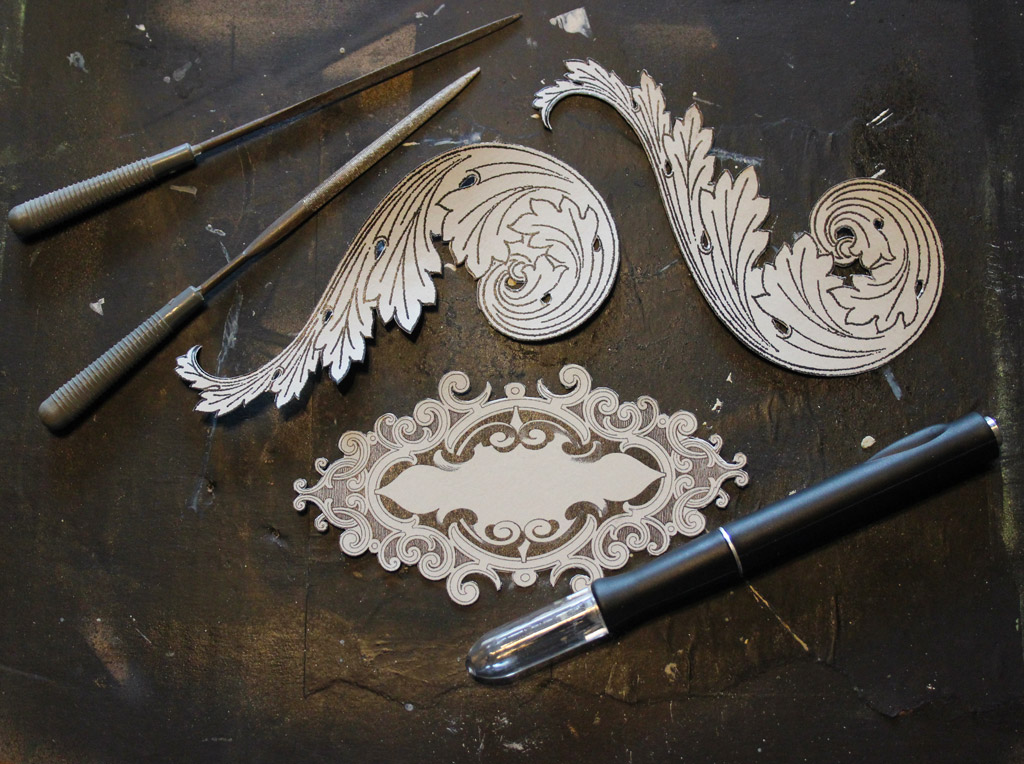
4) At this point, it’s time to mix a small amount of joint compound with just enough water to make it the consistency of yogurt. Then the concoction is loaded into a fine-tip bottle, (I got mine via Amazon). Or, if you prefer, contaminate your fancy cake-decorating equipment in a way that will make it unsuitable for food, ever again.
Don’t be afraid to experiment with the goop-to-water ratio – a thin slurry will give you more flowing lines, and a drier mix will be less smooth, but gives greater definition. If you have some fancy artistic texture paste lying around, I’m sure it will work just as well.
Just remember to clean out the bottle tip when you’re finished, or it will clog and make you sad. The mix can last for a few days if kept air-tight.
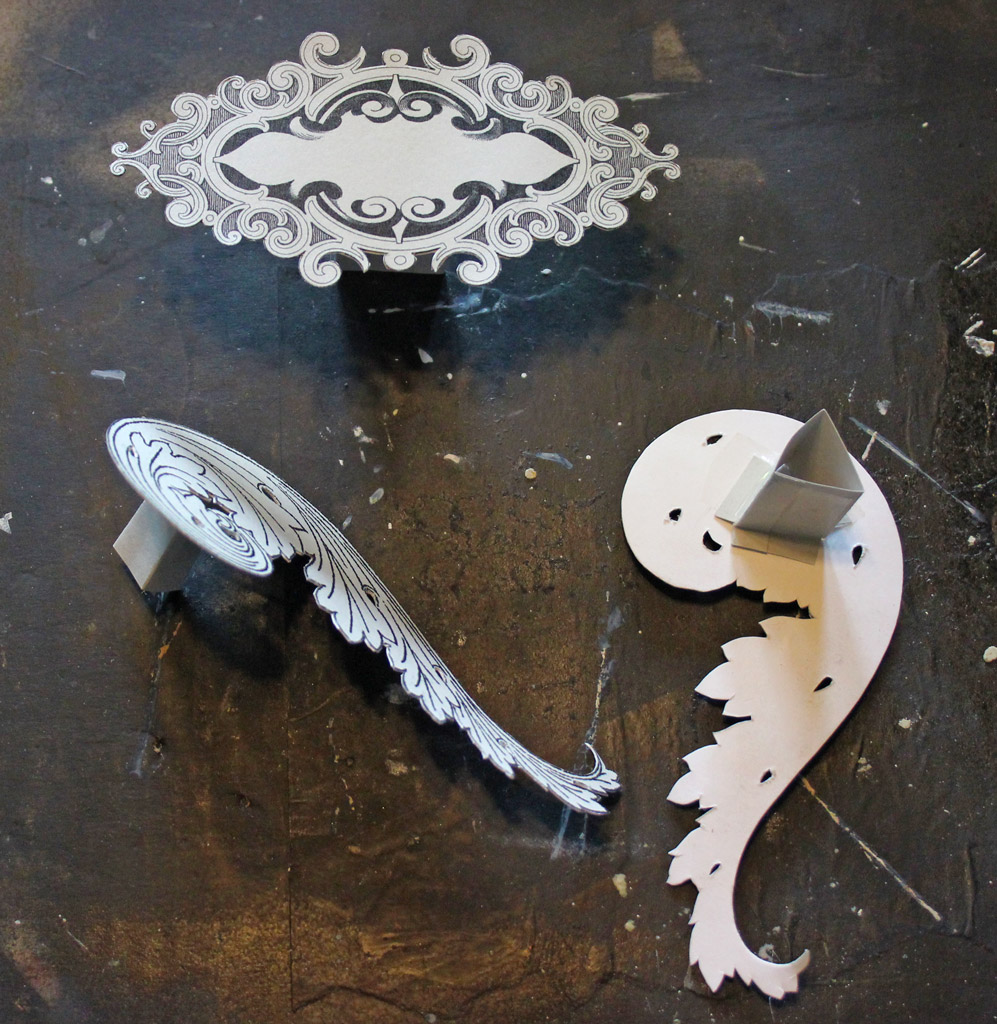
5) Because this project can get really messy, (don’t drip this stuff on your nice carpet) it’s important to create some kind of doohickey to allow you to hold the image cut-outs without touching their sides or tops. To that end, I folded up little scraps of cardstock into triangular tubes and taped them to the undersides of each piece. (I’m sure you can come up with a better solution).
I also recommend working on a surface you don’t mind getting goopy. I use sheets of cardboard.
Now, those of you who have experience decorating cakes will ace this next part. I, however, have never (successfully) managed to decorate any baked goods, and my results just go to show that real skill is not necessary. Really.
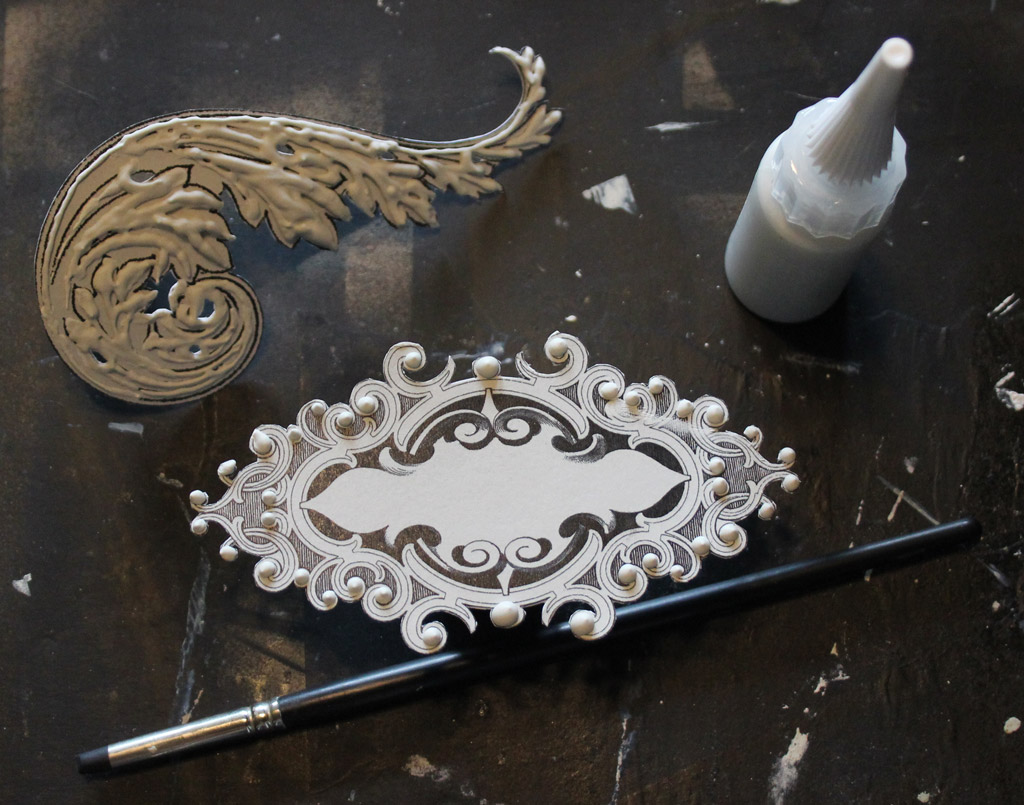
6) Using a steady hand, and a good grip on the bottle, pipe along the printed design. I like to start by piping little balls onto the ends of the scroll parts. It’s not important to be perfectly accurate, just select the features you want to emphasize and go for it. I find this process oddly meditative, despite hand cramps.
If you make any mistakes that you can’t live with, just use a small-scale tool to wipe the joint compound off of the surface, and do it again. I use these ridiculously expensive, but oh-so-precise tools, called Royal Sovereign Clay Shapers. I think an orange stick would work just as well, but what the heck, I have the tools, so better use them, right?
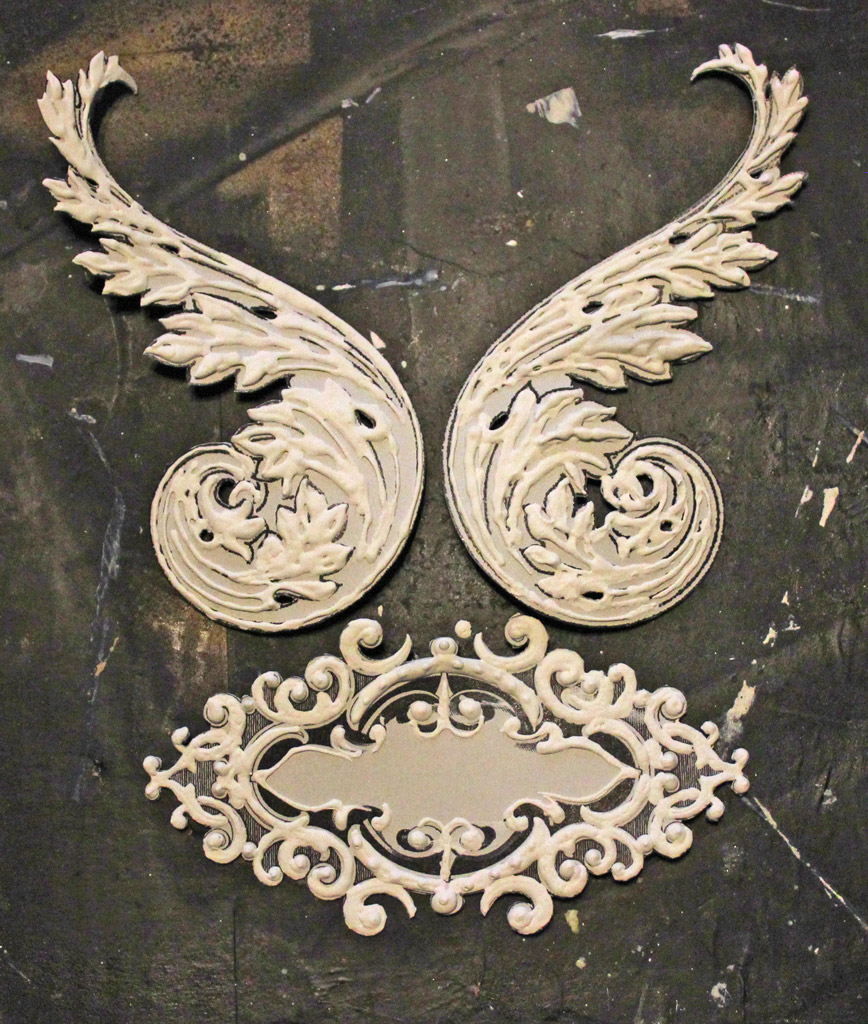
7) Once you have added dimension to your cardstock cut-outs, it’s time to wait for them to dry. Again. I use a heat tool to speed things up, but it’s still tedious.
8) When the joint compound/texture paste is completely dry, coat the little guys with a couple of coats of gesso, or DIY chalk paint.
9) And, yep, you guessed it. Wait for them to dry. Or, grab your heat gun and have fun creating an even more uneven surface as the gesso bubbles up.
During all of these processes, the cardstock will tend to warp when damp, then flatten out again as it dries. Try not to be alarmed. It should be okay.
(The joint compound I use is fairly flexible, so it doesn’t flake off during all this bending business).
You could absolutely leave these as is, for a shabby chic vibe. Could be perfect for weddings…
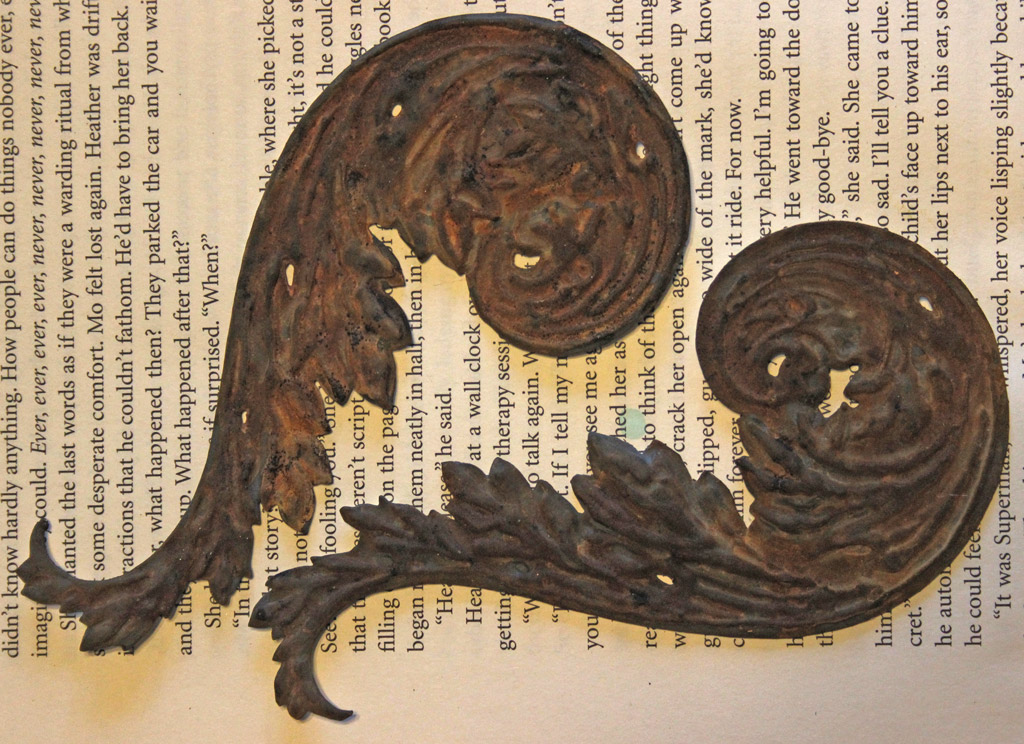
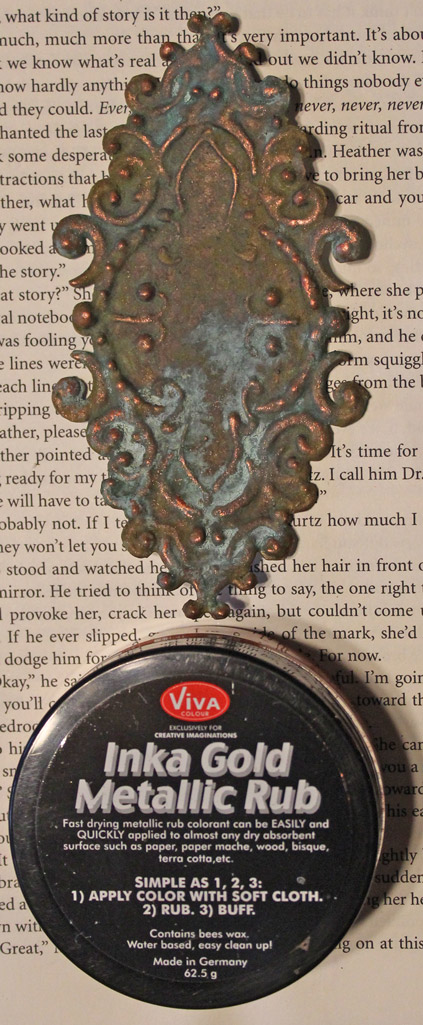
Or, if you’re like me, you’ll be eager to create some grunge. There are many different ways to create patinas. Now, craft paints can be used for this, so use what you have on hand. I used Modern Masters Reactive Metallic Copper Paint, Green Patina, and Blue Patina to get this particular effect.
10) First, a base coat of the Copper Paint. When dry, apply a second coat. While the second coat is still wet, dribble Green Patina over the surface.
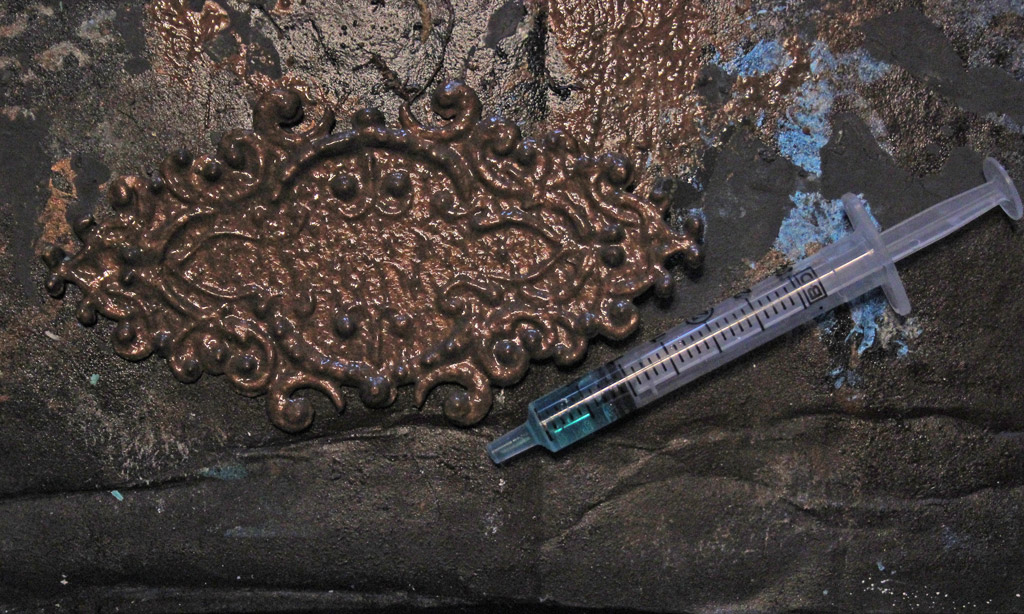
12) It looks pretty gross at this point, but I promise, the magic is working! Add some Blue Patina while things are still damp and goopy:
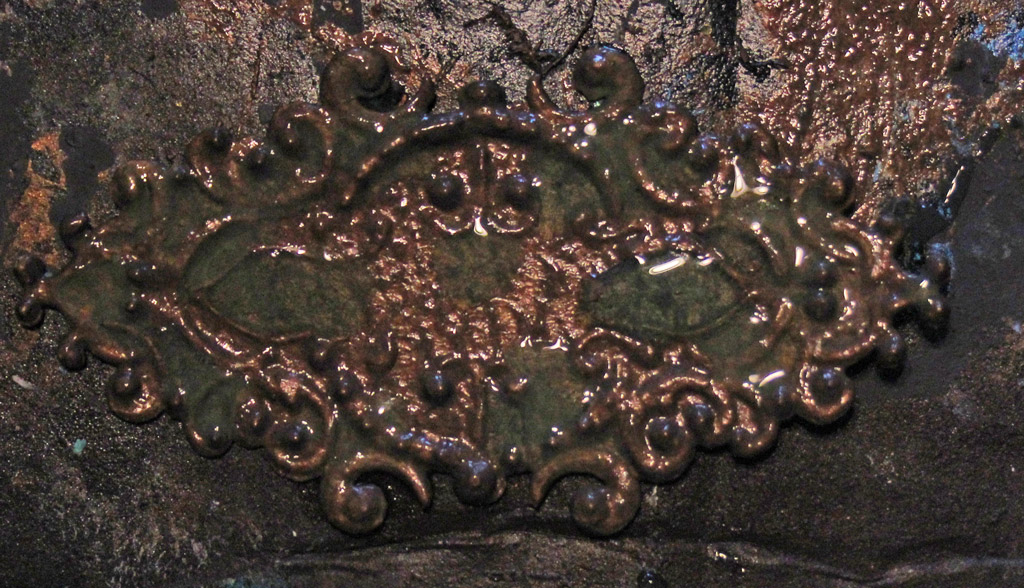
12) Wait for it to dry. I know. Boring. BUT…
The result is so worth it:
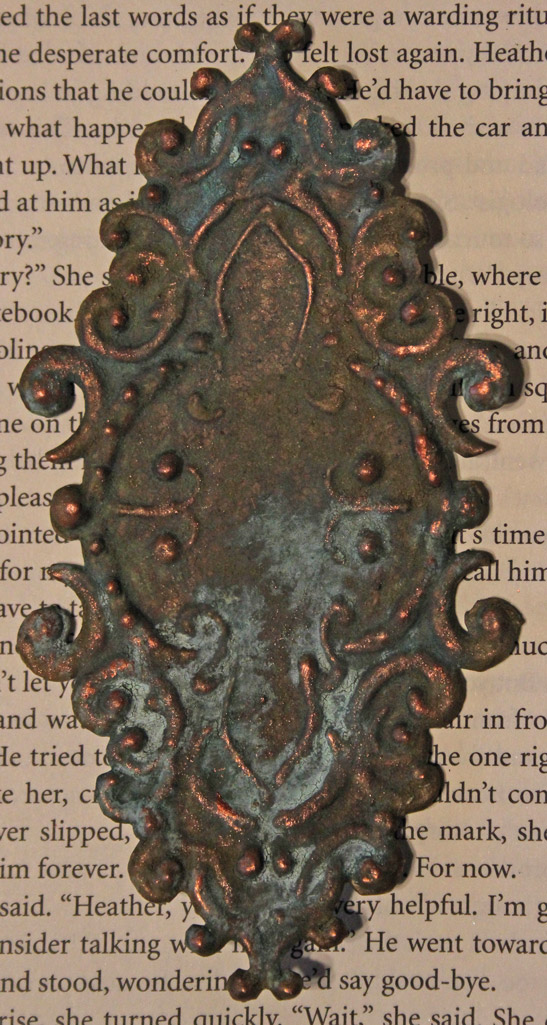
14) And, just because I can’t leave well enough alone, a touch of Inka Gold, in Copper on the high points, and we are done.
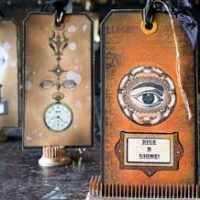
For variations on this theme, here is an example of Modern Masters Reactive Metallic Iron Paint – again, for a certain look, this would be perfect as is.
Think Victorian Mourning Accessories…
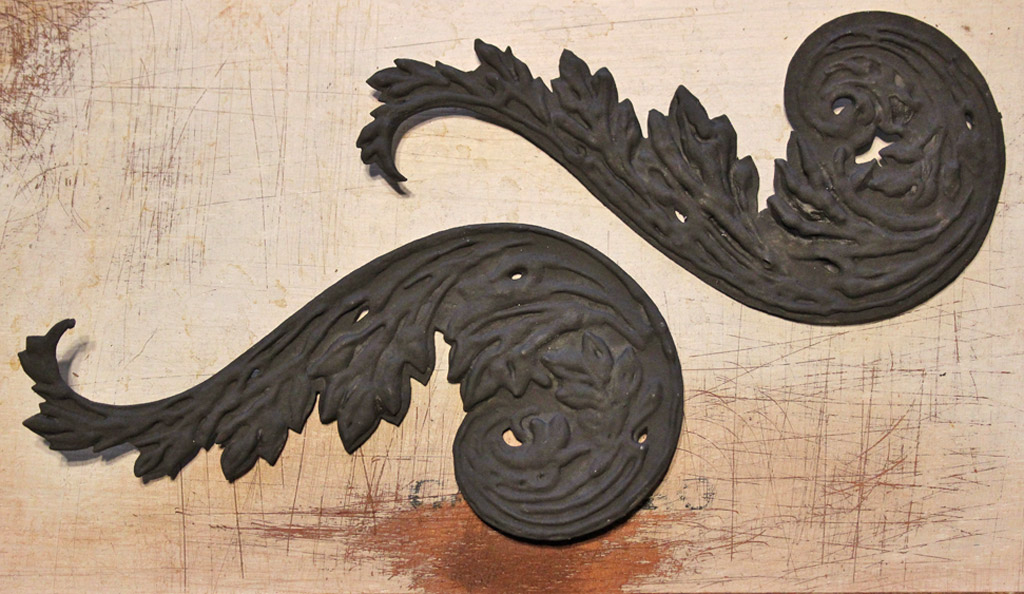
With the addition of Rust Activator, you get ancient deliciousness:

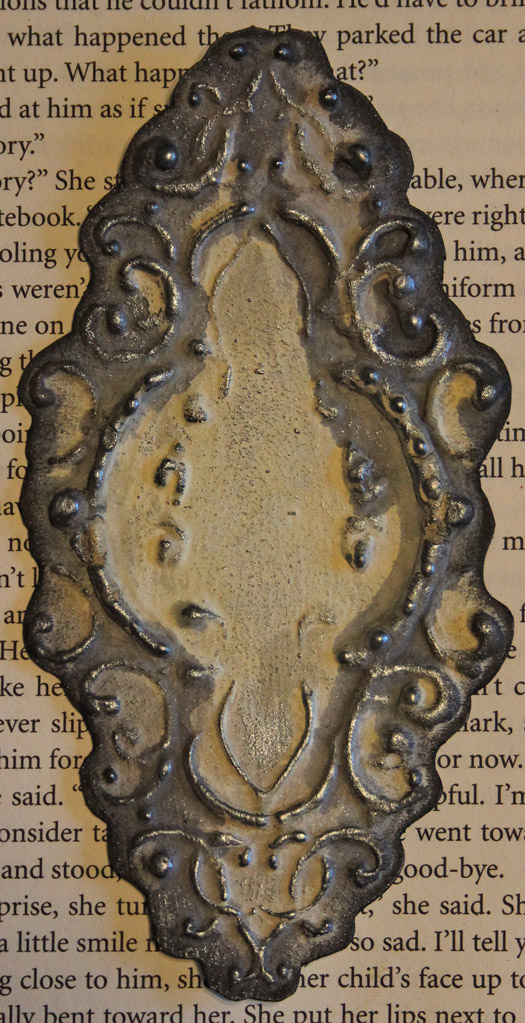
For this example, I experimented with not fussy cutting – just approximating the undulating profile of the graphic with a cheap pair of scissors, then layering Distress Stains over two coats of DIY chalk paint. A final touch of Inka Gold in Silver, and this look is cool, too:
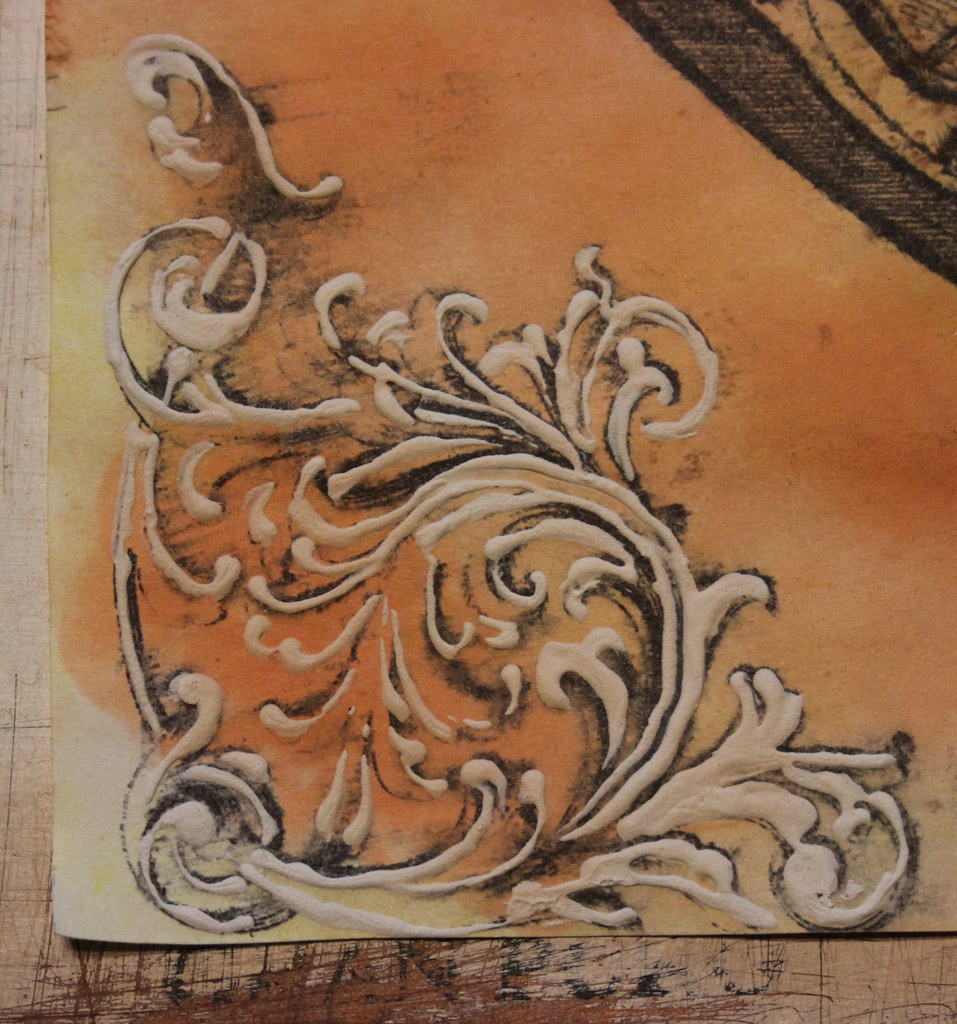
Finally, one last example of how you can use joint compound to lightly emboss a graphic in your Art Journal, or on any type of paper crafting.
I love how the joint compound takes on the tint of Distress Ink when layered over an inked area:

Thanks for joining me for this project – I hope you have as much fun with this simple (if tedious) DIY Faux Metal Embellishments for Crafts technique as I do!
If you like this kind of project, stop by Thicketworks to say hello, and look around.
Take Care!
Heather


Patricia says
Unbelievably amazing! Beautiful! Thanks for sharing!
Christine E. says
Thanks so much for sharing this amazing diy. I don’t seem to ever be able to find lovely decorative wood embellishments as beautiful as these around where I live so this is really exciting. Can’t wait to give it a try!
Flo says
Greaaaat! Really love this! Thank you for sharing the technique!
Hi from France
yve hooson says
OOOooOOOOOooooo, fab! I can’t wait to try this but have never heard of “Joint Compound”. I remember never being able to follow an online formula for Paper Maché because of the fact that it isn’t sold in the Uk or EU and couldn’t find an alternative…. does anyone know what it might relate to here?
Karen Watson says
Hi Yve, It’s a construction material, used to smooth out the seams in drywall, when building a house. Try your local home improvement or hardware store. Maybe it has a different name where you are.
Heather says
Hi Yve,
In the UK, this is called ‘ready mixed jointing compound’. It’s available at Wickes. Have fun!
Lia says
This is amazing! I love it and I think I am going to use it for a project soon. I cannot wait! Thank you!
Ri Brom says
OMG What a fab idear!! I just LOve this,can think of lots of ways to use this creative gorgeousness for.Thanks for sharing,GREAT Tutorial, easy to follow too,can we have some more please??? xx
Susan Homeroad says
Amazingly awesome! I love them!
Cathy M T says
Awesome! Thanks.
Hilda says
LOVE IT!
mar says
Gracias por este diy, es muy interesante.
Jean Bullock says
Awesome! Thanks for the great tutorial and the inspiration!
Elsie says
Oh my word! What awesomeness; who would have thought that these embellishments are actually cardboard. Thank you so much for sharing, Heather. And thank you too, Karen, for finding beautiful images and featuring all the creative people’s skills with us.
Karen Watson says
Thanks Elsie!! I was pretty blown away by it too! Stay tuned for more awesomeness from Heather!!
Marilyn Gray says
I LOVED this tutorial! Thank you so much! I can see so many things you could do with this, it boggles the mind! Thank you, again. I so enjoyed it!
Bernadette says
Love this! Is it strong enough to be applied to furniture? I’m thinking the edges of a mirror or another area that wouldn’t get too much wear. Thanks!!
Karen Watson says
I think the mirror is a great idea Bernadette! They might a bit too fragile for furniture, but maybe Heather will have a suggestion for that.
Heather says
Hey Bernadette – I’m with you…I want this stuff all over my furniture…not sure about the fragility issue. You have given me a challenge, missy. Stay tuned. We’re going to experiment in an upcoming post. In the meantime, I can tell you that I often use joint compound through a stencil on my curbside rescue furniture, and as long as the raised pattern is coated with DIY chalk paint or similar, it is incredibly wear-resistant. I have a piece embellished this way in the extreme humidity / temp fluctuations of my bathroom, and it’s holding up beautifully. Raised textures rule!
tina says
This is absolutely FANTASTIC.
Thank you so much for sharing.
Looking forward to Heather’s next post.
Karen Watson says
Me too Tina! I’m glad you liked it!!
Heather says
Hi Tina! Thanks for your sweet comment, and I hope you try this for yourself. You’ll have a ball.
Take Care!