{This post contains affiliate links}
Today, I’ll be showing you how to make a graphic’s background transparent so it can be layered with other graphics. This is a quick workaround when you need to edit a graphic and may not have the more expensive software on your computer. We’ll be using online software called PicMonkey to do the job.
This post is a companion to two earlier posts that showed you how to make simple edits (e.g., rotate, mirror image), and simple edits to photos (e.g., recolor, add text, change to black & white) using PicMonkey.

Essentially what we’ll be doing in the following steps is creating a new blank canvas in PicMonkey, changing the canvas background to transparent, adding our graphic, and erasing the portions we don’t want. The FAQs at the end of the post answer some common image editing questions we get via email.
Download and Save the Image. First, download the image you want to work with and save it to your computer.
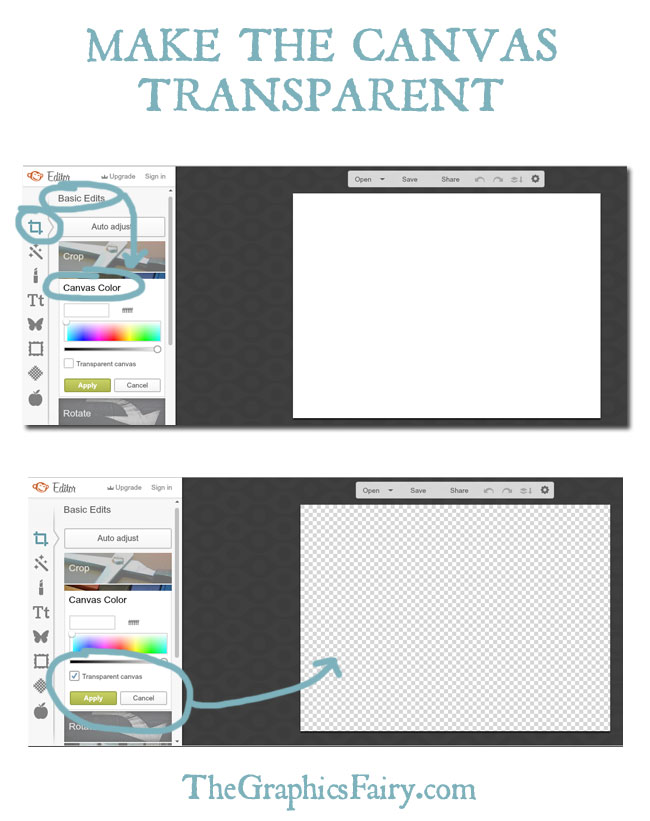
Create a Blank Canvas in PicMonkey. Go to PicMonkey and hover over the Design option at the top. A menu of sub-options will open, click on Custom. Enter the dimensions of the image you’d like to make and click the Make It button.

Make the Canvas Transparent. I now have a blank canvas but I first need to make it transparent, not the white color it defaults to. Go to the Basic Edits menu (first icon on left side that looks like square), select Canvas Color and click Transparent Canvas. Hit the Apply button.
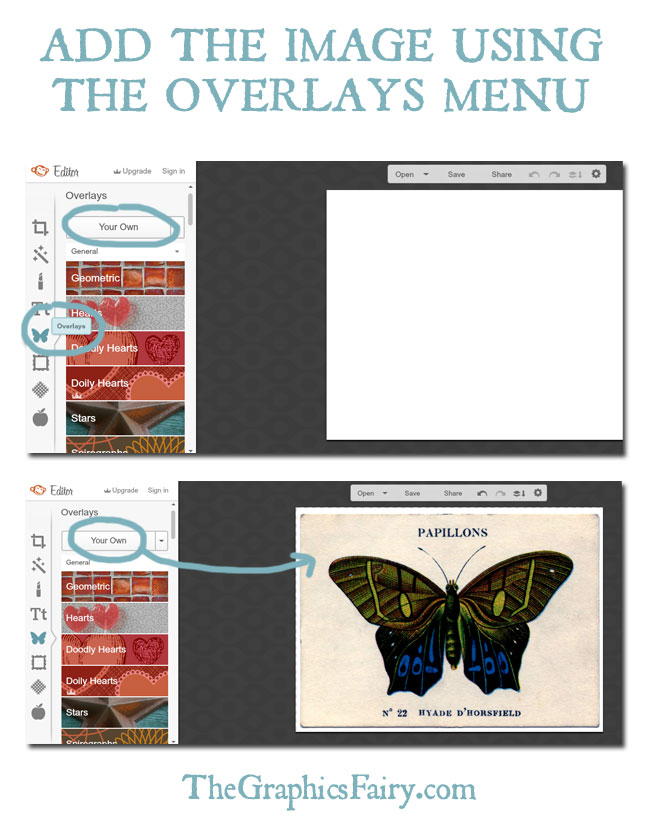
Add the Image Using the Overlays Menu. On the left, select the Overlays option (the symbol is a butterfly). Click Your Own to add the graphic you want to work with. TIP: when the image pops up, you may need to pull on the corners to resize it to fit the canvas.
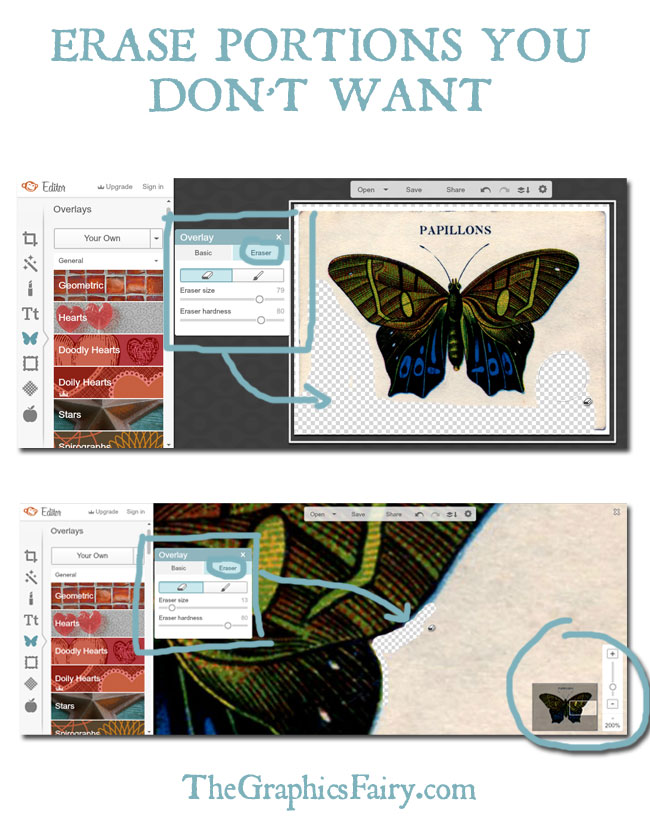
Erase Portions of the Image You Don’t Want. A small Overlay menu pops up when you insert an overlay. Click on Eraser and your mouse pointer becomes an eraser. Erase the background you don’t want by holding down the mouse button and moving the mouse/eraser (use a large eraser size for large sections, and make the eraser size smaller for fine details close to the image). TIP: there is a zoom function in the lower right corner that can help you really zoom in for detailed sections. ANOTHER TIP: When you get close to details, unclick every so often (which “picks up” the eraser, and resets the action). Otherwise if you’ve put in a lot of work, then make a mistake, you can undo the mistake (using the undo arrow at the top of the screen), but it will go back to when you last “picked up” the eraser. If you erased everything without picking up the mouse, you would have to do a lot of work over.
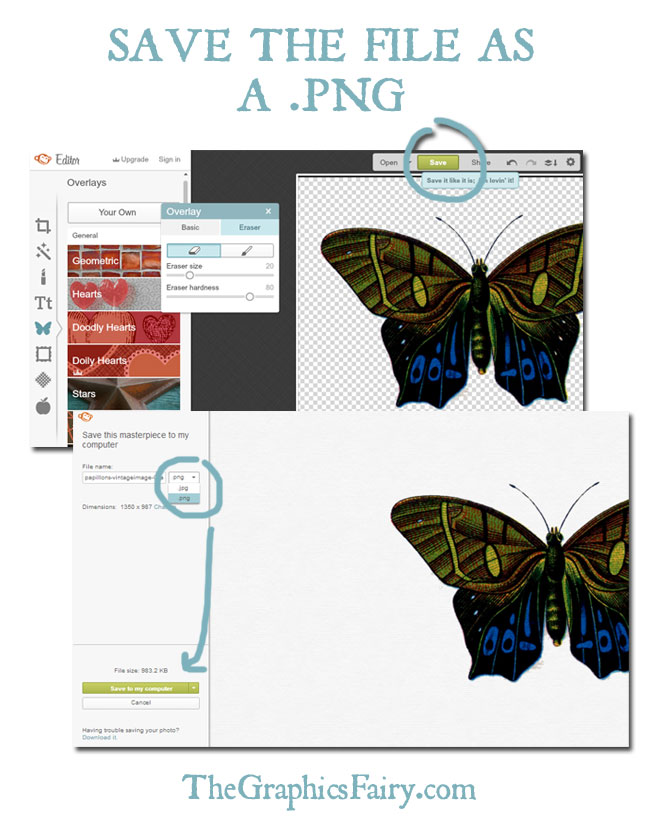
Save the File as a .PNG. When you’re happy, click the green Save button at the top. Select a filename and click the file type drop down box as .png. This preserves the transparent background you created (saving it as a .jpg would add the white background back in). Click the Save to My Computer button.
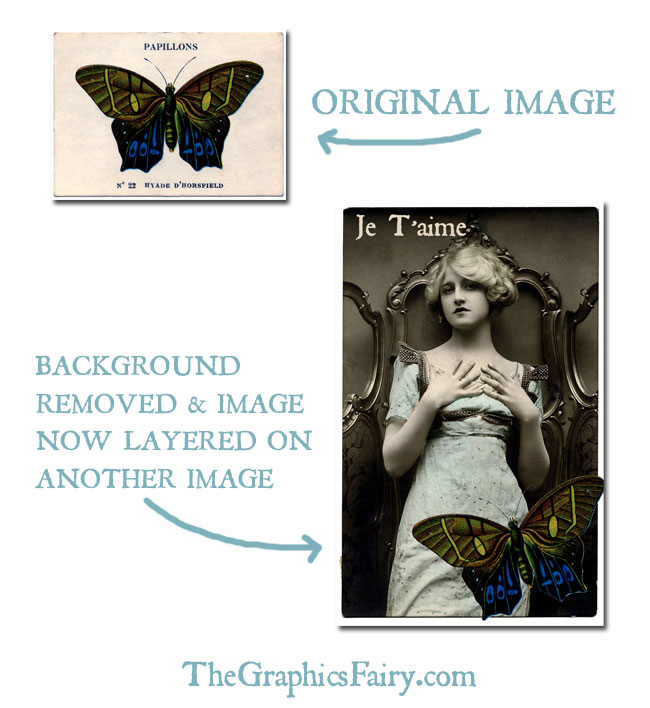
Here is my butterfly image now layered on top of one of my favorite images. It would probably look really pretty layered over some vintage ephemera too.
***UPDATE 7/16: a few people asked about layering the newly created transparent image. It really depends on the graphics programs you have on your computer and what you’re trying to create. If you want to use an image you already have and put the transparent one you just created on top using PicMonkey, 1) go to PicMonkey and click “edit” at the top. Choose the image you want in the background. 2) Now click the “overlays” menu on the left (the butterfly) and click “your own” —- now select the image with the transparent background. It will appear on top of your other image (you can resize and rotate using the edges of the image’s box). You can add as many (transparent background) images as you want doing step #2 again and again. Save using the save button at the top. I can do a full post on layering images using PicMonkey specifically, and show screenshots if anyone is interested, just leave a comment.***
*********************************************************
FREQUENTLY ASKED QUESTIONS:
When would I need to remove the background of an image? This is helpful if you’re layering graphics or want to erase a portion of a graphic.
What images work best? Can I use the workaround for any image? Images with clear shapes that are not too intricate work best. Simple shapes (e.g., butterflies, silhouettes) work well with this technique. Intricate images (e.g., an intricate frame, lots of text) would be difficult to do & would require lots of patience. If you’re going to be working with more complex graphics, or layering lots of graphics, or doing this often, I’d recommend purchasing a graphics editing program like PhotoShop Elements. Some readers have had success using sites like Fiverr.com to hire someone to edit more complex images.
*********************************************************
I hope you enjoy layering your graphics and creating something fun. Be sure to share your creations on the Reader Submissions Page!


Jessica Allion says
I am not able to see what I am erasing anymore as I am erasing the background of an image since the new Layers option? I have to go back and ‘un’ layer to see the work I had previously done?
Is anyone else having that problem?
Karen Watson says
Hmm. I’m wondering if they changed some things at Picmonkey. You might want to email them and see what’s up with that Jessica. 🙂
Nicola says
Thank you for this quick and easy guide!! I have been able to make some much needed adjustments to make my site more user friendly because of this! 🙂
graphicsfairy says
That’s great Nicola! So glad we could help out 🙂
Mary says
Hi Karen and Emily,
I am wondering if you have an easy way to put a drop shadow onto an image in Picmonkey. I’ve searched high and low, both here and Picmonkey, and can’t find anything.
Thanks so much.
Mary
Deb says
I’ve tried this and don’t know what is going wrong. A friend made me up a logo and it would show as a greyish background when I uploaded to website. He, then, sent it to me as a transparent.png file but still didn’t work.
I tried your explanation above and when I uploaded to my website, it was still grey and the eraser marks I created were black.
At the moment, I have given up and used a coloured canvas to hide the grey effects.
Emily says
Hi Deb – I’m trying to picture what you’re asking. I’m assuming you have a logo, and you’re trying to remove a grey portion of it? I tried to visit your website & I think it’s the main logo? As background info., if you have a logo made with a white or grey background and it’s a .jpg, then you resave as a .png, the background white/grey will always still be there since it was created with a colored background. If it’s your logo & you’re trying to erase the background of that complex logo with all the text, PicMonkey isn’t your best bet; with erasing around all that text, it will drive you crazy. I would ask the person who created it to create it on a transparent (not white, not grey) background and save as a .png. If you do have a simple image or logo, and want to erase a portion of it, start in PicMonkey NOT by pulling up the picture immediately. Instead start with a blank canvas by hitting Design to create your canvas, go to the Basic Edits menu, go down to Canvas Color, and click the checkbox for “Transparent Canvas” and Apply (the canvas will have a checkered background…now it’s really transparent). Now you can add your logo (Overylays > Your Own and choose your logo). Finally follow the instructions to erase and the transparent background will peek through. When you save, make sure you give the file a name and make sure the file type chosen is .png. Hope that helps!
Debbie says
I tried clicking off to save my progress. It closed the file and I couldn’t go back to it.
graphicsfairy says
Hmmm, I’m not sure what happened Debbie! You may just have to re-try, sometimes we have to try multiple times to get it just right, good luck!!
Kate says
THANK YOU SO MUCH! I’m so excited because I thought you could only do this type of thing with illustrator or Photoshop (which I have neither)! I can’t wait to try this out on PicMonkey!
Karen Watson says
You’re welcome Kate! Have fun playing with Picmonkey, there is so much that you can do with it!
Terry says
I just love all the information I get at the Graphics Fairy. Thank you so much! I have a Mac and I’m not very skilled at using it… can you tell me what program I should use when I want to mess around with graphics?
P.S. It is a older Mac.
Karen Watson says
Hi Terry, Just use Picmonkey like in the tutorial above! It’s web based and free, so it doesn’t matter what kind of computer you have! There are links in the post that will take you there. I hope that helps!
Pendra says
Thanks for the great tips/tutorial!! I need all the help I can get in this area, so the more the BETTER!!! I would love to see any tutorials you would care to share!! Thanks again!
Marie-Anne says
Thank you so much for this tip/tutorial!!!!!
You are such a darling!!!
Carole says
Yes, I would also like to know how to combine two or more images. Thanks for the tutorial, very helpful and easy to follow.
Emily says
Hi Carole – I will ask Karen if I can do a post on that, since it seems like a logical next step. It really depends on the graphics programs you have on your computer and what you’re trying to do. If you want to use an image you already have and put the transparent one you just created on top using PicMonkey, 1) go to http://www.picmonkey.com/ and click “edit” at the top. Choose the image you want in the background. 2) Now click the “overlays” menu on the left (the butterfly) and click “your own” —- now select the image with the transparent background. It will appear on top of your other image (you can resize and rotate using the edges of the box). You can add as many (transparent background) images as you want doing step #2 again and again. Save using the save button at the top.
Gms Taylor says
Did I miss a step? How do you get the image you just created on another picture? How do you combined the two. Thanks.
Emily says
At the end of the tutorial, you should have an image that has a transparent background that you can use for anything you need. If you want to combine it, it will depend on what graphics program you’re using and what you’re trying to do. If you want to use an image you already have and put the transparent one on top using PicMonkey, go to http://www.picmonkey.com/ and click “edit” at the top. Choose the image you want in the background. Now click the overlays menu on the left (the butterfly) and click “your own” —- now select the image with the transparent background. It will appear on top of your other image (you can resize and rotate using the edges of the box). Save your creation.
Carol says
Thanks for this great tutorial. I already love PicMonkey and can’t wait to try this!
Debra says
I’m marking this so that I can really take the time to read this and I can’t wait to try it.
cath t says
Thanks for the tips!!
Emily says
Thank you for all the wonderful images and for the “How Tos” as well!!! Cannot wait to try the PicMonkey Transparent Background using your instructions.