It’s pretty clear that the crafting and DIY communities LOVE Pinterest. I absolutely do, and Pinterest is a wonderful way to organize all of your holiday crafts. In fact, I pinned about a hundred “pin now, read later” pins last year (you know the ones I’m talking about) for craft ideas for this Christmas…..except just one thing….I went back & couldn’t find anything. Correction, that’s not totally true. I usually can find what I’m looking for, but only after searching a few hundred pins, going to a few different boards, and going down a few rabbit holes. Why can’t I find what I’m looking for when I’m looking for it?
So, I’m on a mission…. This is going to be the year. The year, when I organize my craft & DIY pins, so I can actually use them when I want to.
I love Pinterest. But once I got up around 2,000 pins on 50 or so boards, I hit a wall. I started repinning the same item. I would go to do a craft and not have a link to the right information (a “bad pin” to begin with). I would see pins and wonder what was I thinking when I pinned that….Is it a link to a project? A product I want to try? Just an inspirational image?
I started to laugh at myself when each pin became an internal dialogue I couldn’t finish. When should I pin a craft project to “Cute Crafty Things” and when is it appropriate to pin it to my “Fun Crafty Things” board? Does this pin belong under my “Sewing Love” board or is this pillow something that’s more of a “Fun Thing to Do with Fabric”?…..I forgot why I made the boards and what was even in them!!!
My boards are a work in progress and I’m continuously editing them. Over time, I came up with some suggestions to help keep my projects organized, and to make Pinterest act like it was intended to, by helping you get the actual content behind the images.
If you just use Pinterest to collect images to look at, or you’ll never want to read the content that goes along with an image, then you are probably fine, though it’s nice to give credit to the image sources. For crafters, DIYers, and makers like us, you need to be organized and you need good content. Here are some suggestions on how to get both.
1. Don’t pin anything until you’ve verified the content. When I’m looking through potential pins, all I want to do is pin the image and move on. However, I’ve gone to create something and the link goes to spam. I’ve had situations where I assumed the pin went to a tutorial (based on another pinner’s comments) but, surprise, the blogger gave only a very high level explanation of how she did the craft, not the step by step instructions I expected. So if I’m on my phone or don’t have time to track images down, I will “Like” the pin, then when I have free time, I go back and verify that it goes to what & where I assumed it goes before pinning it to a board. Funny note: I was about to pin the “awesome edible glitter tutorial for Christmas cookies” (according to the last pinner’s wording). I’m grateful I checked out the pin beforehand….it did go to a glitter recipe, but the recipe involved foil and glass, and last time I checked, I’d rather not eat my glittered Christmas cookies in the ER! Don’t believe everything you read on the internet : )
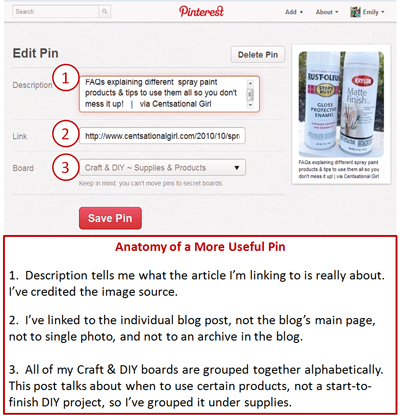
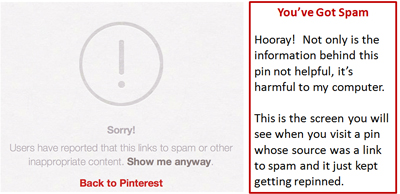 2. Clean up your pins. Face it, lots of people do not pin images correctly. If you repin without checking the pin out first, you’re perpetuating the problem. The best time to clean up a pin is right before you pin it. There is nothing worse than getting ready to do a tutorial, thinking you’re a click away, and being brought to an image with no directions, a tumblr post, a lone Google image, or some part of the right blog, but a totally incorrect series of entries. This creates extra work to find what you really wanted, and that’s no fun….especially when you finally have free time & are all excited to do a project. Be sure the pin goes to the individual blog post entry with the content (always click on the blog post’s title to get there)….not the website’s / blog’s main page, a blog’s monthly posts, or a Google image search picture. It’s true that a tutorial may be on a blog’s front page when you pin it, but when more content is added, the pin that only goes only to the blog’s main URL, will no longer take you to the right content.
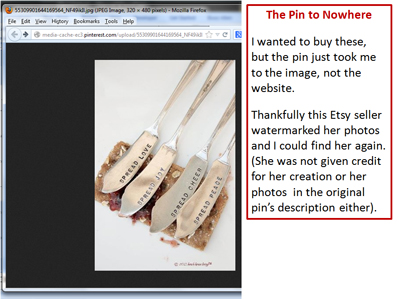 |
| {Hand Stamped Cheese Spreaders via BeachHouseLiving} |
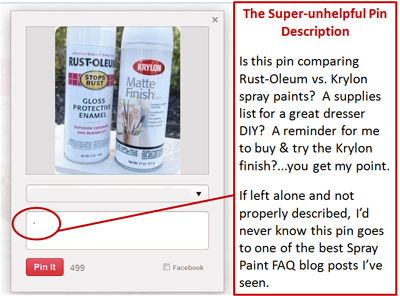
3. Label craft / DIY pins accordingly. I follow some popular pinners that have lots of pins with descriptions as “.” or “<3”. That’s great if you are collecting images, but for crafters & DIYers, that doesn’t help. You can label each pin with 500 characters of text. I’ve found it really helpful to not just describe the image, but write some text about why you pinned it, e.g., “great idea for leftover small scraps of paper” or “love the color combo used in this ornament” instead of simply saying “ornament” or “love this.” The comments section is also a great place to write a little detail about what the informational link behind the image represents….Is this a full, written out tutorial? Is this a link to a product you want to buy? Is this image the result of a technique you want to try? Is this image just inspiration & you can figure out how to duplicate it yourself?
In addition, be specific so others can find your pins in the search feature. A description like “great idea for kitchen back splash” is much more helpful & searchable than the description “great kitchen idea.” {Tip courtesy of Cyndi}
4. Always add the content or image’s source…the original source. The Graphics Fairy has this popular post on how to use google images to find the source if you don’t already know how to do it. Aside from helping you easily find the people, blogs, or products you want without clicking on the pin, giving credit to the individual who took the photo or created the tutorial is good karma.
5. Use multiple boards and separate by content purpose. It goes without saying and you probably already have multiple project boards, but do you really know what each one means and how they are distinct? Did you create cute & catchy names, and now you just pin everything, to….wherever?
Pinterest recommends you use cute, catchy names for your boards. I admit, it makes me jealous when someone else has thought of a clever board name. However when you get 1,000’s of pins and you have 15 boards each
with pieces of tutorials, DIYs, & inspirational pictures all mixed
together, a board like “The Crafting Life” won’t cut it. What are you
supposed to do with those images?…be inspired, create something, read
further / learn something, just
look at the pictures, buy something? It helps to be clear about what are actual tutorials, what
are “fun to look at” pictures, what are products, etc. in the board’s
name. Here is an example series of general crafting board names that separate pins by the purpose of the content:
Craft & DIY ~ Digital Art & Photoshop Resources
Craft & DIY ~ Downloadable Images I Love
Craft & DIY ~ Image Transfer Techniques & Tutorials
Craft & DIY ~ Painting Techniques
Craft & DIY ~ Project Tutorials
Craft & DIY ~ Supplies & Products
6. Create multiple boards for each craft / DIY medium. If you do a lot of crafting in a certain medium (e.g. sewing), putting 100’s of pins under a generic Craft &
DIY board and mixing them with other projects or creating “Sewing 1” (and then “Sewing 2” when that gets full), could be very confusing. If you’re an avid paper crafter, create multiple boards that start with “Paper Crafts.” You could do something like this:
Paper Crafts ~ Project Tutorials & DIY’s
Paper Crafts ~ Christmas Projects
Paper Crafts ~ Inspiration & Ideas
Paper Crafts ~ Products to Try
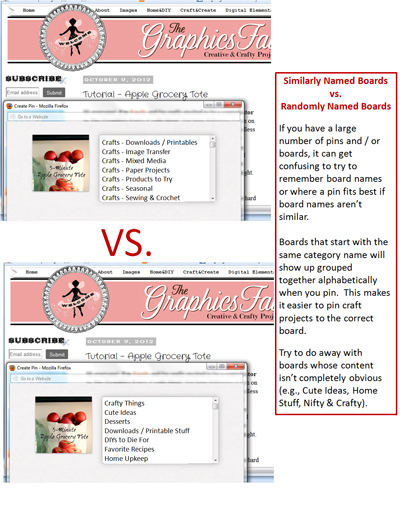
I started each board with “Paper Crafts”, so when I’m choosing a board
to pin to, I have 3 or 4 Paper Craft boards next to each other
alphabetically and I can quickly select the right one. This is a lot easier than
remembering to scroll through and figure out the difference between my old boards called “paper
projects”, “fun things to do with paper”, “crafts I simply MUST Do”,
and “neat craft and DIY projects”….all of which used to contain paper
crafting projects but were alphabetically mixed since they started with C, F, N, & P. If you get to 100+ pins in a category, you may want to segment the category further or see about editing down your pins.
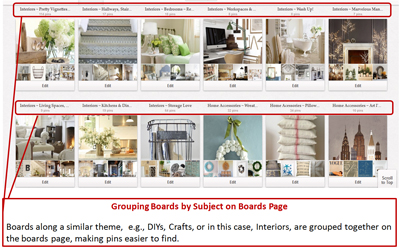
7. Rearrange your boards. In my boards menu, I group similar boards together (e.g., all my Paper Craft boards are together), so I find things more easily. Your boards don’t need to be organized alphabetically on your boards page, in fact, I have some of my prettier, more popular boards at the top of my boards page in case people stop by and visit me. But, you may want to group like craft / DIY boards on the same row of your board page so if you need a certain DIY pin, you can find it easily.
Whew….that post took a lot longer than I expected. I’ve only been pinning for over a year, so I’m sure there are more tips & tricks to learn. If you have some, please share using the comments below & we’ll keep this post updated so everyone can benefit!
Happy Pinning!
Emily {You can find me online. I’ll be the one fixing up & relabeling all my pins}
You can follow My Boards HERE and you can follow The Graphics Fairy Boards HERE.



Tana says
I did this with the recipes I’d pinned. They were on one humongous “Recipes” board, but I’ve got them mostly sorted out by flavor or something else they have in common, i.e., Caramel, PB, Cake Mix Makeovers, Meat & Potatoes, etc.
graphicsfairy says
Thanks Tana, it helps so much when you do!
Darlene says
Hi Emily, I have read your instructions about a dozen times. Every once-in-a-while I read it again. It has been very helpful and I have boards almost (lol) organized. I have a question though, is there a way to search for something in just my pins? I know how to search all of Pinterest but I often wish I could search just my pins. Thanks for all your help, Emily.
Karen Watson says
Hi Darlene,
Unfortunately I don’t think there’s any way to do that right now.
Ilene says
Emily, Thanks for this push to sort out my pins. I started today but it might take a while.
Darlene, When I did a search today it gave me the option of All pins, Your pins, Pinners or Boards. Hopefully this will help you.
Karen Watson says
Thanks for helping Darlene out with that tip Ilene!
Elaine says
Emily, this is such a great post. I have been working on cleaning up my pinterest stuff for a few weeks. I have also been pinning for just over a year, so I have a LOT of images. LOL, I saved this post in my email in-box to read later. I especially liked the tips for naming boards, and putting my most “public” boards at the top for visitors. Here’s a link to my board: http://www.pinterest.com/elainemccarty/ if you would like to stop by ~ Thanks again, Emily!
lyla says
I have never used pinterest because I found it so difficult to find what I was looking. I’ll have another go at it now. thank you.
Skye says
SUCH a good post, thank you for pulling this together! Pins that lead to nowhere, spam, or worse “adult” sites are so annoying.
Karen Watson says
Nice to see you here Skye! Thanks for the comment!
Michele says
This is so timely for me! Just this week I spent a frustrating evening trying to locate a pin and dealt with broken links and my lack of organization. Thanks for the suggestions! I need to totally reorganize!!
Cheryl @ Artzzle says
So much helpful info here. I love pinterest but now will be able to use it too, and not just look at the pretty pictures.
Thanks.
Katy says
Thanks for all the wonderful ideas. My Pinterest boards are in need of cleaning 🙂
Marcie Rhys says
This is fabulous Emily! I’ve done many of the things you’ve suggested, and just recently, added a new task to my board clean-up. Boards are organic, and how we categorize our ideas, changes as we build them.
I like to look through all my Pins (over time), and see if I have made a newer board that is a better fit for an old Pin. I don’t know any official way to send a Pin to a new board, so I hit the Pin button on the upper left of my single old Pin, and select the new location from my drop down Pin menu. Once the Pin is safely on its new board, I edit the original Pin to delete it from that original board. A bit nudgy, but much easier to find that Pin, now that your “brain map” has changed.
Rebecca Ednie says
I guess I must have organization in my blood because that’s how I naturally did my boards. Though I’ve been dying to reorganize the order of my boards but didn’t know how to. Can you explain that better?
Leslie Schmidt says
Hi Rebecca. When you go to your boards, double click on your name at the top right. You will see the background change to blue and your name will be white. That unlocks the boards so you can click and drag them to where you want them to be. Do as many as you want . When you are done, click once on your name and it will revert back to the light background and the darker letters. That locks the boards in place. I hope this is what you were looking for. Now I have to go do some organizing myself.
JULES says
Thanks so much for the info i really do need to clear up my boards, i started off well but got bogged down and now everythings mixed up!.
Well i know what i will be doing over the weekend!
Cynthia says
I have been thinking about the organization of Pinterest and wondered even from the beginning “how do I set up my Pinterest?”. This is the first article I have found that addresses the issue. THANK YOU Very helpful indeed. I pinned this article under Organizing. Thanks again.
crafty grandma says
OMG!! we are so on the same wave length – I ve been sitting here since this morning cleaning up my Pinterest Boards!! Your list is fabulous…may I add something to it…it happens that you pinned something but you go back the blog was changed ie another company so your pin is no longer valid…very frustrating when I always check the site before pinning!! but it happens…some people pin things but it goes to the present day blog not the original which was pinned 3 months ago and impossible to find on the site because the title is not mentioned ….good idea to mention at least the original title…I add the site in the comments while cleaning up…It happened a few times a pop up appeared saying that it was already pinned – thank you Pinterest – but what happened to it – mine no longer works! Sometimes using Google image helps to find the original source…use it! I really like the way you set up your board – mine is similar in that I name them similarly so they are grouped together – ie Fav Cakes – Fav Cookies Fav Meat (baked items) just add an adjective in front! Thanks for your suggestions back to cleaning up!