Today, I’ll be showing you how to make a graphic’s background transparent so it can be layered with other graphics. This is a quick workaround when you need to edit a graphic and may not have the more expensive software on your computer. We’ll be using free online software called PicMonkey to do the job.
This post is a companion to two earlier posts that showed you how to make simple edits (e.g., rotate, mirror image), and simple edits to photos (e.g., recolor, add text, change to black & white) using PicMonkey.
– See more at: https://thegraphicsfairy.com/make-a-transparent-background-using-picmonkey/#sthash.VKQuFoYF.dpuf
{This post contains affiliate links}
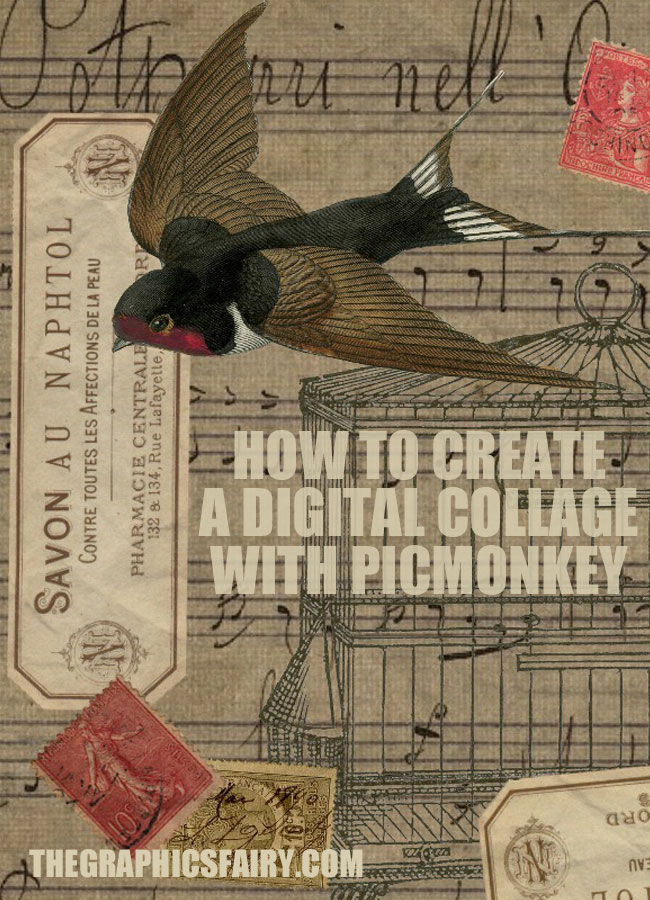
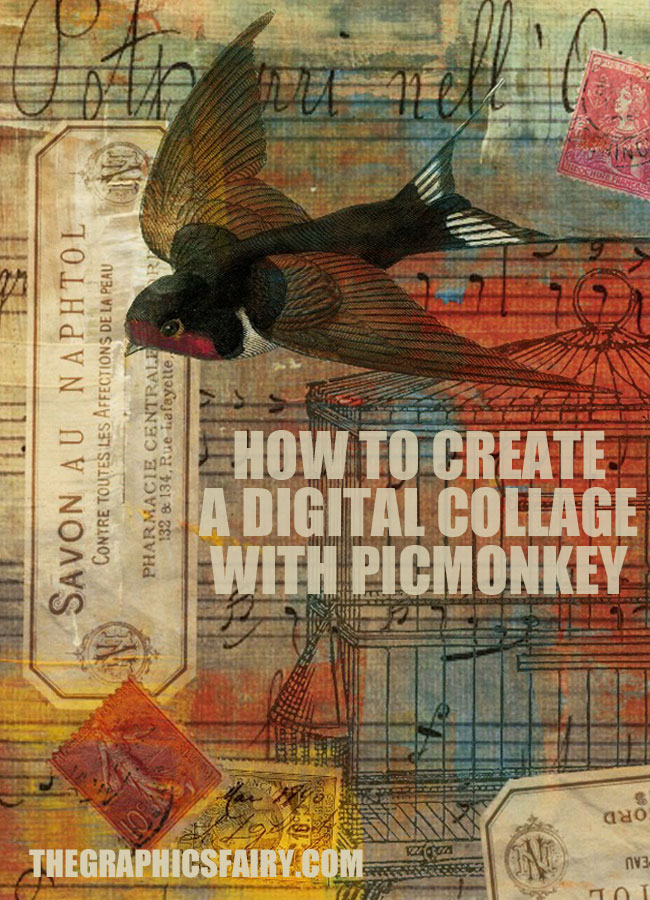
Today, I’ll be showing you how to create a digital collage with PicMonkey. This is a workaround if you do not have the more high powered graphics software on your computer. We’ll be using online software called PicMonkey
This post is a companion to earlier posts that showed you how to use PicMonkey to make simple edits (e.g., rotate, mirror image), simple edits to photos (e.g., recolor, add text, change to black & white), and how to make an image’s background transparent.
Today, I’ll be showing you how to make a graphic’s background transparent so it can be layered with other graphics. This is a quick workaround when you need to edit a graphic and may not have the more expensive software on your computer. We’ll be using free online software called PicMonkey to do the job.
This post is a companion to two earlier posts that showed you how to make simple edits (e.g., rotate, mirror image), and simple edits to photos (e.g., recolor, add text, change to black & white) using PicMonkey.
– See more at: https://thegraphicsfairy.com/make-a-transparent-background-using-picmonkey/#sthash.VKQuFoYF.dpuf
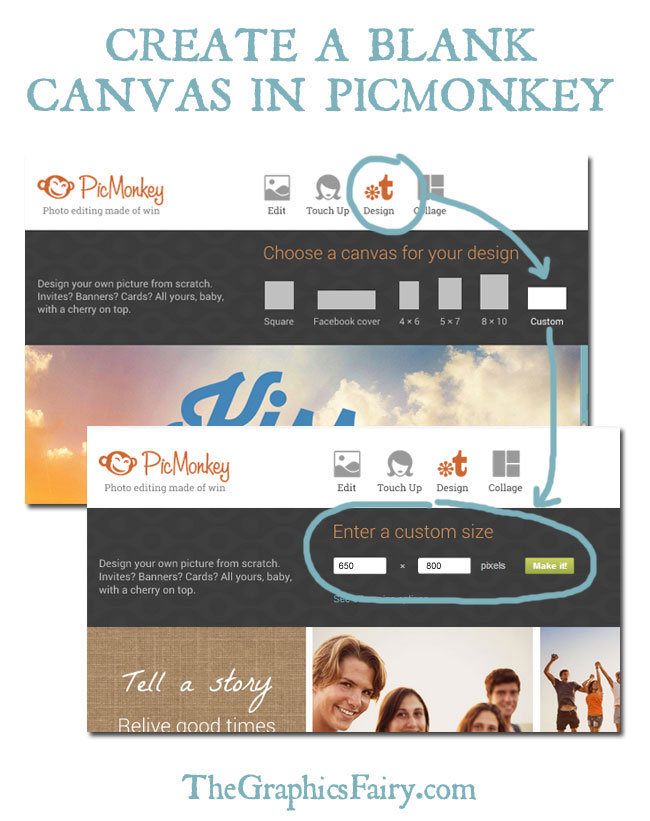
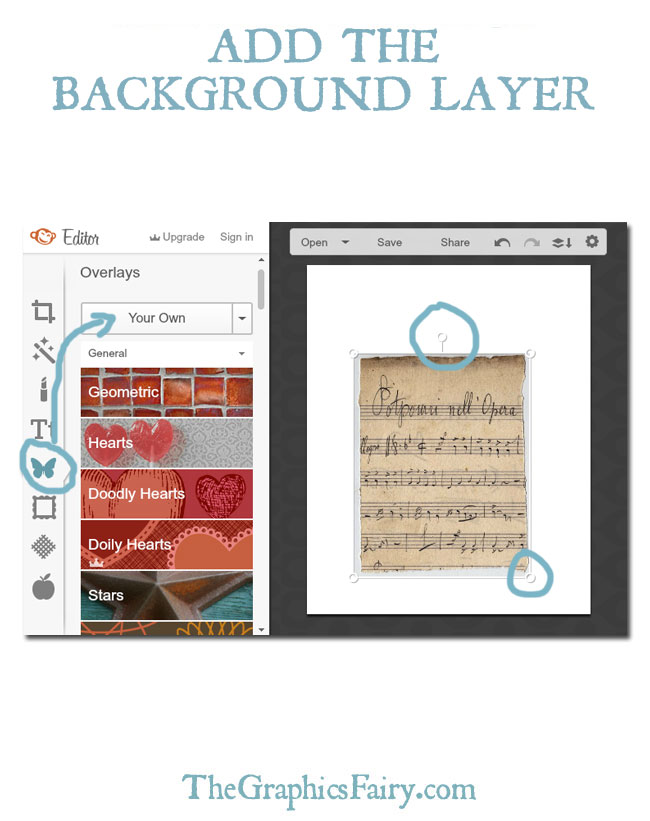
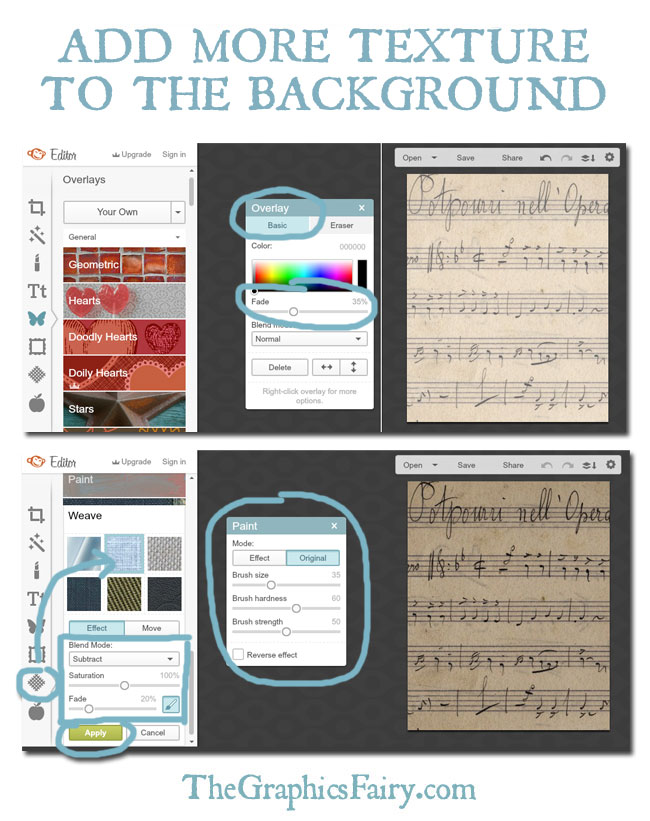
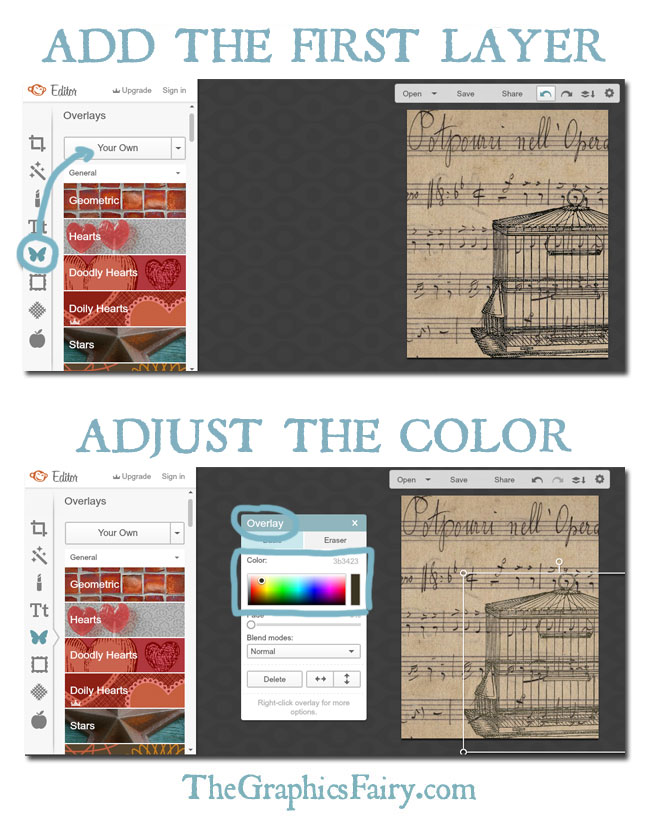
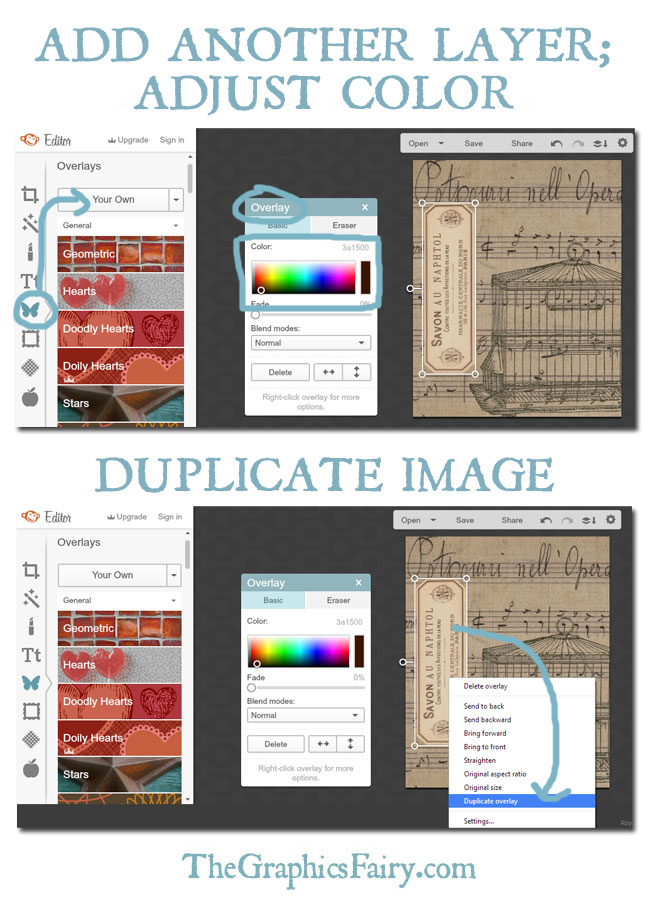
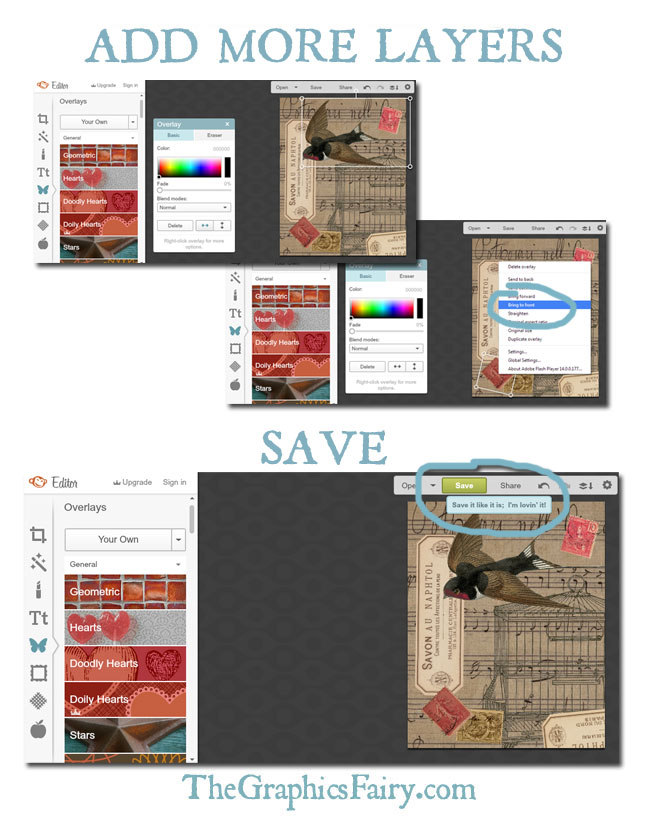
Essentially what we’ll be doing in the steps is creating a new blank canvas in PicMonkey, adding multiple images using the Overlays menu, and working with the images until we get something we like.
Download and Save the Images. First, download the images you want to work with and save them to your computer. I start every collage with a folder on my computer with images I think I want to use. For images that will sit on top of another, I create .png files so they’re ready to layer. If you want to follow along without creating your own transparent images or cutting images from their sources (i.e., removing the stamp from a postcard, making the bird cage transparent), I’ve edited & saved the images here for you to complete this image. Here is the sheet music, swallow, soap label, bird cage image, and three stamps-dark red, brown, and light red used in this collage.
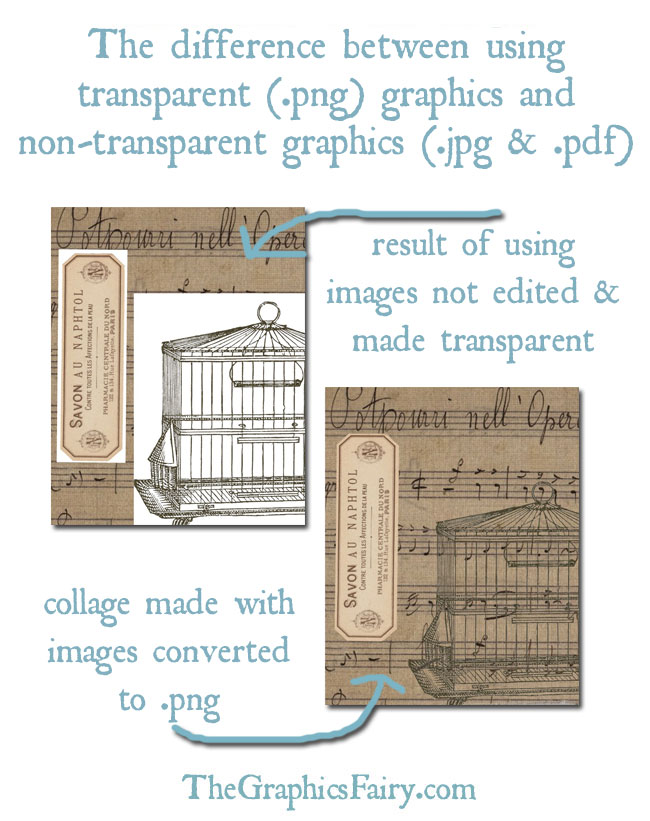
***Check Your File Types. You must know what image file types you’re working with. I generally use .png files for digital collages, as they can have transparent backgrounds and they’re great for layering. I occasionally use .jpg files for backgrounds. NOTE: .png files are harder to come by…they aren’t your typical free image since they require extra time and special software to create. This site mainly offers .jpg and .pdf image files that may need to be converted to .png files. You may be able to create your own transparent images (.png files) with basic shapes using free software and my tutorial here. If you’re creating .png files and you don’t have advanced software like PhotoShop, pick images with simple shapes that will be easier to convert — silhouettes, photos, labels, flowers, butterflies. You’ll need patience & a steady hand as you’ll basically be erasing portions of your images with a mouse.***
*************************************************************************************
If you’re looking for the original images I used before making any edits: French sheet music, bird cage, Paris soap label, swallow, deep red stamp, brown stamp, and red stamp.
I hope you enjoy layering your graphics and creating something fun. Be sure to share your creations on the Reader Submissions Page!
Emily
********************
Hello! Are you new to The Graphics Fairy?
Welcome, I’m so glad you’re here! Browse around to find thousands of Stock Images that you can use in your projects or designs! I post new Vintage images every day. Need more info about my site? Try my FAQ page.



Francesca says
Thank you so much for this tutorial … so well explained and super easy to follow … I shall be using it quite regularly I’m sure. Thank you!
graphicsfairy says
That’s great Francesca, have fun creating!
Amy says
Your site is so inspiring! I have just gotten a wonderful idea for a collage to make for my first grandchild!!
JoEllen says
Thank you so much for your instructions on making a collage! This was exactly what I was looking for. I seems to be having a problem though–I have been able to successfully create .png photos with the transparency instructions however I have two images that I have erased all the background, saved as a .png then when I try to insert the image into my collage, it isn’t transparent, there is white everywhere I erased! Any suggestions would be greatly appreciated!
Karen Watson says
Hi JoEllen, Double check that you are actually saving it as a PNG, it sounds like you’re saving it as a JPEG by mistake. It should be transparent if it’s a PNG.
Mary Scaletta says
I’m so glad I found this post. I was looking at this site recently for exactly this and couldn’t find it. If there isn’t a post already, could you do a post with a round up of all the images that have transparent backgrounds? And honestly, this site would be even greater than it already is if every image offered was offered with an option of a transparent background since you probably have the high-powered tools and know-how that a lot of us don’t have the luxury of having. What an amazing help that would be especially with the more intricate images! (Although I’m asking not knowing if .png images are downloadable.(?)) Thanks for this great tutorial!
Karen Watson says
Hi Mary, if you do a search for PNG, in my search box, you should be able to find most of them. Even with the best tools, it can be time consuming to remove the backgrounds, since most of the images are on old paper textures that have to be erased by hand. Thanks for the recommendation though! Emily and I are working on a project now, that will have more of these types of images, we hope to be announcing it in the next month or so, but it’s hush/hush for now! 😉
Mary Scaletta says
Oh, so looking forward to that!!! And thank you for your quick response! Again, this post was so very helpful for a somewhat of a beginner like me!
BarbD says
I’ve been wondering how to make my images transparent, and for a long time have struggled with creating collages (opening a Word Doc, cut/paste…oh you don’t want to know all the horrible angst). Easy to follow, very clear. Thank you so much!!
Barb D at Aerie Images ~
Anne Pillsbury says
Hello Emily,
Your tutorial on creating a digital collage is incredible. You obviously have a deep knowledge of our tool and can clearly explain to others how to use it! We love finding PicMonkey fans like you. Would you mind shooting me an email? I have a question for you. Thanks.
jeanette says
You can also turn the background clear on some .jpg’s to transparent by using the blend mode drop down. I use that a lot. Not all images are suitable, but strong graphic line drawings work well.
Emily says
Thank Jeanette, that’s a great idea for a post about working more with the black and white line drawings, thank you!
RonnieSewLoca says
I wondered if there are any free sites to create collages to try out before purchasing something I would not enjoy. Thank you for sharing this info! I look forward to exploring my creative side in a new medium.
Pendra says
I love PicMonkey, but really don’t know anything more than very simple techniques and not how to use it in layers like this, so thanks sooooo much for sharing this! I have a question though, I don’t understand how to resize as it’s in pixels… what if you wanted to do a 4X6 or 5X7 how do you know what size that is in pixels???
Emily says
Hi Pendra – If you want to start an image a specific size, when you go to PicMonkey.com, you’ll see the option called “Design” at the top. Hover over it (don’t click), and it will give you typical sizes to choose from, including a 4×6 and 5×7. A 4×6 is 1200×1800 pixels (4inches x 300 pixels = 1200 and 6 inches x 300 pixels = 1800). A 5×7 is 1500×2100 pixels for print quality. (You can also see that if you choose 4×6 and then go in to the “basic edits” menu on the left and scroll down to “resize” and you’ll see the measurements there too)
Riana Lightfoot says
I am so thankful for all the fantastic information I receive from you. I enjoy your post and look forward to it.
Kat says
Thank you so much for this tutorial! I am looking forward to playing with it.