Today, I’ve put together some tips to help you get a great quality print of your images when printing at home.
Over the years, I’ve gotten quite a few emails and questions from readers about the best way to print images in order to get the best quality. These are a few of my favorite tips to help you get a good quality print. Some of these can tips can be used together, or try one or two of these ideas to enhance your prints! (This post contains affiliate links)
Use Photo Paper. I’ve found that the best paper to print on is Matte Photo Paper. This type of paper makes a huge difference in your print quality. I like to use “Matte” paper. Matte finished paper has no shine to it, and gives you and old fashioned looking print. There are loads of brands to choose from, including ones that are specific to your brand of computer.
Try Heavier Papers. Ink jet prints on regular weight (copy) paper may wrinkle or buckle when too much ink is applied to the paper. If you don’t want to use photo paper, try printing on a heavier paper (like white matte 65lb. card stock). This will produce a better quality print than by using regular printer/copy paper. This is a great tip if you have a very colorful image and are using an ink jet printer.
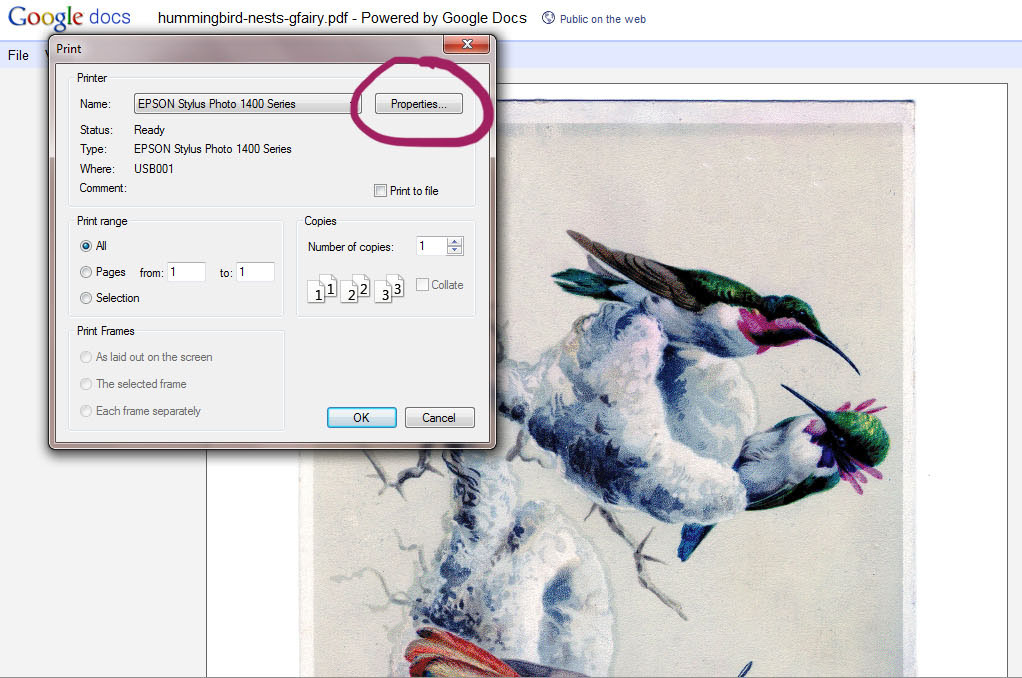
Change Your Printer Settings. For the best quality, you want to select a setting on your printer that is made to give you the best quality. I’ve taken some screen shots of how it looks on my computer, yours may look a little different, but it should be pretty similar. After clicking on the “print” button, a little screen will pop up. Instead of hitting the “ok” button, like you normally do, this time hit “Properties”.
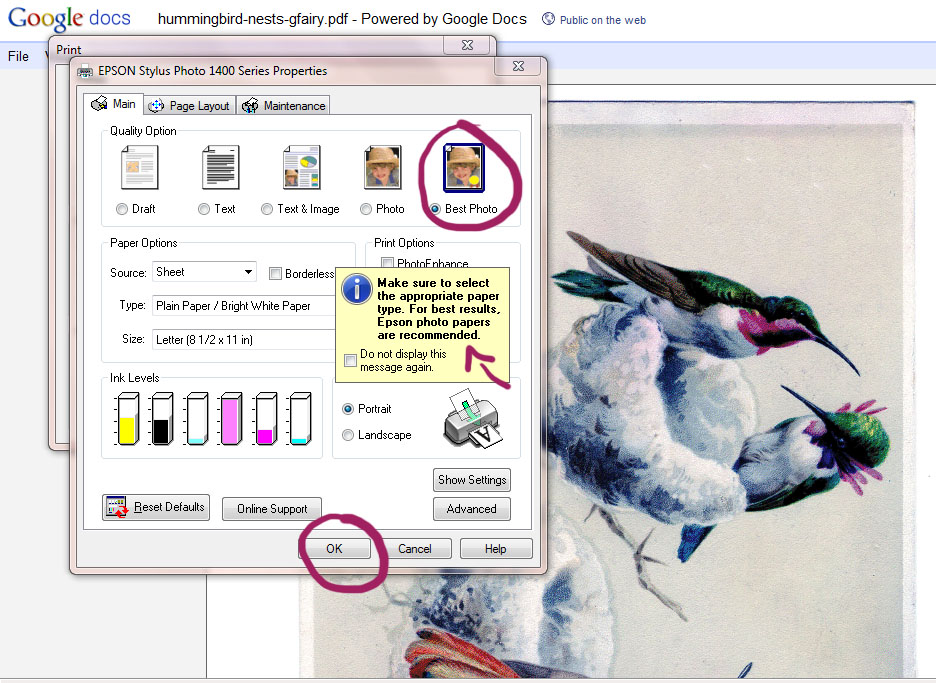
Here we have the Properties screen. Make sure you select “Best Photo” or whatever your screen offers, as the highest quality option. (Notice the reminder about using good quality paper!). Then hit the “ok” button.
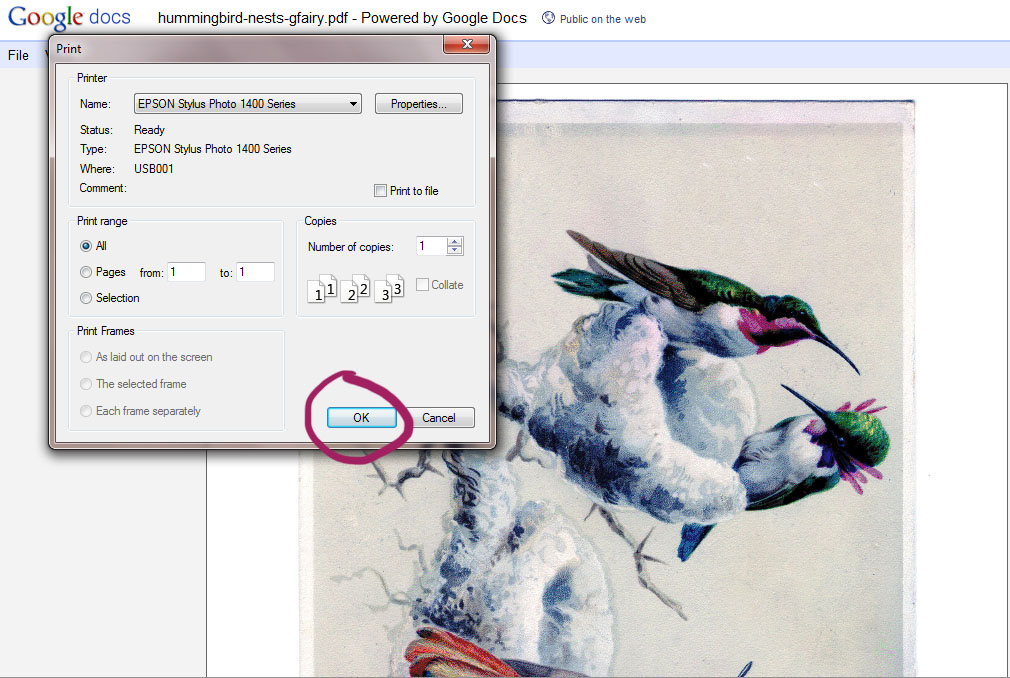
On my computer I end up back at the first screen again, then I hit the “ok” button, and your image will start to print.
This is a photo of two printed images. The one on the left was printed on regular printer paper, with the standard print setting. The one at the right was printed using “Matte Photo Paper” with the Best Quality setting on my computer. You can see the difference is like night and day!!
Try a Printer that Uses Pigment Inks. I’m also often asked about what type of printer I use. I always have used Epson Printers. The reason I like Epsons so much, is because many of them (although not all) come with pigment inks, that are both waterproof and fade-proof, which makes it the perfect ink for crafting! This means your ink won’t run or bleed, even when you apply something wet over top of it, like various types of glues, Mod Podge, etc. You can even tea stain over it!
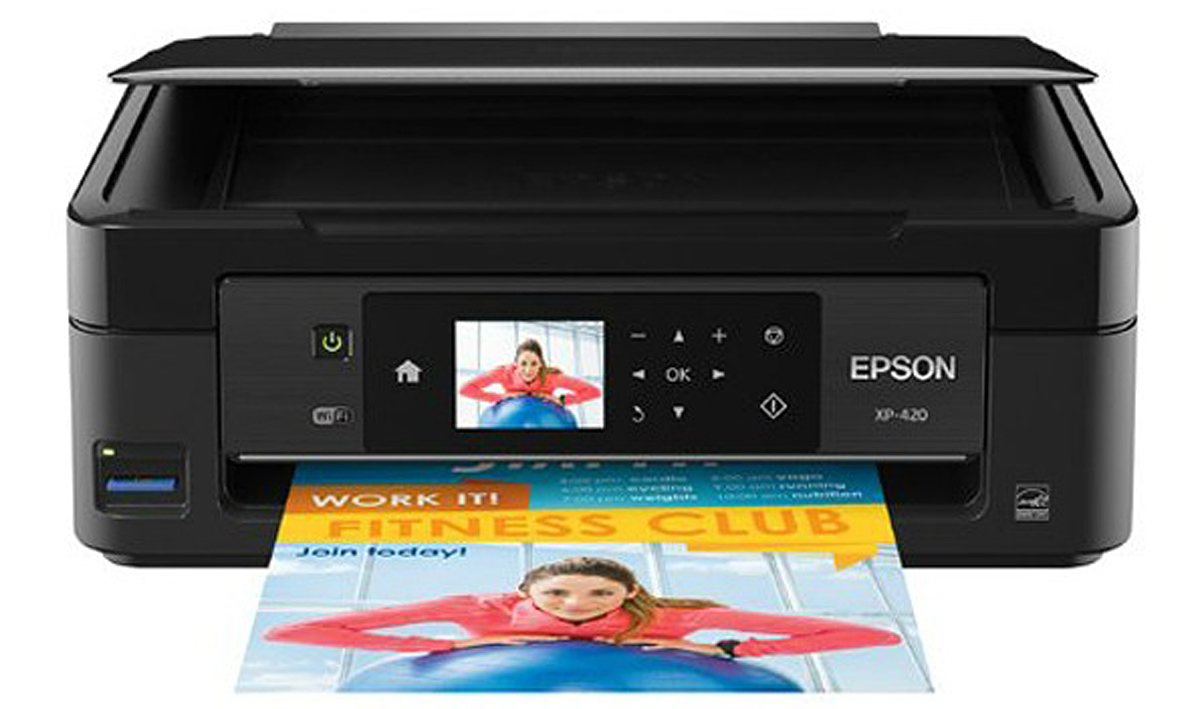
My current printer is an Epson that uses pigment inks, and like the one you see below. This printer uses DuraBrite ink. DuraBrite is Pigment Ink so if that’s what you want to look for when purchasing on Epson.
>>>Update: It’s nearly impossible to find these types of printers anymore. You can go to the post in the link below to read about the types of printers that we recommend for crafting now.
I’ve written an UPDATED post about printers that work best for crafting, that has lots more info you can find the post about the Best Printers for Crafting HERE.
Preserve Your Print with a Sealer. Another trick to protect prints, for example printable art found on the blog, you may want to protect your print from fading by using a sealer. I like the one by Krylon’s Preserve It with a Matte finish. Krylon also sells other clear acrylic coatings, options to make your print/paper acid-free, and options to make your print more waterproof you can read more about those, and how to use them in the post How to Make Inkjet Prints Waterproof HERE.
Try Professional Laser Printing. Most home crafters have ink jet printers and are completely satisfied. However, some image transfer image techniques may call for a laser print, which you can get at your local copy shop. You can also try a laser print if you do not have the best quality printer at home. I often visit my copy shop when I’m making multiple high quality prints and when I’m concerned about running out of ink (for example, weddings, making multiple gifts). The prints are high quality and reasonably priced; you can also request to print on photo paper or card stock instead to further enhance your print.
Printing Video
You might also enjoy this Printing Video that Emily created, showing the effects of printing on papers with slightly different colors. This is a great way to get an Antique or Vintage effect to your prints or pages. Gorgeous!
Welcome, I’m so glad you’re here! Browse around to find thousands of Stock Images that you can use in your projects or designs! I post new Vintage images every day, as well as projects and DIY’s too! Need more info about my site? Try my FAQ page.




Darlene says
Hi Karen,
Thanks for all the information, I was wondering what I would use with my laser printer to print an image on cloth?
Thanks,
Darlene
graphicsfairy says
Hi Darlene, here is a link to my favorite transfer methods, https://thegraphicsfairy.com/12-easy-image-transfer-methods-for-diy-projects/
Number 4, the freezer paper method is good for fabric, good luck!
beverly callis says
hello karen, I have an image I printed off the computer and I would like to enlarge it to a 36×36. how do I go about doing this with distorting the image?
Thank you for your input. beverly
graphicsfairy says
You can resize the images using a photo software editing program. If you don’t have a program like that already, you can use a wonderful free online site, called Picmonkey.com! You’ll be able to open PNG, or JPEG, files, layer them with other images, add text, resize them and so much more. And of course you can save them and print them as well. It’s very easy to use, but we also have lots of Tutorials if you need a little help! You can find the Tutorials, and a link to Picmonkey, on my blog here https://thegraphicsfairy.com/best-picmonkey-image-editing-tutorials/
Or if you are one of our Premium Members you can go here http://members.thegraphicsfairy.com/2015/02/17/understanding-picmonkey-basics/
Keep in mind that when you are resizing, you can go smaller with no problem, or slightly larger, but if you try to go very large you will lose quality with the image.
I hope that helps!
Sherry
claudia guerr says
I use Epson too. But, if i wanna use a normal paper & print good at both sides? I mean, i wanna print a planner insert at a normal paper. There´s a trick for have the best qualy on front and back? 🙂
Flora says
May I provide your link to my customers on my etsy store? ‘ The Graphics Fairy has some magical tips for you to get the perfect print: https://thegraphicsfairy.com/tips-get-great-quality-print-images/‘
Thanks!
graphicsfairy says
Hi Flora, yes that would be fine, thank you for the link 🙂
Terry Lunsford says
Karen,
Thank you for your printing info, it was very helpful. I do have a question. When your talking about using matte photo paper or cardstock does that apply to reverse transfers mediums like 1Gel or Mod Podge and burnishing?
Terry
graphicsfairy says
Hi Terry,
I was referring to using card stock when using the images to use as they are, for cards, wall art, etc. They just hold up better than regular paper. I hope that makes sense 🙂
David Marcus says
I am interested in attempting to develop an idea, which entails printing on fabric .
I have just read your comments on the various ideas for using your own printer.
My question is can you purchase machines that .will do this type of printing? I have little knowledge of this area.
Thanking you in anticipation
graphicsfairy says
Hi David,
Here is a link to a post I wrote about my favorite printer, https://thegraphicsfairy.com/the-best-printers-for-crafting/
You can purchase these printers at any office supply store or Amazon, pretty much anywhere that sells computer and printer equipment. Good luck!
Pat Kohrman says
Love your prints!
graphicsfairy says
Thanks so much Pat 🙂
Al says
Is this a good printer for decals??
Karen Watson says
Hi Al, I’ve never printed on decals, so I’m afraid I can’t advise you on that.
Sue says
Thank You for your time and info much appreciated
Karen Watson says
You’re welcome Sue!
Joy says
Thank you for your tips. I have an Epson Workforce and have one thing I don’t like at all and even had the same problem with an Epson I had years ago but when I print a picture on it, it leaves these light colored lines vertically every inch or so. Makes the print nasty looking. I make a lot of cards and really makes the card look unprofessional!! Don’t know how or if it’s possible to correct this or not. Just wondered whether you ever had this same issue.
Karen Watson says
Hi Joy, It sounds like you just need to clean the print head or printer head? Something like that! Anyway, the printer does that for you, there’s a setting for that. Once you find the setting just click it to clean and you should be all fixed up! I usually have to do mine a few times each year. If you can’t find the setting try going to the Epson website to get instructions for your printer. I hope that helps!
Mary Decker says
Why do I need a scanner?
Terry Kennedy says
Wonderful information!
I have always been interested in your approach to image creation and production. Now I have a peek into your world. THANKS!
Terry
PS: Any chance we could see some similar tips about “Scanning” images?
Karen Watson says
Thanks Terry! I don’t think I have many tips for scanning. My only tip would be to buy a really good quality scanner, they are worth the money if you scan a lot!
Elena Moore says
I so enjoy your imagery and tips. Thanks so much for all your hard work!
Susan says
Great tips. My son is a graphic designer & has shared a couple of these with me. Now I just have to remember to use them!
Thank you
Carol says
Thank you so much for these helpful tips, Karen. I so appreciate your help in helping us get the most out of our efforts 🙂